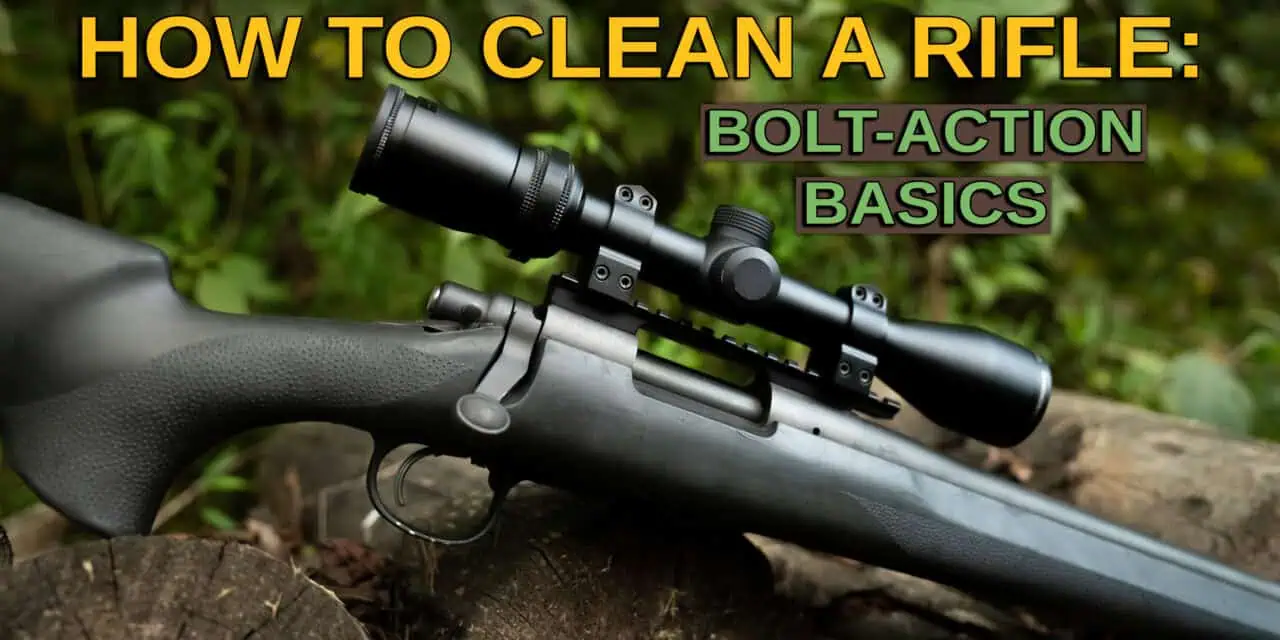
So you want to learn how to clean a rifle? We can help, read on for a step-by-step guide. If you prefer, the video also quickly walks you through the process.
I took a look through our AmmoMan Armory and found a Remington 700 that needed some maintenance. As long as your rifle functions similarly, you should be able to copy each step along with me unless you have a detachable box magazine.
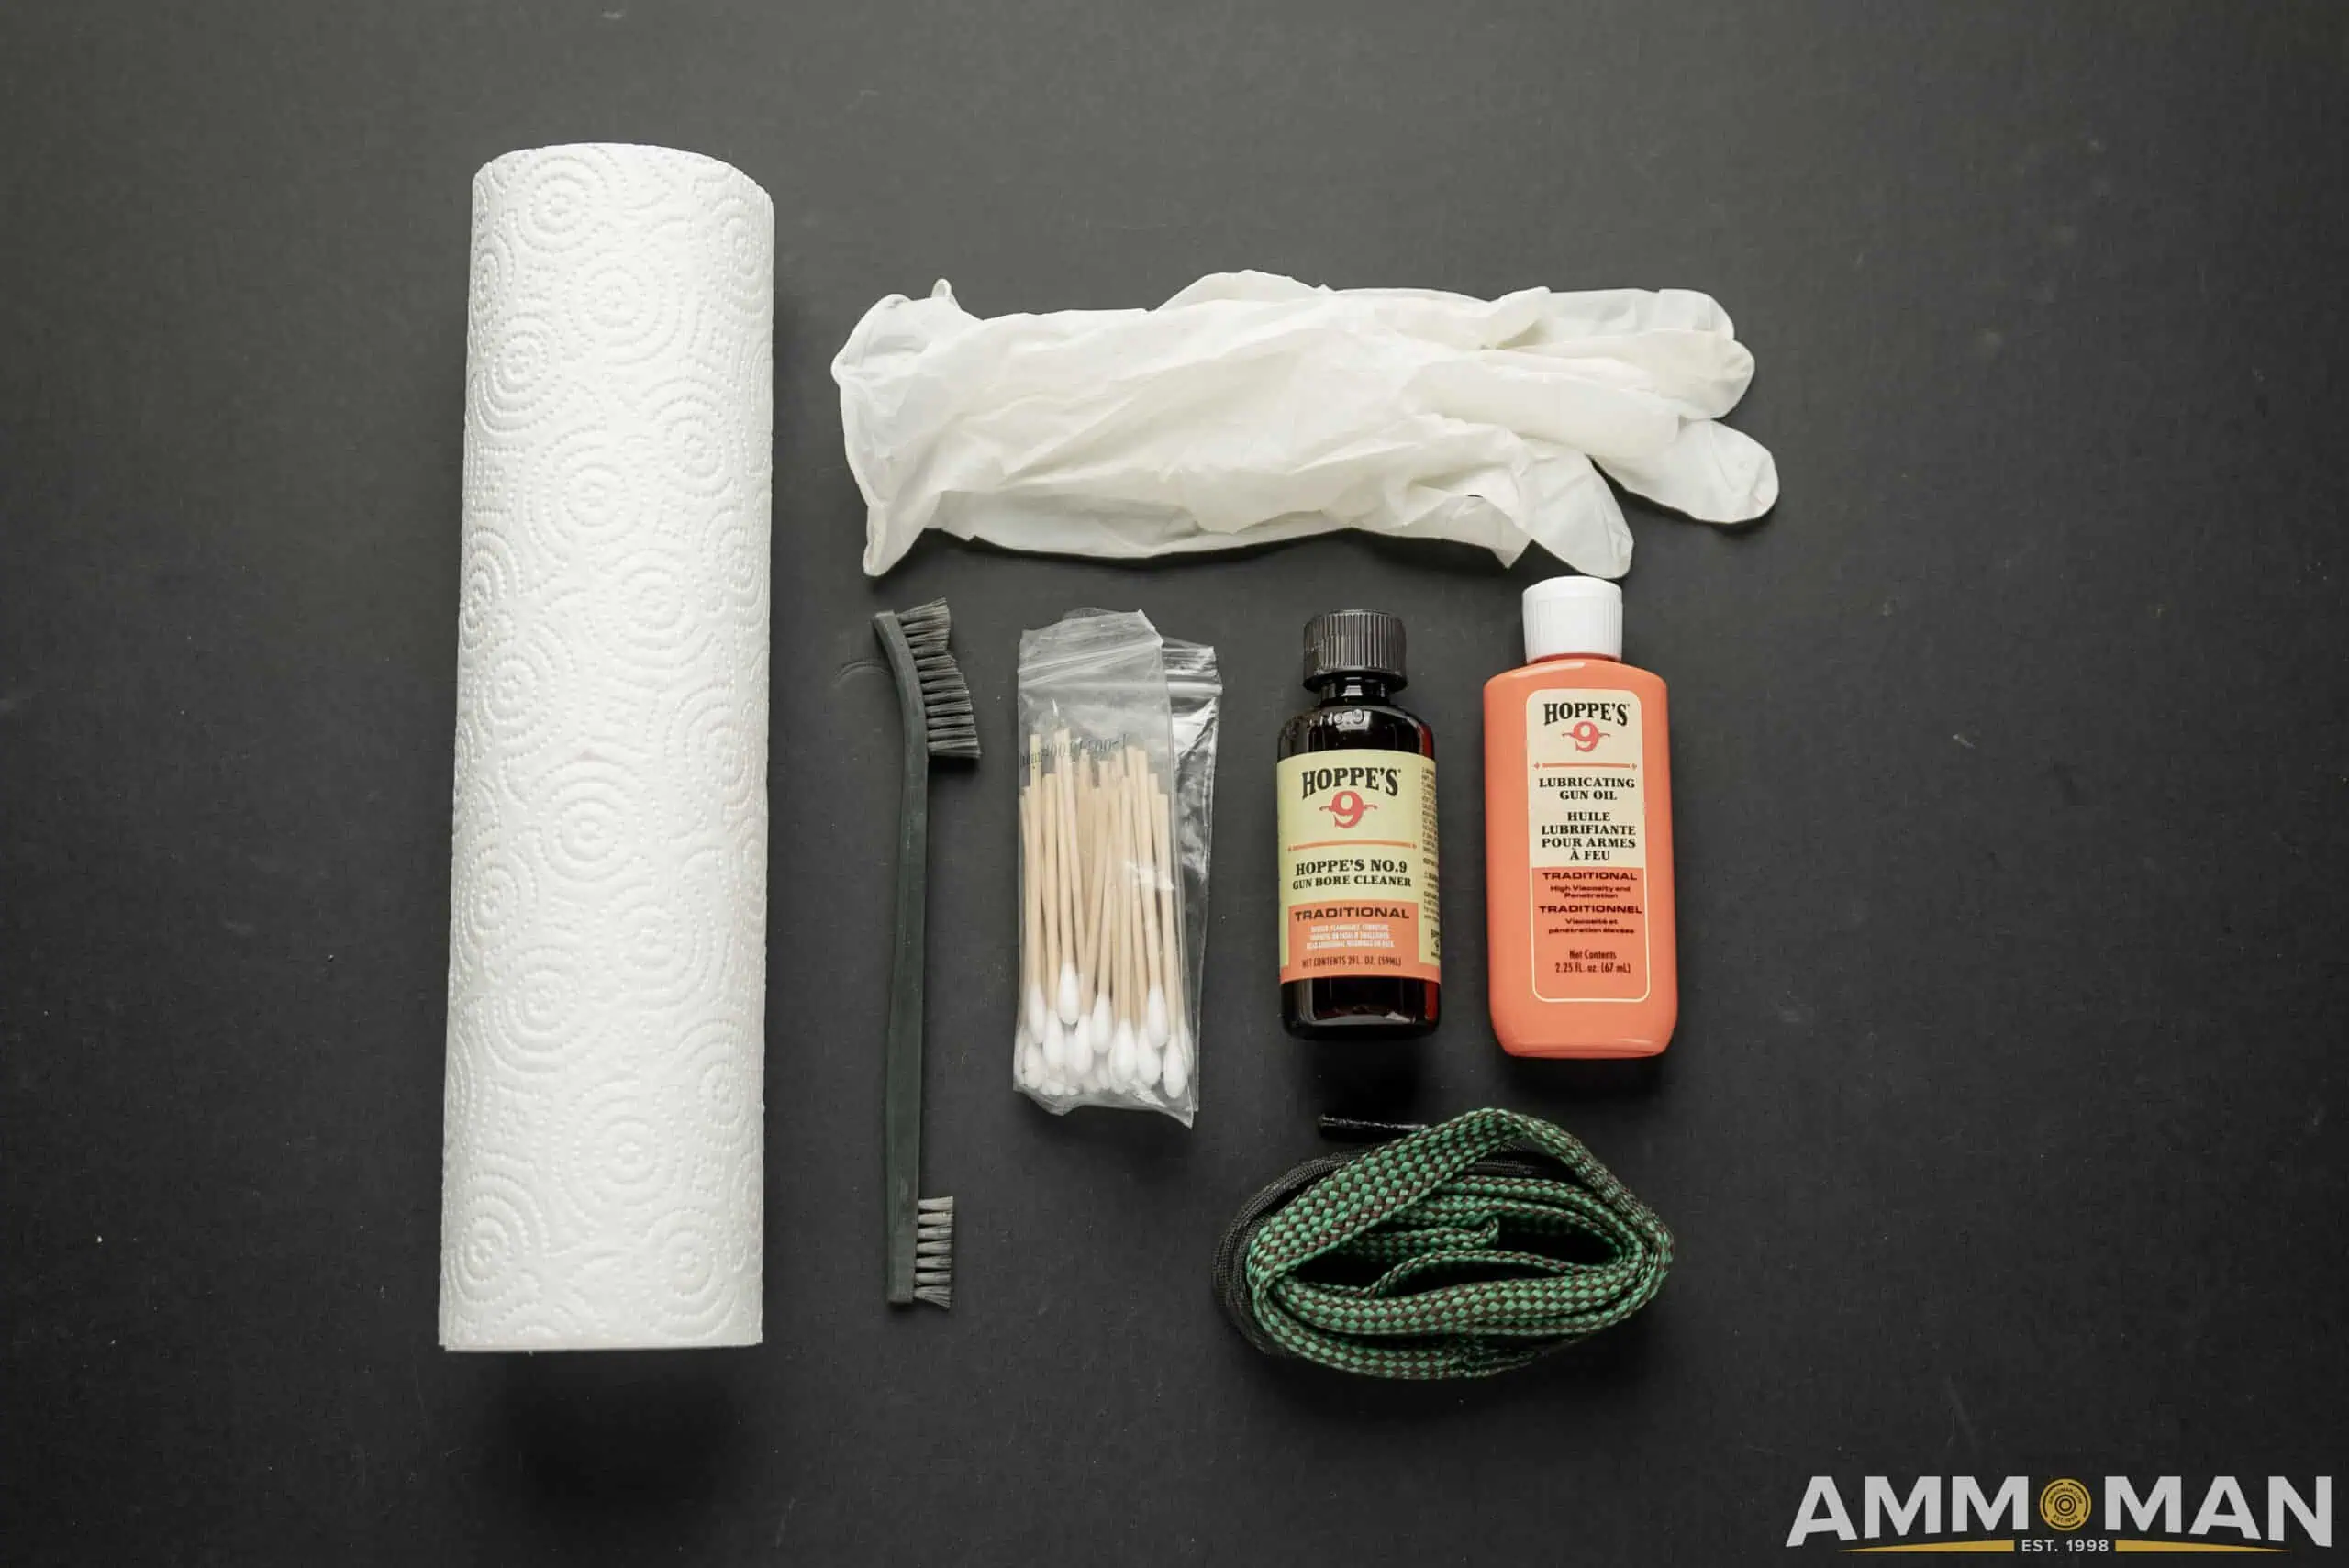
Materials
Similarly to how to clean an AR-15, the supplies you’ll need are simple and smart to keep on hand.
Gun cleaner
Lubricant
Nylon brush
Bore snake in the correct caliber
Wipes, patches, gloves
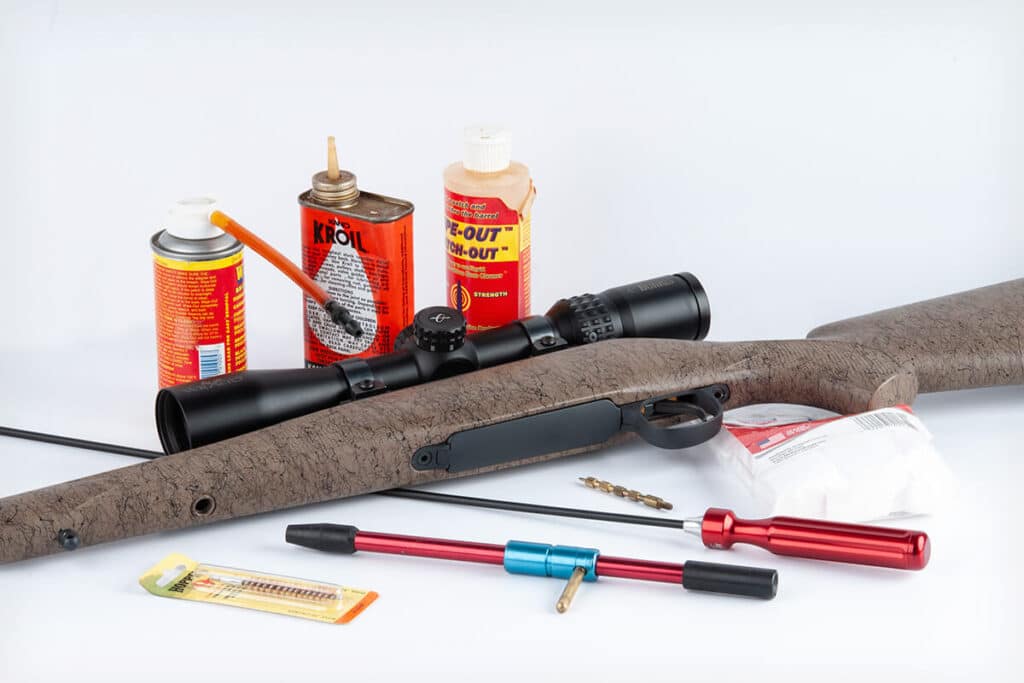
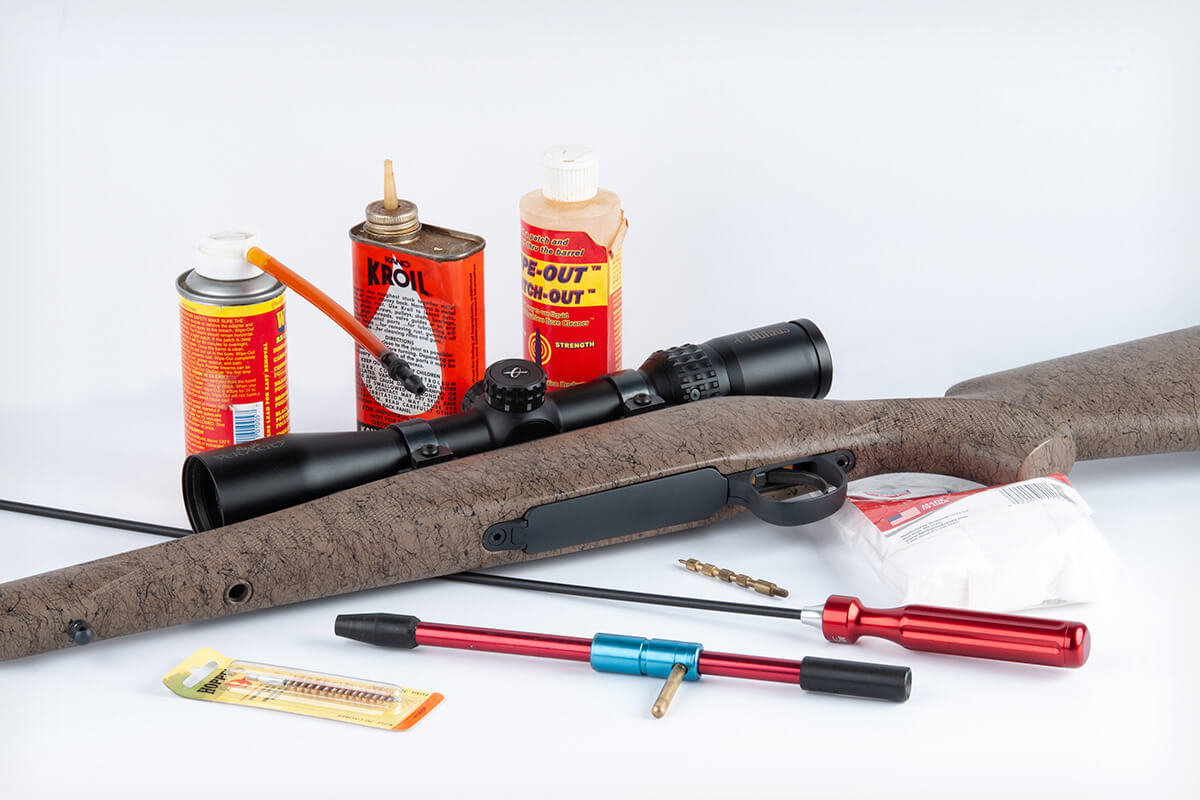
Basic cleaning supplies.
Today, I’m using the Hoppe’s products for oil and cleaner. Anything you choose will work fine, though.
5 Steps for Cleaning your Rifle
Now for cleaning. The first thing you need to do, whether it is obvious or not, is to clear your rifle of any ammunition and make sure there is no live ammo in your working space. Accidents happen all the time followed by “But it was unloaded!”
To clear your rifle: lift the bolt, pull back and check the chamber.
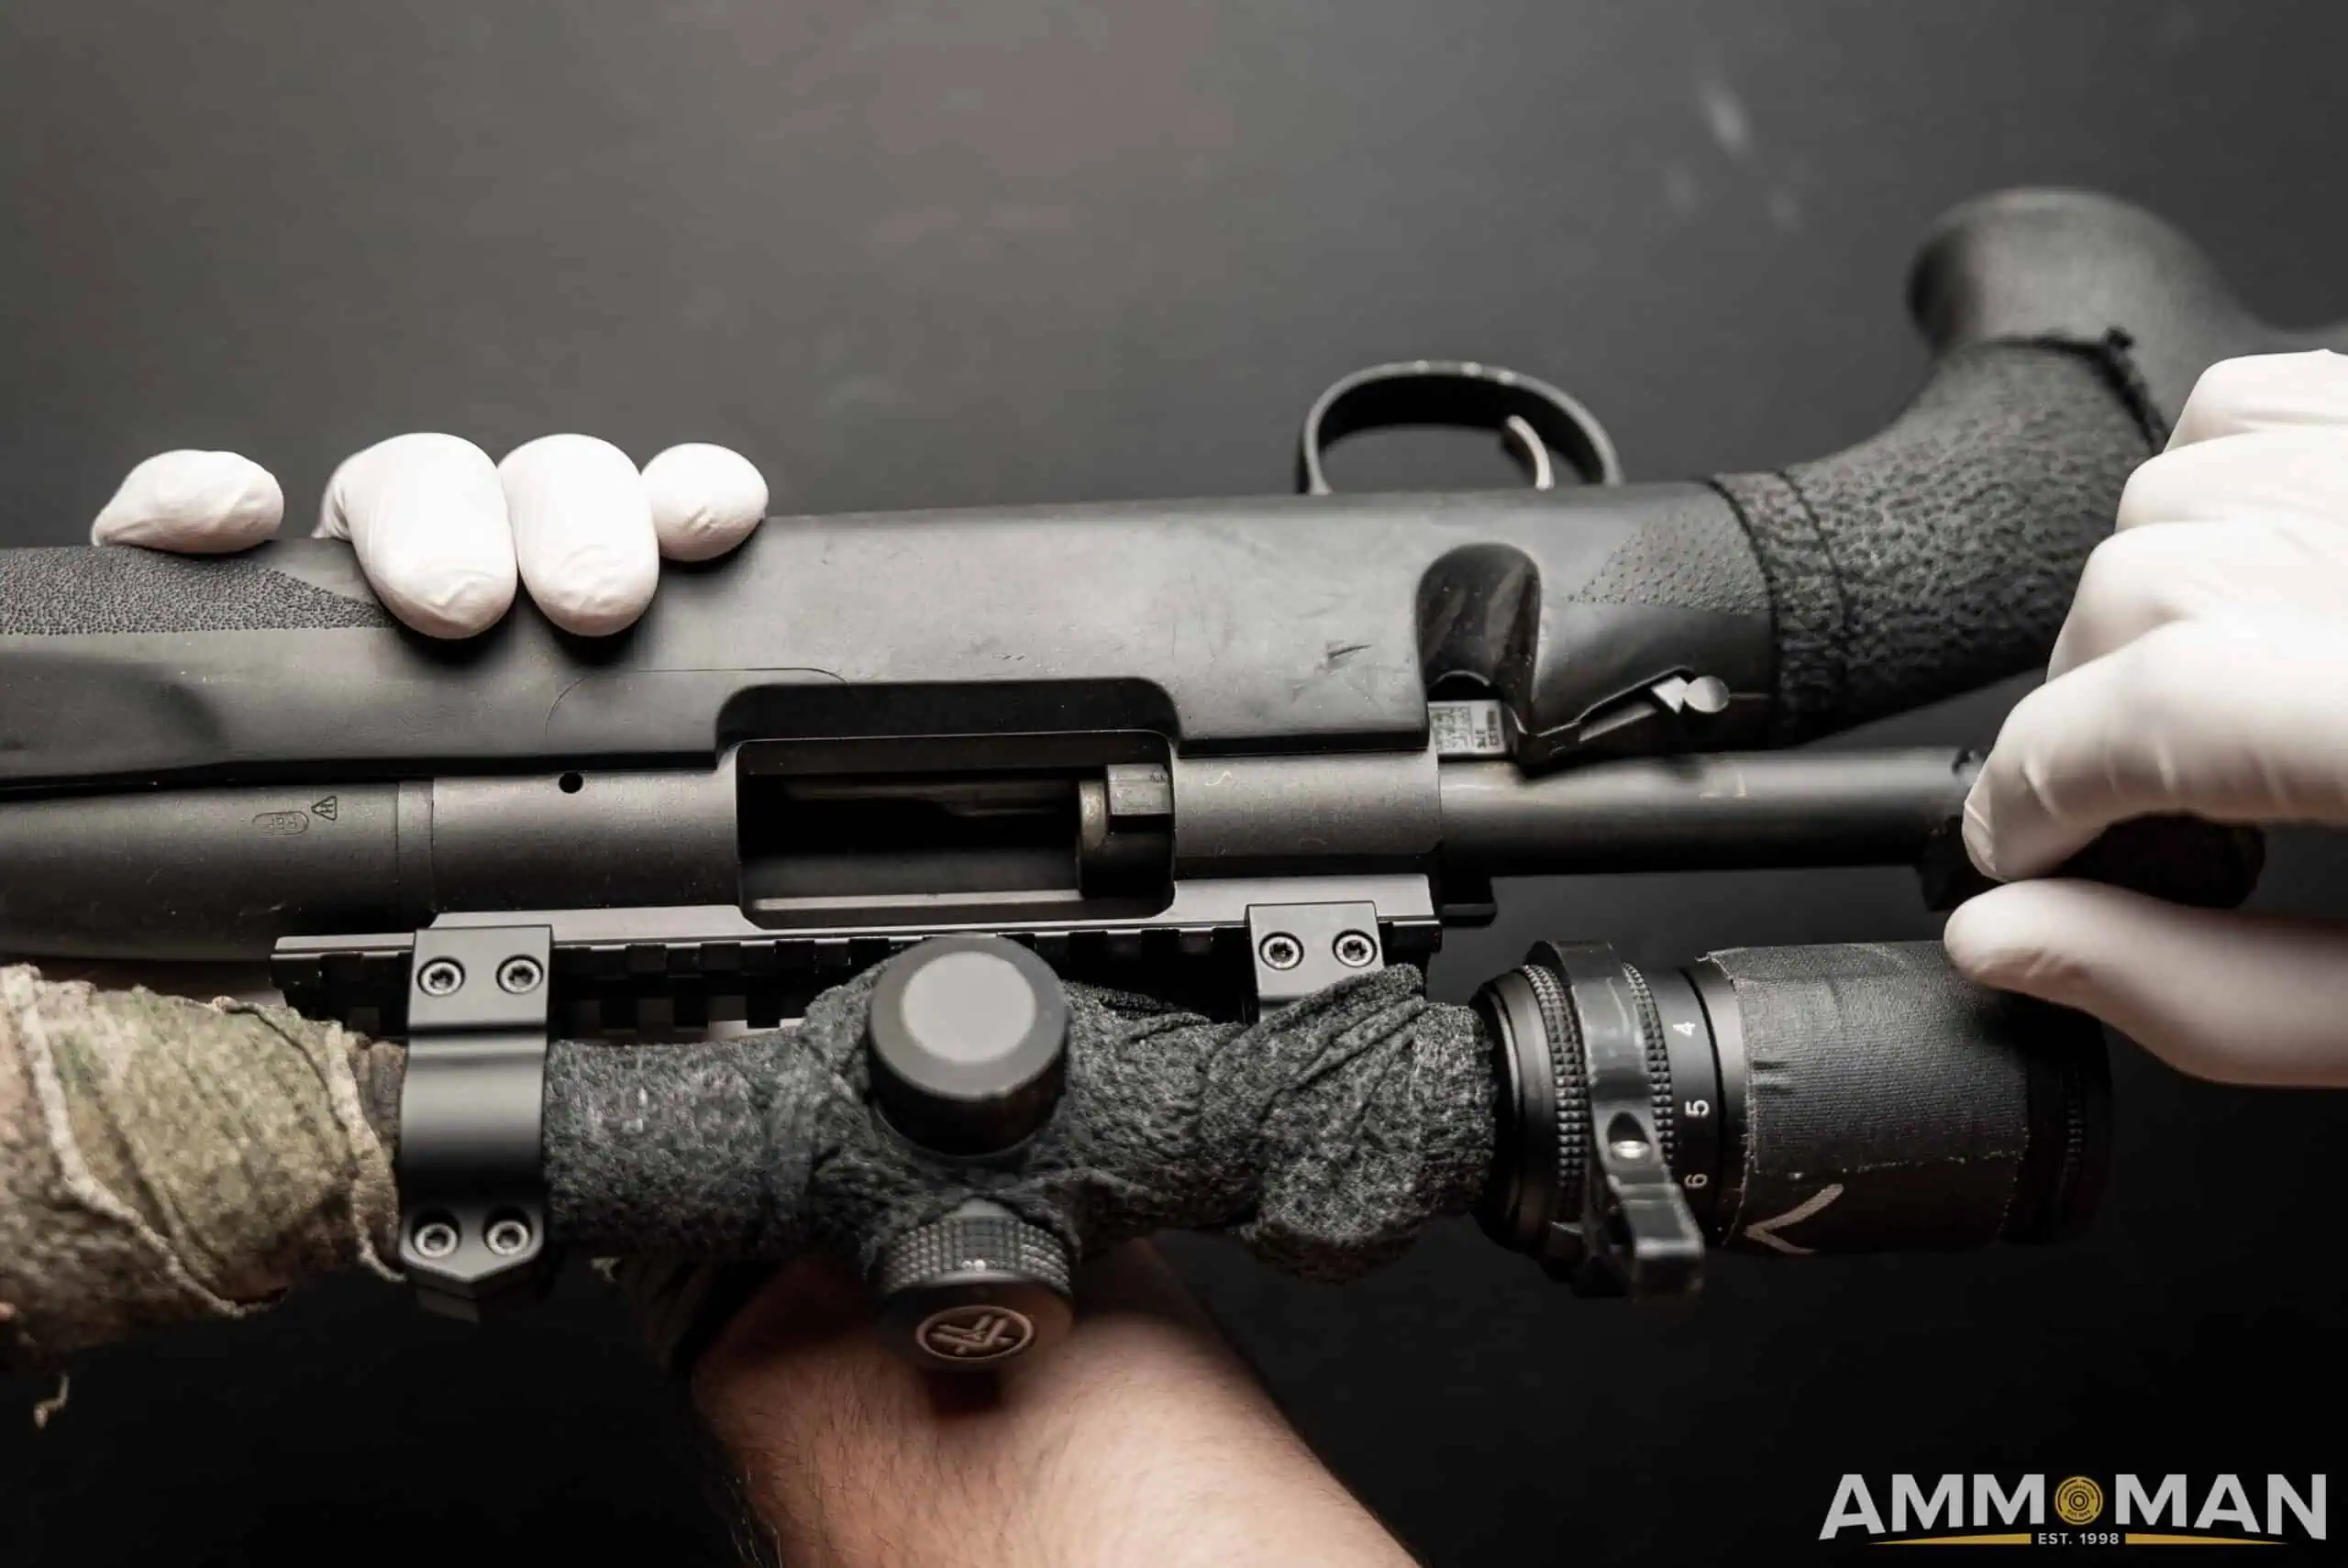
Remove your Bolt
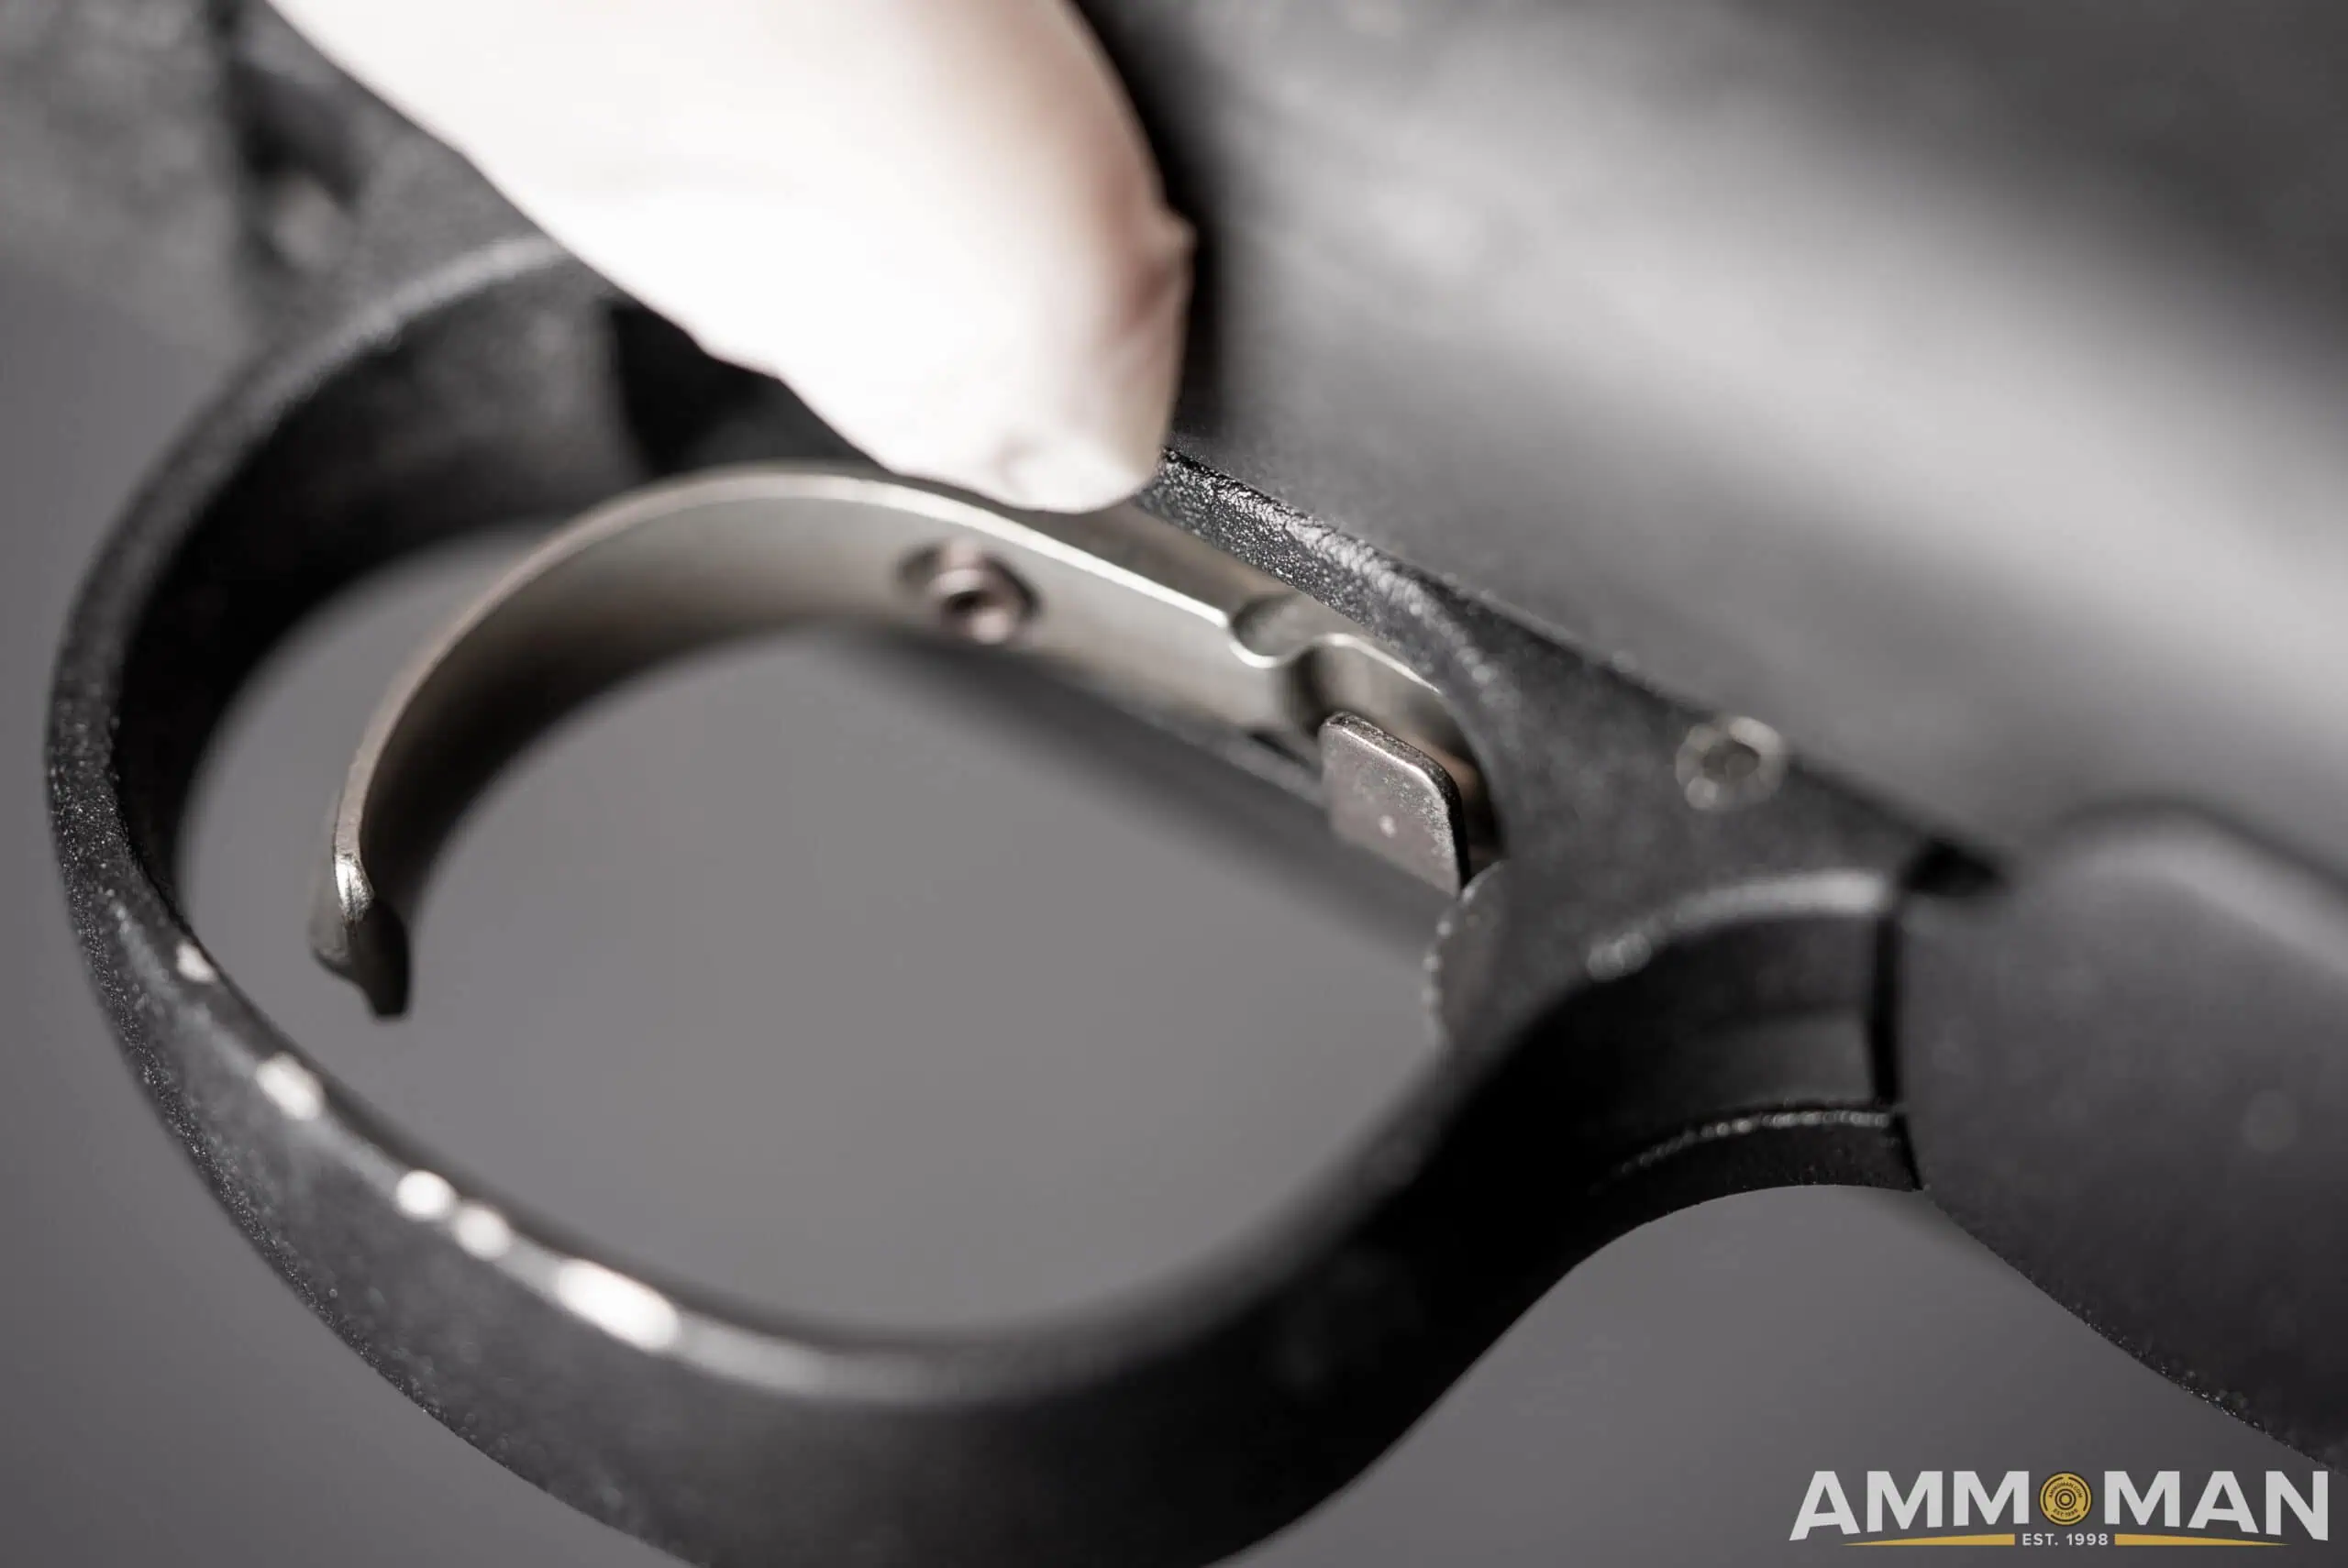
Next, take your rifle and remove the bolt by unlocking it and pulling back while pressing the bolt release button. This is most often located on the left side of the action, but for this Remington 700, it is on the roof of the trigger guard.
Bolt release button on Remington 700.
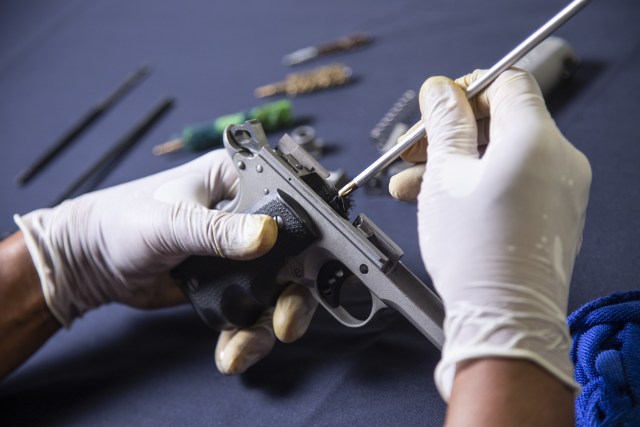
After removing your bolt, take your rag or wipes and spray gun cleaner on the entire bolt and begin to do your first wipe down.
Scrub the Bolt
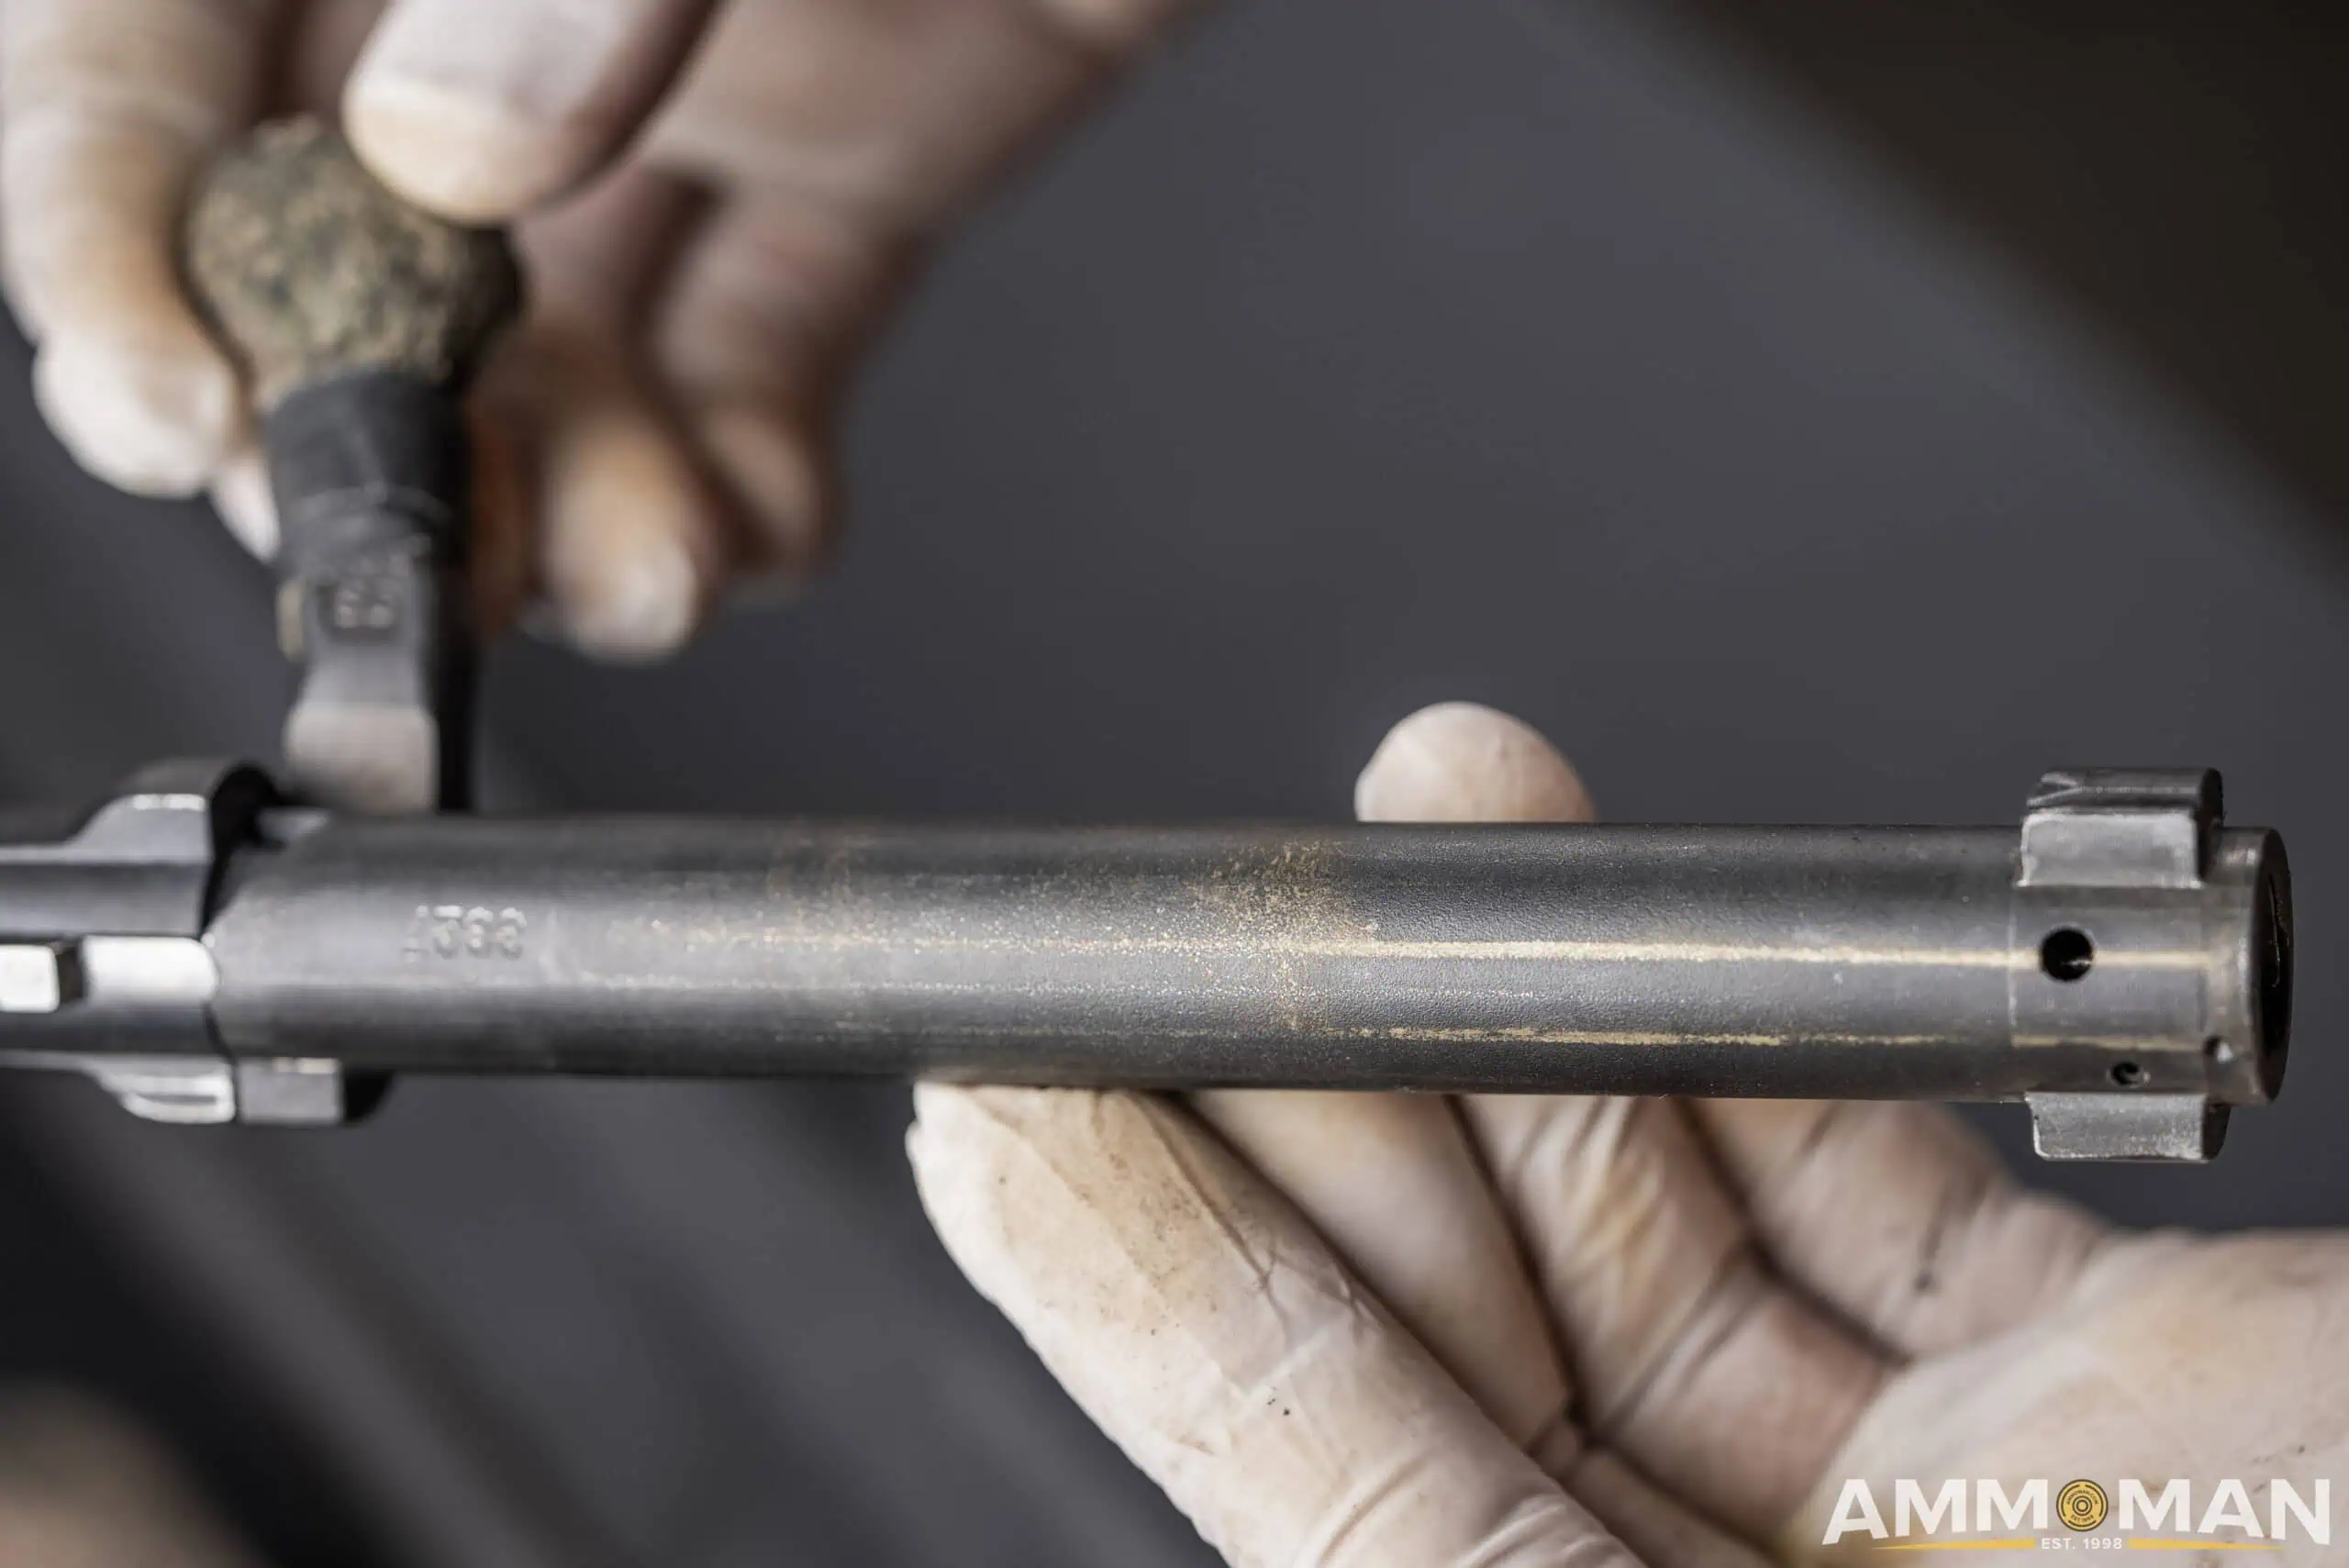
When you are done with your initial pass, you can take a brush and apply more cleaner and start scrubbing anything on the bolt that you missed with your wipes. Make sure to get all of the carbon fouling off of the lugs on the bolt, and the firing pin hole. When you are satisfied, you can put a light coat of gun oil on your bolt. (excluding the bolt throw)
Dirty bolt.
You can set your bolt to the side until the very end when you need to reassemble.
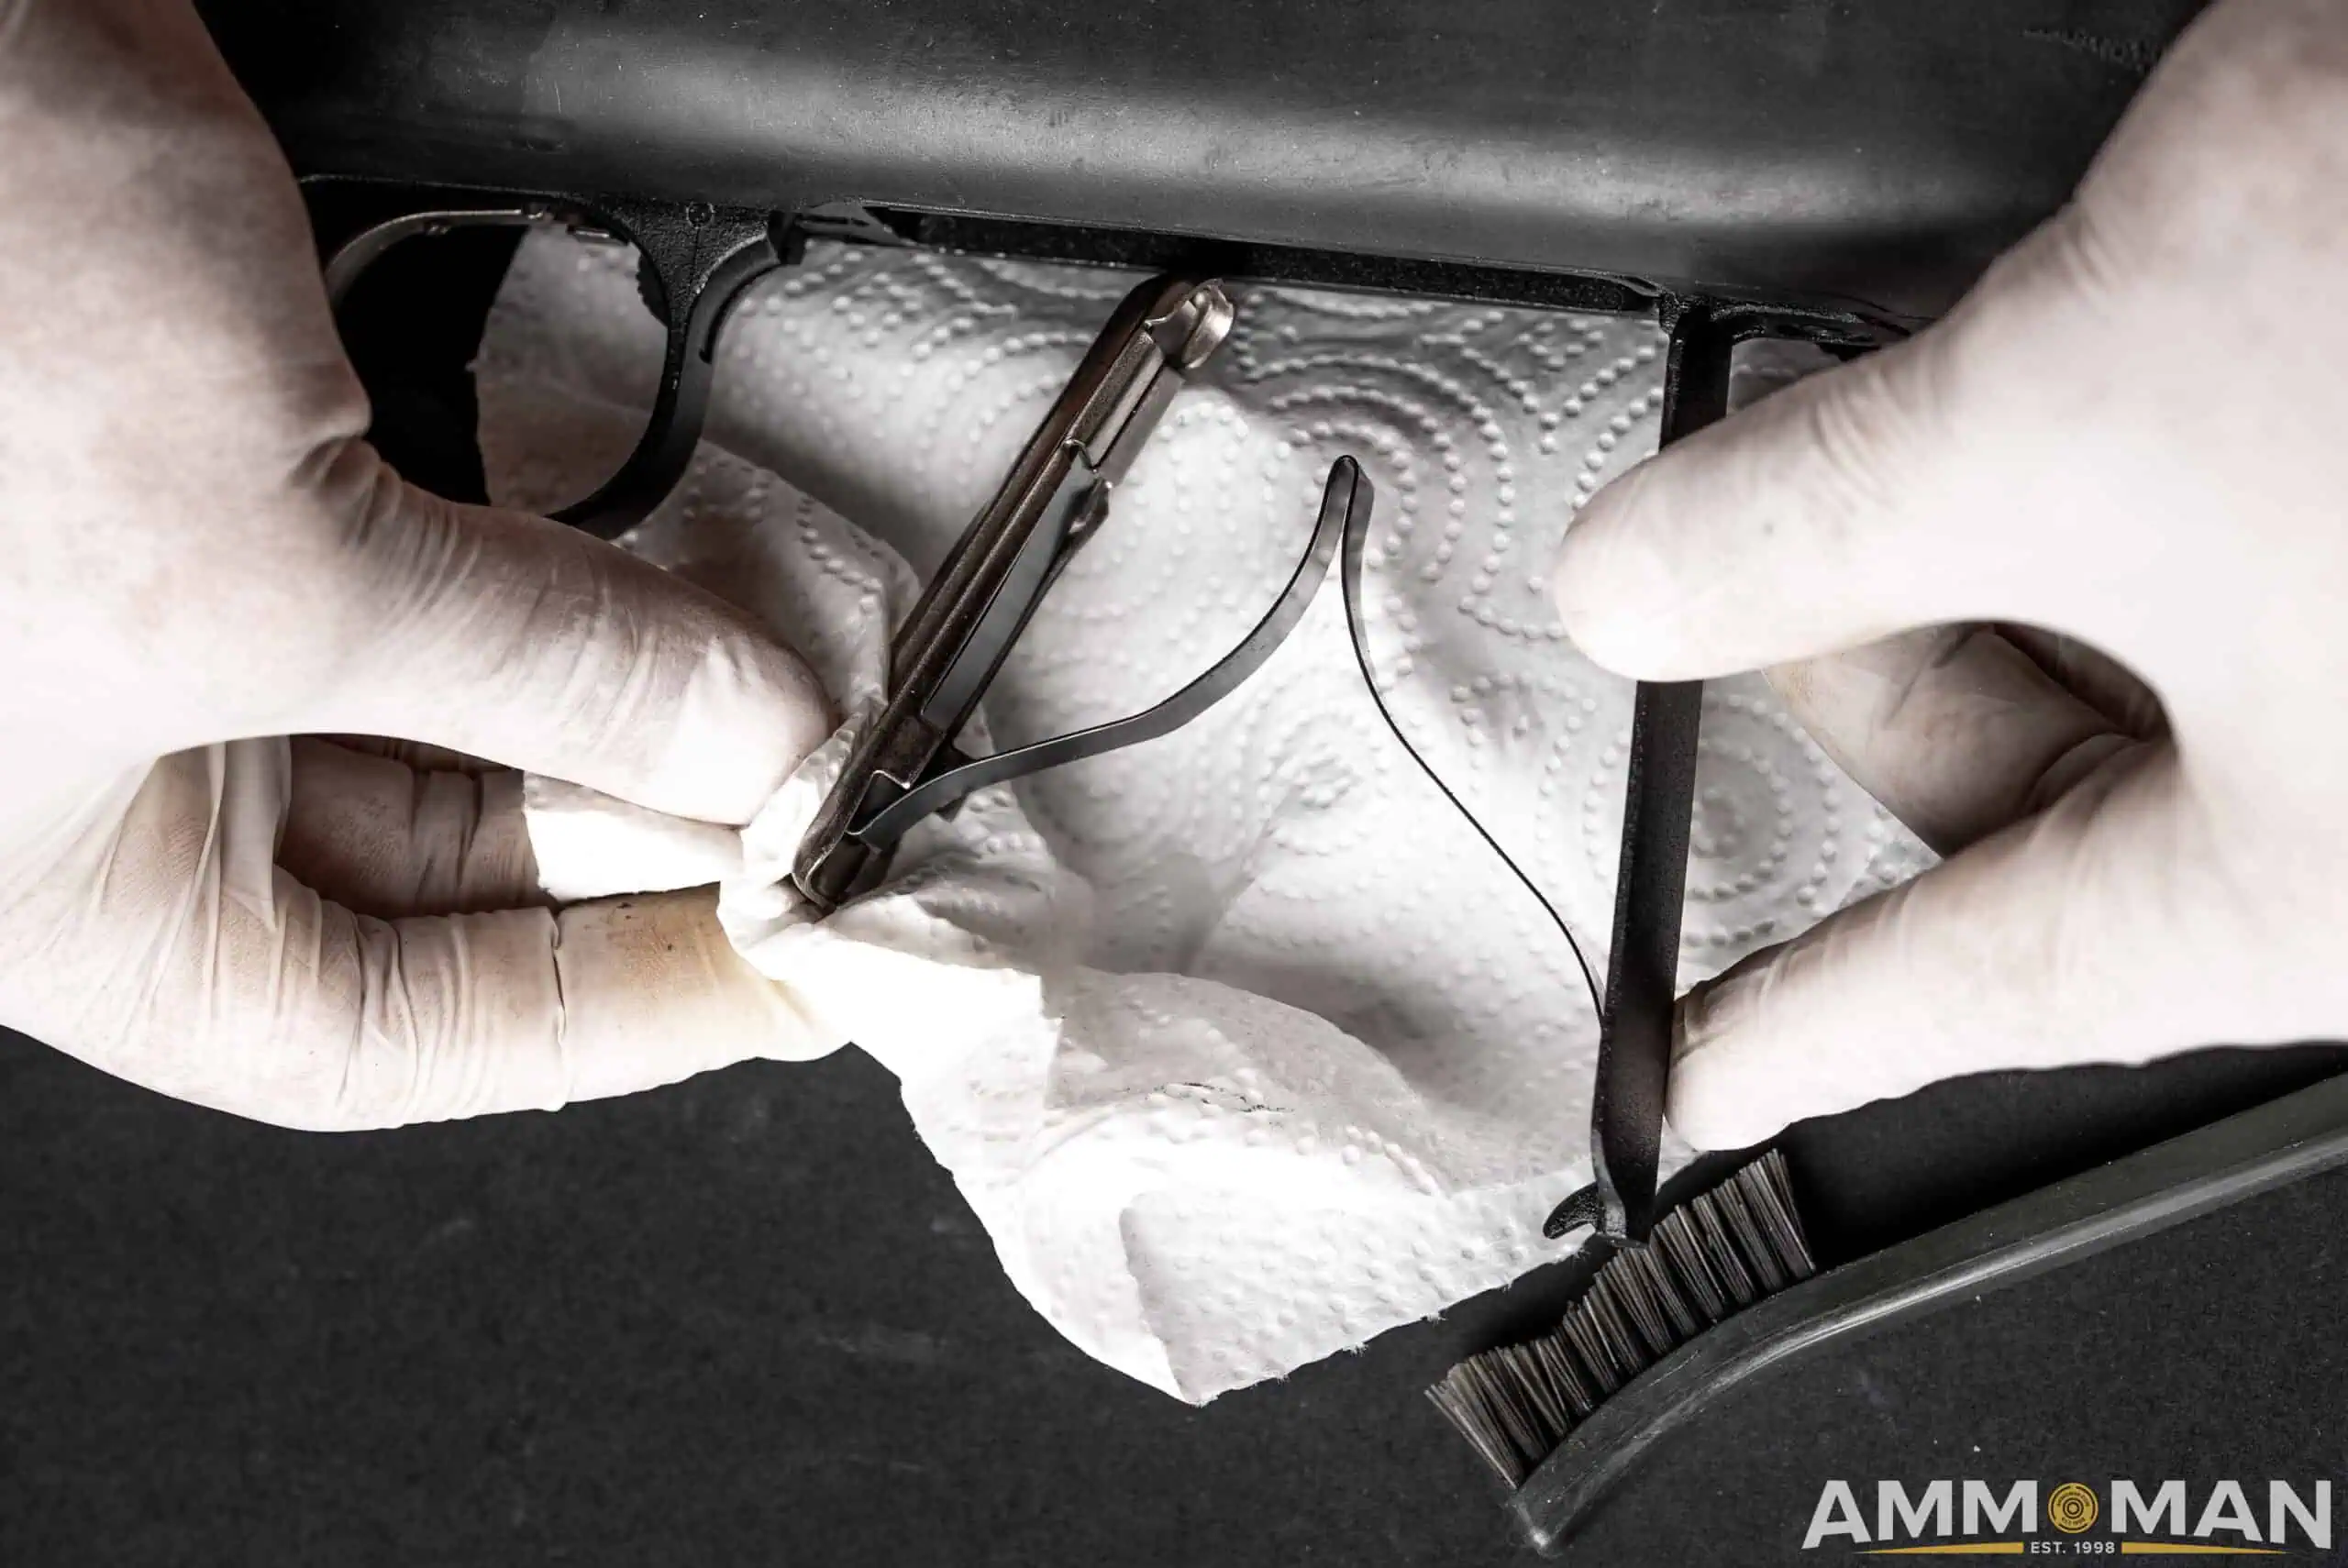
How to Clean the Action
To clean your action, just repeat the process of spraying cleaner and scrubbing out as much fouling as you can from the inside of the action. Then take a lightly oiled wipe and do a pass through to finish. Don’t forget to wipe down your magazine well while you’re cleaning here.
Make sure you wipe down the internal magazine spring.
We are almost finished!
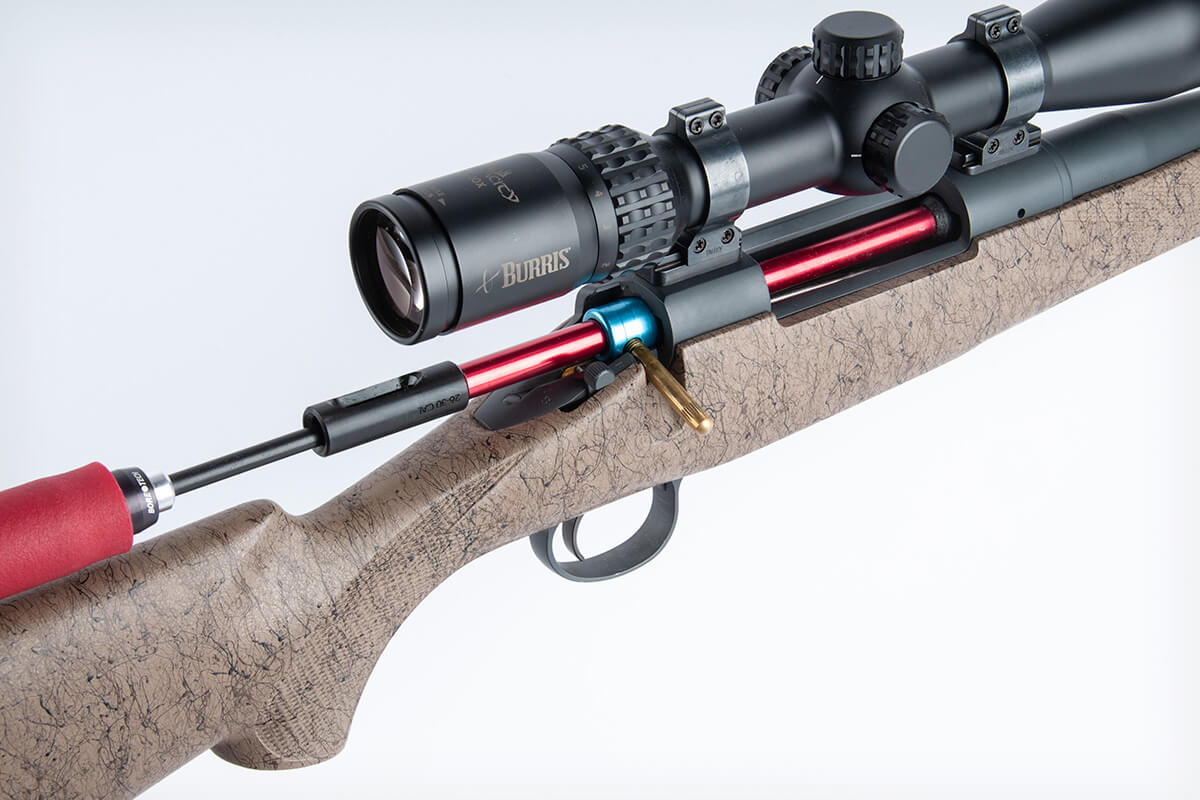
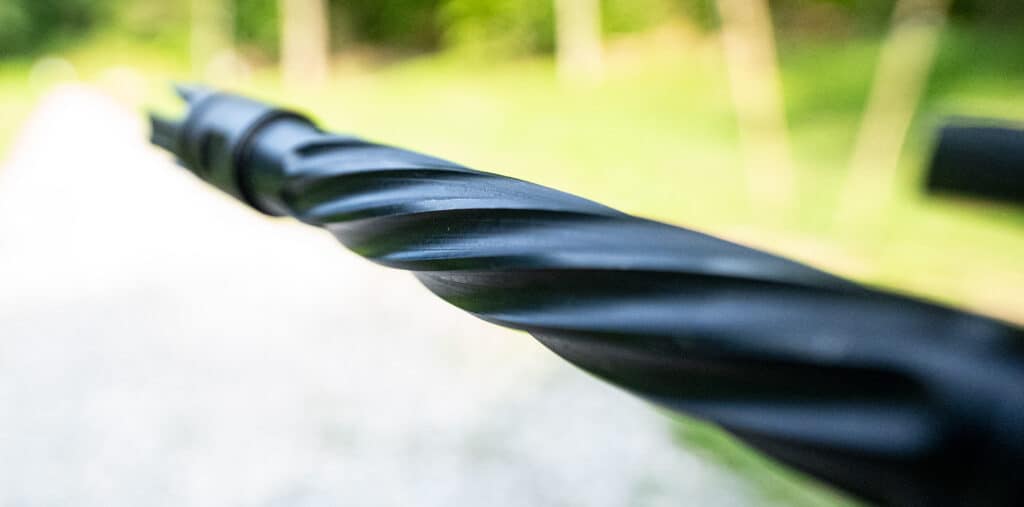
Cleaning a Rifle Barrel
Now all you need to do is clean the rifle’s barrel, lubricate and reassemble.
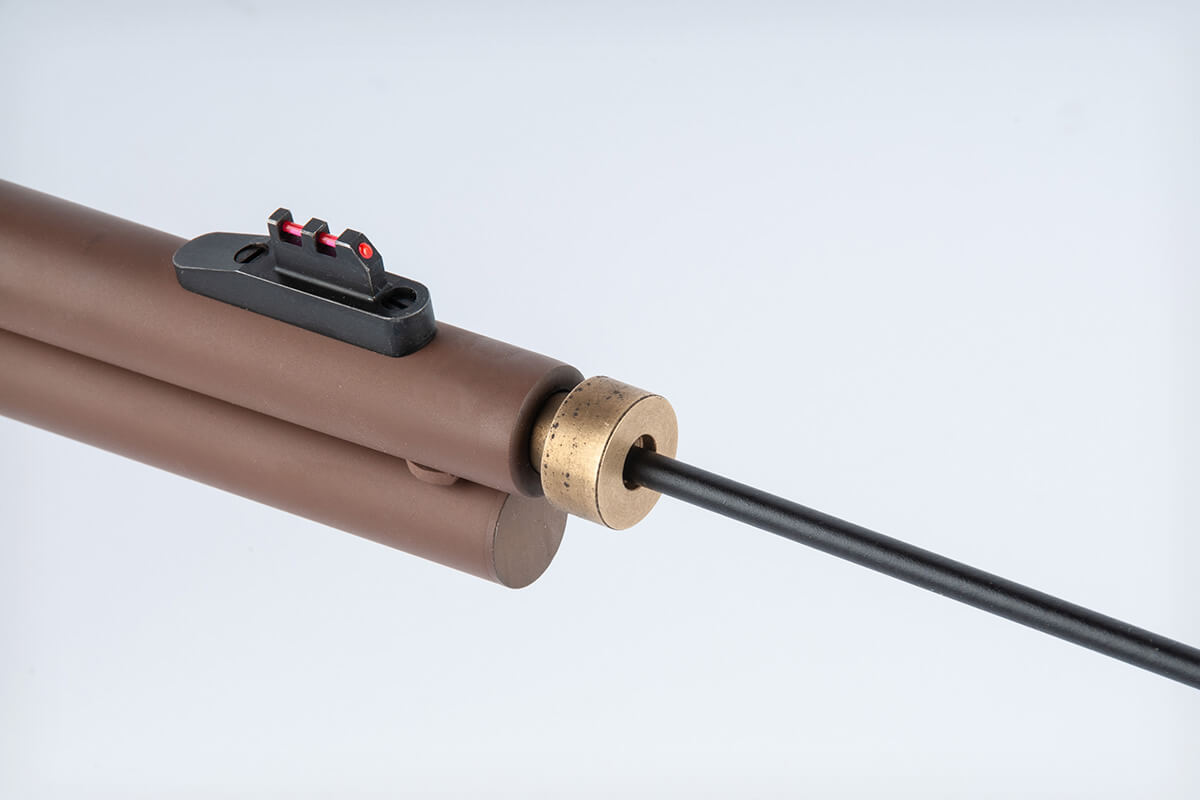
Start by taking your preferred barrel cleaning tool, (both a rod or snake will work) and add cleaner to it’s brushes. Do your best to ensure that it passes through the barrel from the breech to the muzzle. This is the direction the bullet travels so we want to pull the debris the same way too.
Bore snakes are simple and easy to use.
As a side note: The cleaning brush “can” damage the bore over time if not pulled straight through so make sure you aren’t pulling hard against one side during this process.
After about 5 passes, you will have gotten most of the fouling, but feel free to do more if you see more fouling breaking down and coming out. Run a few clean patches through to the barrel. When the patches come out the same color as they went in, you can move on to lubricating and reassembly.
Don’t Forget to Lubricate your Rifle!
Lastly, it’s a good idea to do a final pass with a patch that has a light coat of gun oil to get any leftover cleaner out of your barrel. Feel free to send another dry patch if you want to remove excess oil.
Now you can reassemble your bolt into your action and do a functions test. Simply put the bolt back into the action the way you took it out. you should not have to press a button to reinstall.
Why Clean your Rifle?
Although some people put it up for debate, if your rifle could speak it would vouch for being kept wiped down and oiled. While our modern guns “can” function for quite a while without being maintained, that is not optimal. If you have a rifle in the first place, you want to be able to reliably and consistently shoot and hit your target, right?
Cleaning your gun is a very critical part of that process. A bolt will run better when it is cleaned of fouling, and oiled for a smoother moving action. The same goes for barrel performance! If your barrel has not been cleaned in hundreds of rounds, you may start to see accuracy shifts.
How Often Should you Clean a Rifle?
With that being said, everyone cleans their rifles at different points, and has their own opinion to support why. So today, I’ll offer something that is not, “up in the air”.
Remington 700, chambered in .308
When it comes to a cleaning schedule, it really does depend how often you shoot your rifle, as well as how much fouling your caliber of choice presents! However, even if it’s just sitting in the corner of a safe, lubricant can still dry up and needs to be checked from time to time, regardless of inactivity.
I would say cleaning your bolt action rifle every hundred rounds or so will be fine, depending on what caliber you are shooting. The important thing is to make sure you are still shooting accurate groups, and that your bolt is easy to work back and forth between shots.
At AmmoMan.com, Kenneth channels his love for creating as well as his enthusiasm for guns and outdoor pursuits into a platform where he shares insights, tips, and firsthand accounts. These articles and contributions foster a community of like-minded individuals eager to learn and engage with the diverse facets of firearm culture and self-defense training. With his unique blend of skills and passion, Kenneth enriches the AmmoMan.com experience, providing valuable perspectives and empowering enthusiasts and beginners alike to explore and enjoy the world of firearms responsibly and safely.
How to Fix Common AR-15 Malfunctions and Stoppages
If you’re somewhat new to the AR-15 platform you might find things that catch you by surprise. The proper use of gas operated weapons like the AR-15 is a bit more complicated than that of your average hunting rifle or handgun. You may have heard stories of AR-15 jamming, failure to feed, and short stroke and wonder what causes them. Maybe you need to know how to clear a double feed. Let’s take a look at the common stoppages and malfunctions of the AR-15 and help you with some of those mysteries.
At one time, or another, it is likely that you will encounter a situation where your AR doesn’t behave as you expect it to. You might squeeze the trigger and find it gives only a little and feels mushy or it might give a click while nothing else happens. Perhaps you’ve just fired one, or maybe several rounds, and now your weapon won’t fire again.
When one of these things occurs, what you’re experiencing is a stoppage of your AR system. Simply put, a stoppage is any situation where your AR-15 fails to complete a cycle of operation. Stoppages may be caused by simple human error or by mechanical malfunction. Many basic stoppage situations can be remedied immediately in the field and will not necessarily repeat themselves. If you have ever failed to chamber the first round and pulled the trigger with no results, you have experienced a stoppage caused by human error. Obviously this stoppage is a simple one to resolve, other stoppages may be more complicated and have mechanical roots. These are malfunctions of your AR system.
Immediate Action: “Tap, Rack, and Reassess”
The first attempt to remedy any stoppage of an AR-15 should be what those in the know call Immediate Action: “Tap, Rack, and Reassess.”
“Tap” your magazine to be sure it is properly seated
“Rack” pull the charging handle of your AR-15 back swiftly with ample force and release it cleanly
“Reassess” This replaces the “Bang” part of the cycle many veterans were taught. Simply said, before firing, be sure that there is still a reason to do so and that it is still safe to fire. Once those conditions are established, feel free to give the “bang” portion a try.
The Tap, Rack, and Reassess cycle will resolve a great many AR-15 stoppages. In fact, the going estimate is that 90 to 95 percent of all stoppages can be resolved with a quick run through of this process. Most of the stoppages that are cleared in this manner would be considered type 1, simple stoppages that may not have a specific known source. If this doesn’t solve your problem, you may have a more complex stoppage such as the stovepipe jam.
The Stovepipe Jam
The stovepipe jam is simply diagnosed. The appearance of a stovepipe jam is the source of its moniker. When this particular type of jam occurs, a piece of spent ammunition, empty brass if you will, is caught in the ejection port, causing an obstruction to the chamber or feed-way. The brass was extracted properly, but did not eject and is pinned in the ejection port by the bolt face.
To resolve a stovepipe jam that you have visually identified, you may simply be able to sweep across the ejection port and dislodge the offending empty with a simple hand motion. While this may work, you still won’t have a round chambered and ready to fire. It is more efficient to use the “tap, rack and reassess” method, but with the rifle angled with the ejection port down so that you can get a little help from Newton’s friend, gravity. Success with the modified version of “tap, rack and reassess” is easily in the 90 percent range. The other ten percent will require the operator to use his or her fingers to clear the brass by sweeping them though the magazine well. With the stovepipe jam cleared, you may reseat your magazine if you’ve had to remove it, rack the bolt back and release it, readying your system to fire.
The Double-Feed
The third and most complicated type of stoppage is the “double-feed.” If you’ve followed proper procedure, you’ve just done a “tap, rack, and reassess” cycle and found that your AR-15 is definitely not ready to fire. In fact, you’ve got something akin to a log jam happening in your receiver. This is a double-feed.
How to Clear a Double Feed
The double-feed is only made worse by the fact that your buffer spring is keeping pressure on the problem. The first thing you will need to do is pull the bolt back and lock it in the rearward position. Once you’ve taken the pressure off the stuck round(s) you’ll need to rip out your magazine. While we consider the double-feed a simple stoppage, magazine function often contributes to this type of stoppage. Now, with the magazine out, rack the bolt back, maybe two or three times to ensure you’ve applied the needed force to the situation. If an application of “lock, rip and rack” doesn’t work, you’ll have to dig in the magazine well with your fingers to clear the offending rounds.
Double-Feeds and the 30-Round Magazine
If you have frequent double-feeds and you’re a fan of 30-round mags, you just might be creating your own malfunction. Since nothing’s really “wrong,” we’ll deal with it here, as a simple stoppage. If you spend enough time around tactical guys, you’ll find out that the average buffer spring in an AR-15 isn’t as strong as you might think. What happens when you’ve got a tightly loaded 30-round mag is that when the buffer spring isn’t strong enough to push the round all the way into the chamber and you end up with a round halfway out of the mag. Now, the bolt isn’t far enough along to use the forward assist to complete the cycle so what do you do? That’s right, cycle it again. That’s when it picks up the second round and you’ve got a beauty of a double-feed on your hands. Prevention? Yes, prevention is the key to this one. Just don’t load those big mags clear full. There are plenty of guys running 29 rounds in 30-round magazines who never have to figure out how to clear a double feed.
Malfunctions in the AR-15
A malfunction is a failure of the mechanical, or working parts of the AR system or a failure of the ammunition itself. AR-15 malfunctions may be due to an irregularity in the performance of the rifle itself, the magazine used to deliver ammunition to the rifle or a problem with the ammunition itself. There are several common categories of malfunction. The most common AR-15 malfunctions are: failure to feed, failure to fire, short stroke, failure to eject, and failure to extract.
Failure to Feed / Chamber
A failure to feed is a malfunction that can happen as you initially load your rifle or during a firing cycle. A common cause of failure to chamber is that the bolt carrier group has not moved forward with enough force to complete the operation of feeding/chambering ammunition or to lock the bolt in place. In this case, you may be able to resolve your problem with a simple “tap, rack and reassess,” but if the failure recurs with any frequency, it is likely your rifle has a true malfunction that needs to be addressed. There are a number of things that can contribute to failure to feed/chamber malfunctions.
Magazine Problems
If you are having issues with failure to feed, you may find that you have a common problem with your magazine. Before you go any further, simply be sure that your magazine is loaded properly and solidly seated. If In doubt, rip it out and replace it with another fresh magazine.
There is a school of thought that believes the proper loading of a magazine is an art of sorts. You need to be sure you are using enough force to properly seat the magazine without being so rough that you dislodge ammunition. You can misalign the ammunition inside the magazine or, if it’s backed by a strong magazine spring, you could even knock loose a round to try to jump into the chamber prematurely. Either of which will inevitably cause AR-15 jamming. Once in place, tug on the magazine to be sure it’s properly engaged with the magazine catch. Using the Tap & Tug loading procedure is second nature to many shooters, and can help the shooter new to the AR platform to avoid a lot of issues that might look like a feeding malfunction at first blush. Categorized as a failure to chamber or feed, the simple problem of an improper lock due to a magazine that is either setting against the ground or influenced by forward pressure will create a malfunction that is easily remedied by using tap and tug and keeping your magazine clear of the ground and other obstacles.
If you’ve ruled out a routine loading issue, but swapping out magazines resolved your malfunction, there are a few things you can look for when you get back to the suspect magazine. If it is dented or bulged, the magazine may not allow ammunition to move properly into the rifle. Check the function of the magazine spring. A weak spring may not have the force required to push the ammunition into position to be pushed forward into the chamber.
If there is nothing obviously wrong with the magazine, there are a couple of other problems that are commonly experienced with larger volume magazines. Where 30 round magazines are involved in repeated stoppages and feeding malfunctions it’s not uncommon to find a specific problem:
There isn’t enough room at the top of a fully loaded 30-round magazine for the magazine catch to take hold of it and the spring is already depressed so far that there is no give. In this case, you might get the first round off, and then the magazine falls away, knocked loose by recoil. The fix for this is the same as the magazine-bred double-feed. Up for a few 29-round mags, anyone?
Buffer Spring Problems
Assuming you’ve ruled out magazine issues, you may have a damaged, worn or completely broken buffer spring. All you can do for this one is head back to the bench, brake the rifle down, and replace that spring with a quality replacement buffer spring like the one offered in Spike’s Tactical AR-15 Buffer Tube Assembly Kit. Drop-in replacement springs are often of a lot better quality than most springs that are original equipment in many builds.
Defective rounds can cause a number of different versions of the failure to feed family, but there are two ammunition failures that are more common than the rest. Stubbed rounds are no fun. When the bullet has been forced back into a cartridge, it’s likely to hang up on its way forward or go any way but straight causing a jam. Even more fun than Stubbed rounds, are cartridges that have separated on extraction, ejecting a partial cartridge and leaving the balance in the chamber. Assuming you’ve already attempted the “immediate action” routine and you’re up against some resistance you’ll need to do the following:
Pull the bolt all the way back and lock it in place.
Pull the magazine
Clear the chamber of the damaged round.
While that sounds simple enough, you need to understand that sometimes these things are really stuck in there. It may take the patience of a saint, more than a few choice words, and smithing tools to extract an ornery piece of brass. After a difficult episode with a piece of damaged ammunition, be sure to check for safe function of your firearm before resuming operation.
Brass Over Bolt (Bolt Override): Everyone’s Favorite Malfunction
While this one isn’t as common as some others, it’s one of those malfunctions that spawns a jam that everyone on the range makes out to be a national emergency. Somehow a piece of spent brass (or for variety and excitement, a live round) becomes lodged above the bolt in forward position and immediate action isn’t happening because the charging handle won’t budge. On examination the operator identifies a bolt over brass malfunction.
Attempt immediate action, discover that charging handle won’t move, and identify brass over bolt condition.
Drop the magazine.
Move the bolt into the rear position by keeping pressure on the charging handle and bumping the butt of your rifle on the ground. It will require fairly aggressive handling to gain the space you will need to clear the stuck round.
Reach through the magazine well to push a finger (or a tool) against the bolt face. Apply steady pressure. Take hold of the charging handle and move finger from the bolt. Strike upward against the charging handle taking care not to break it. This should allow the round to come loose. Pull the bolt to the rear position and the round should fall away.
The correction of a brass over bolt malfunction requires a bit of force, but it really isn’t a dire situation. Be calm and work the problem.
Failure to Feed Due to Dirt, Debris, and Fouling: Short Stroke
As a gas operated weapon system, the AR-15, operates best when kept clean and well lubricated. Accumulation of “fouling,” soot and debris that are a by-product of firing the rifle itself can cause a failure to feed malfunction by slowing or restricting the movement of the bolt carrier group, causing it to fail to cycle completely rearward. Likewise, excess dirt on the lower receiver extension (buffer tube) or a fouled gas tube may have a negative impact on the ability of the system to function. Many gas system issues will produce a particular malfunction causing a short stroke or “short recoil.” This malfunction of gas management systems creates excess back pressure so that the bolt carrier group is not forced through the full rearward cycle as required to feed subsequent rounds. Simply put, dirty weapons often short cycle, either due to friction or binding of the bolt carrier group or because fouling or dirt increases back-pressure on the gas system to a level that cushions the action of the bolt rather than allowing it to cycle backward to its fullest extent. Gas systems are also at risk of not holding enough pressure to properly cycle when they become fouled. Moral of the story, clean, properly maintained rifles rarely short cycle. Dirt, debris, and soot are an invitation for failure to feed malfunctions.
Failure to Fire
Failure to fire is a fairly small category of malfunctions suffered by the AR-15. If a live cartridge is loaded into the weapon, properly chambered, and the operator has pulled the trigger to release the hammer a round may fail to fire. There are two causes of failure to fire that are at fault in the vast majority of this category of malfunction: Either the ammunition itself is defective or the firing pin has not struck the primer hard enough to trigger the initial explosion that ignites the powder inside the casing.
As always, perform immediate action to attempt to resolve your stoppage. If the malfunction recurs, you will need to complete troubleshooting and address the problem.
In order to determine which cause has created your failure to fire malfunction, inspect the round which failed to go off. Looking at the primer of the round in question, note the depth of the mark left by the firing pin striking the primer. It may be helpful to compare the primer to that of an empty cartridge that was successfully fired. If the indentation in the primer appears to be of normal depth, the round is defective and should be disposed of safely. If the primer is unmarked or the indentation is significantly shallower than normal, there is a problem with the function of the firing pin.
Diagnosing Firing Pin Faults
Like many other AR-15 malfunctions, failure to fire malfunctions that are due to a firing pin malfunction are frequently caused by a buildup of by-product from the combustion of propellant, or fouling. If you inspect the firing pin and find no obvious defect, your best bet is to clean the weapon being sure to pay special attention to the firing pin, bolt and bolt carrier, as well as the area of the barrel extension locking lug. Obviously, if you do find damage to the firing pin, it will require replacement.
If you are shooting and experience a situation in which there is unusually weak recoil or a weak “pop” rather than the weapon’s normal report, you should stop immediately and lock the bolt to the rear. DO NOT try immediate action. Once the bolt is locked back move the safety selector to the safe position and take out the magazine. Once the rifle is secure, look into the barrel to see if the bullet is lodged inside. If you can see that the barrel is obstructed your rifle will need to spend some time on the bench, this isn’t a field serviceable malfunction.
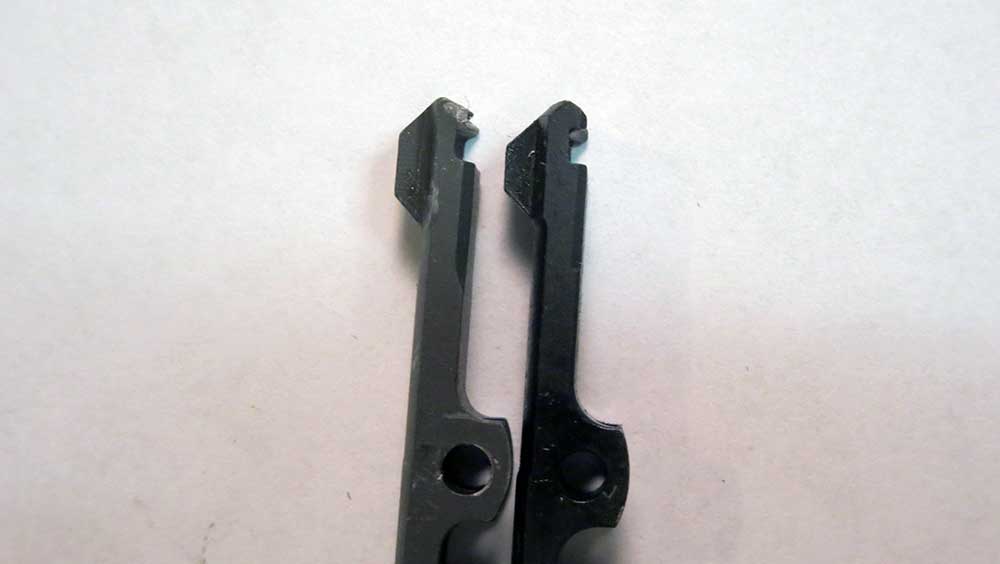
Failure to Extract
While failure to fire might seem to be a serious malfunction, failure to extract can have much more serious results if the problem is not readily identified. It is possible that an unfired cartridge could be in the chamber. If you were to feed another live cartridge you could create a catastrophic explosion. That’s almost certain to cause the kind of injury that could end your shooting career. Moral of the story: failure to extract can be serious business and should be treated accordingly.
When a failure to extract occurs, the bolt and bolt carrier may short stroke, or they may return completely rearward. In either case, a cartridge is left in the chamber. On the next cycle, a live round may be fed and forced into the base of the case that was left behind. This malfunction can be difficult to resolve. The remedy will depend on whether the cartridge is actually stuck in the chamber and if another round has been fed.
Lock the BCG to the rear of the action and change the safety selector to safe.
Remove the mag and any loose cartridges.
Bump the rifle butt stock on a firm surface to dislodge the remaining round.
If the case has broken or ruptured, it is likely to be stuck in the chamber. If it is:
Place a cleaning rod in the barrel from the muzzle end.
Tape the casing with the cleaning rod to chase it back out of the chamber.
There are several causes that may be identified for extraction failures:
Short Recoil – see the section above on short stroke due to dirt, debris, and fouling.
Fouled or Corroded Chamber – Inspect and clean, then determine if the chamber is damaged or safe to return to service. If it is damaged, the barrel will need to be replaced.
Weak or Broken Extractor Spring – replace spring that is no longer serviceable.
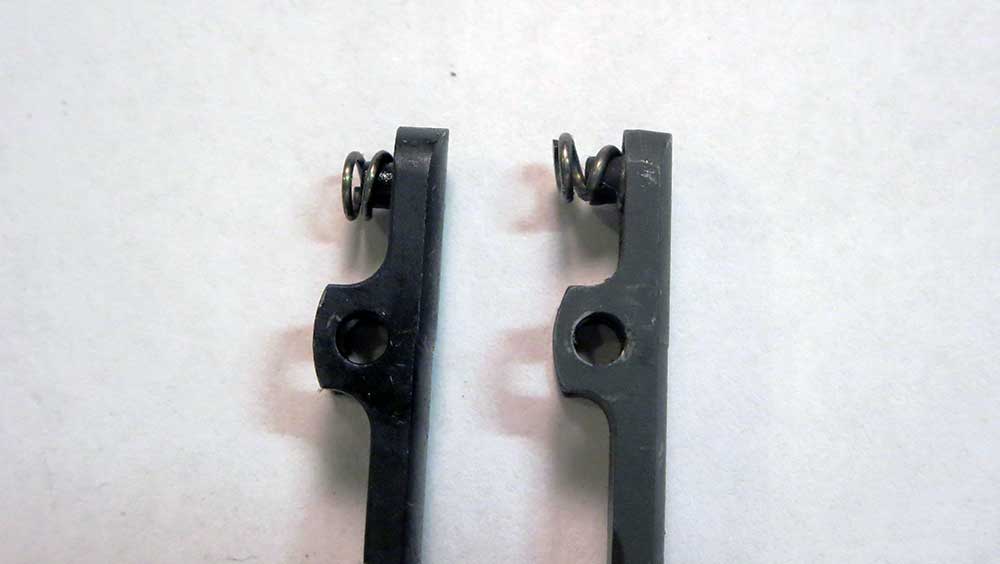
Failure to Eject
The end of cycle malfunction. The cartridge that should have been ejected does not exit through the ejection port, but either stays part way in the chamber or ends up jammed into the upper when the bolt comes forward. Most of the time this malfunction is caused by short stroking (we covered short recoil earlier) or fouling or corrosion of the chamber which cause friction on extraction throwing off extraction and ejection functions.
Resolving Failure to Eject Malfunctions
In most cases, you will find that a simple pull of the charging handle will free the brass that failed to eject, you need to be sure that live round hasn’t been fed either partially or completely into the chamber. If a live round is present, the magazine and all live cartridges will need to be removed before you can release the charging handle. If the failure to eject malfunction is a recurring problem and it is not resolved by giving your weapon a good cleaning and proper lubrication treatment, it is best to just go ahead and replace the ejector and extractor springs as well as the extractor.
After looking at the most common stoppages and malfunctions of the AR-15, you really need to take away two things: The AR-15 functions best when kept clean and lubricated, don’t neglect basic rifle hygiene! Good quality AR-15 parts will save you a lot of trouble. Strong springs, components with quality finishes and parts that fit properly are essential for trouble free operation of the AR-15 weapon system.
Craig Boddingtongives new rifle shooters a basic primer on how and why you must zero your rifle. Once you understand these fundamentals you’ll be ready for more complex sighting systems.
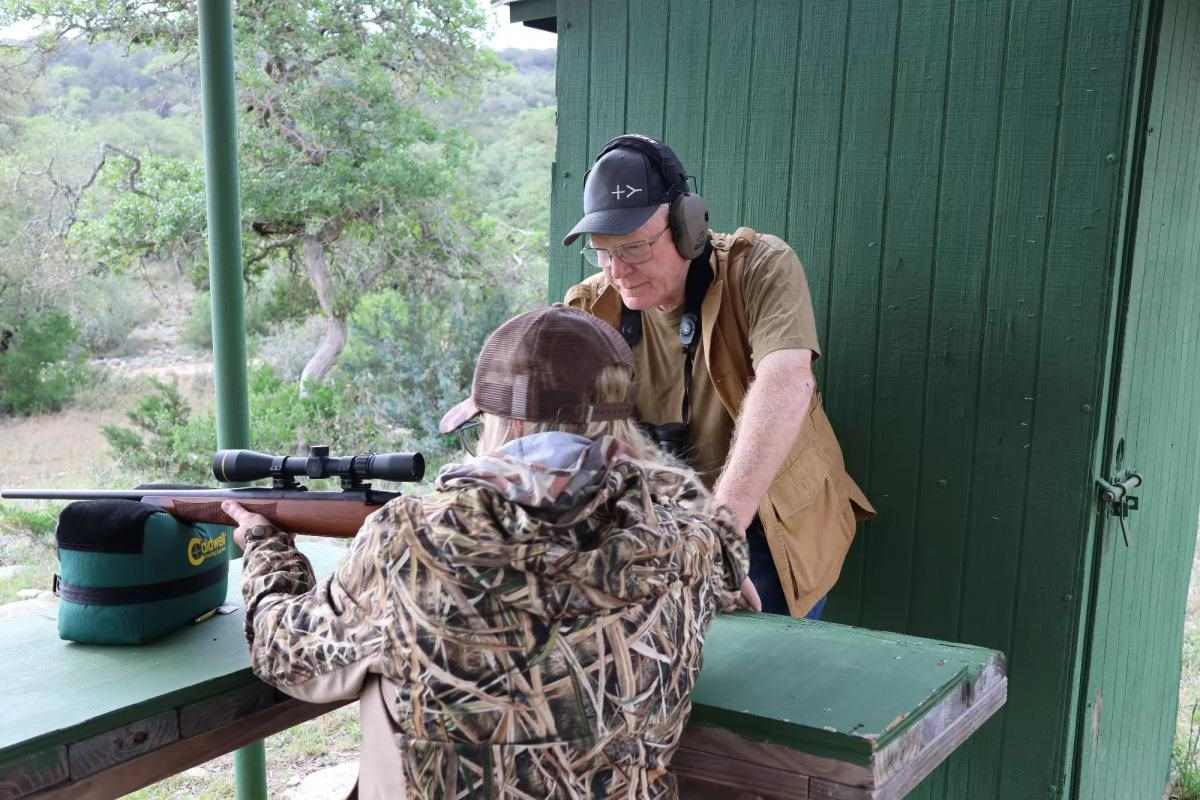
Sight-in session at one of Brittany Boddington’s She Hunts skills camps. As in all bench shooting, it starts with a steady position; the idea is to remove as much human element as possible and let the rifle do its work.
August 17, 2023By Craig Boddington
Achieving the desired sight-in—“zero”—is an essential ritual. Doesn’t matter if you’re going hunting, ringing steel or punching paper, your rifle and scope must be aligned, and your barrel must steer your bullets where you want them to go. Obvious (duh) that we must carefully zero with a new rifle or scope. However, things change. Screws come loose, bores wear, and loads can change (manufacturers aren’t likely to tell you if they revise propellants and charges, change primers, even update bullets). If accuracy doesn’t matter to you, no problem. If it does, you need to at least check zero before taking any shot that matters.
Zeroing completed at one of Brittany Boddington’s She Hunts camps. Aside from absolute necessity, a good zero instills confidence. Next, these ladies will do some field position practice; by the end of the course, most will successfully take game animals, several for the first time.
Check All Screws
Let’s start at the beginning, assuming a new rifle or you’ve switched scopes or sights. These days, nobody has ammo to waste, so make sure everything is right. It’s frustrating to have trouble getting a rifle on paper, only to discover a loose screw. First step is to check all screws: Action screws, mount and ring screws.
I’m the most non-mechanical person you’ll meet. A screwdriver is a complex tool. A loose screw is bad, but so is over-tightening, especially if you really bear down and shear off a screw. To avoid this, I use a torque screwdriver. Unmanly as it is, I check the directions on scope mounts. Most mount manufacturers give you the recommended inch-pounds for their mounts (usually between 20 and 30). Set the screwdriver accordingly. Action screws also need to be snug. However, over-tightening can be worse; you can suck the action down into the stock and impair the bedding relationship. Hand-tight is about right.
To simplify zeroing and save ammo, start close with a big target. Boddington believes bore-sighting is most accurate with a round bullseye target. With scoped rifles he usually starts at 50 yards, but cuts that in half for iron sights, or rifles that cannot readily be bore-sighted.
Get On Paper
I’ve read articles on three, even two-shot zeroing. Fine in theory, but it’s not a perfect world and I don’t believe in Santa Claus. Scopes are not created equal, and few have exactly precise and consistent adjustments (as in, every click moves the strike ¼-inch at 100 yards).
We don’t want to waste ammo, but we must get on paper as quickly as possible. My recommendation: Start close with a big target!
Ideally, before the first shot you want your scope/sights and bore as roughly aligned as possible. There are three primary methods: An optical collimator; laser bore-sighter; and good, old-fashioned bore-sighting. Collimators and lasers work okay, but not all of us have access to them. I’ve seen such imprecise results that, given a choice, I prefer bore-sighting by eye. We’re not looking for precision, just a starting point to get on paper.
It’s simple. Except: Manual bore-sighting is only practical if you can remove the bolt or open the action and look down the bore. Put up a round target. With the bolt removed, rest the rifle securely, look through the barrel, and visually center the target in the bore. Ensure the rifle is rested securely enough that it remains stable with no touching. Then raise your head and look through the scope (or iron sights). If the scope/sights aren’t on the target, use your windage and elevation adjustments to bring the sights onto the target. In bore-sighting, movements will be opposite: Up is down, left is right!
This method is ideal for bolt-actions. It also works for most single-shots and AR-type semi-autos that allow easy bolt removal. With break-open actions and ARs, you may need a tall enough rest so that you can open the action or disengage the lower receiver to see down the barrel. Precision is not required; the point is to get on paper. With a good-sized target and visible, round aiming point, 50 yards should be close enough. However, the larger the caliber (bore diameter), the less precise. With a .22, you can get close; with a .30-caliber or .375, not so good.
Actions that don’t allow you to see directly down the barrel are more difficult: Lever and slide-actions, some semiautos. Absent a collimator or laser bore-sighter, don’t panic; just use a bigger target and start closer! We keep a roll of butcher paper at the range. For such rifles—and most rifles with iron sights—I cover the target frame with blank paper and put an aiming point somewhere near the center…and I start at 25 yards. Honest, absent the ability to look down the barrel, sometimes even this isn’t close enough. No problem, move up to ten yards, get a steady rest (I use sticks for this exercise), and take a shot. Now, finally, you should be on paper.×
Always check for loose screws before firing a shot. Boddington likes to use a torque screwdriver to avoid overtightening and stripping or breaking screws.
Adjust Your Sights
Once you have a strike—anywhere—it’s a simple matter of adjusting your scope or sights. Again, don’t expect all adjustments to be perfect, but do the math based on what your scope’s adjustments are supposed to be. If your scope’s turret says ¼ MOA, that’s four clicks to the inch at 100 yards. If you’re on paper at 50 yards, then you’ll need to double that (eight clicks to the inch). If you’re on paper at 25 yards, then you’ll need to quadruple the clicks (16 to the inch).
I make the first adjustments at short range (25 or 50). If a scope’s adjustments are accurate, this may waste a cartridge. However, I hate to move out to 100 yards and find myself off paper again, so I like to get very close at short range before moving out.
Iron sights are a grab-bag; few iron sights give any index as to how much movement is needed to move the strike a certain distance. So, it’s trial and error, but all scopes, red dots, and rear iron sights are the same: You move the sight the direction you wish to move the strike of the bullet! So, when a turret or sight shows a “U” or “H” (common with German optics, meaning hoch for “higher”), you turn in that direction to raise the strike, opposite for lower. For windage, “R” is fairly universal, Right or Rechts to move the strike right, opposite for left. Some iron sights, such as many AR15 battlesights, use the front sight to adjust elevation. If this is the case, then the adjustment is opposite. Regardless of what an arrow on the sight might tell you, physical adjustment of the front sight up moves the strike down, and vice versa.
Provided you can easily remove the bolt and look down the bore, bore-sighting is easy. Securely rest the rifle (5975) and center the target in the bore. Without touching the rifle, raise your head and look through the scope or sights. If the picture isn’t the same, adjust your scope or sights until it is.
Distance
There’s a myth out there that a “25-yard zero” will be about right at 100 yards. Fairly true with iron sights mounted low on the barrel. With a scope this doesn’t account for the distance between line of bore and line of sight through the scope. With flat-shooting cartridges and, especially with today’s big scopes that must be mounted higher above, a 25-yard zero will put you several inches high at 100 yards. If I start at 25 yards with a scope, I want a strike at least an inch low before I move to 100 yards.
With iron sights, I usually stop at 50 yards. I can’t see the darned things well enough anymore to get meaningful 100-yard accuracy. With red-dots, big-bores, and relatively inaccurate platforms (like double rifles and many older lever actions), I also often stop at 50 yards. With such rifles, I know my effective range is limited. A final zero of maybe an inch high at 50 yards will enable me to do anything I’m likely to do.
Now, with most scoped rifles chambered to versatile or fast cartridges, I go to 100 yards for fine tuning. 50 yards is too close to always pick up the nuances of being a bit high, low or to either side. There is no substitute for achieving final zero at a full 100 yards. Some folks go beyond that and zero at 200. I group at 200 for practice, and to prep for an important hunt, but not for zeroing because: 200 yards introduces more human error, and you start to see wind effects.
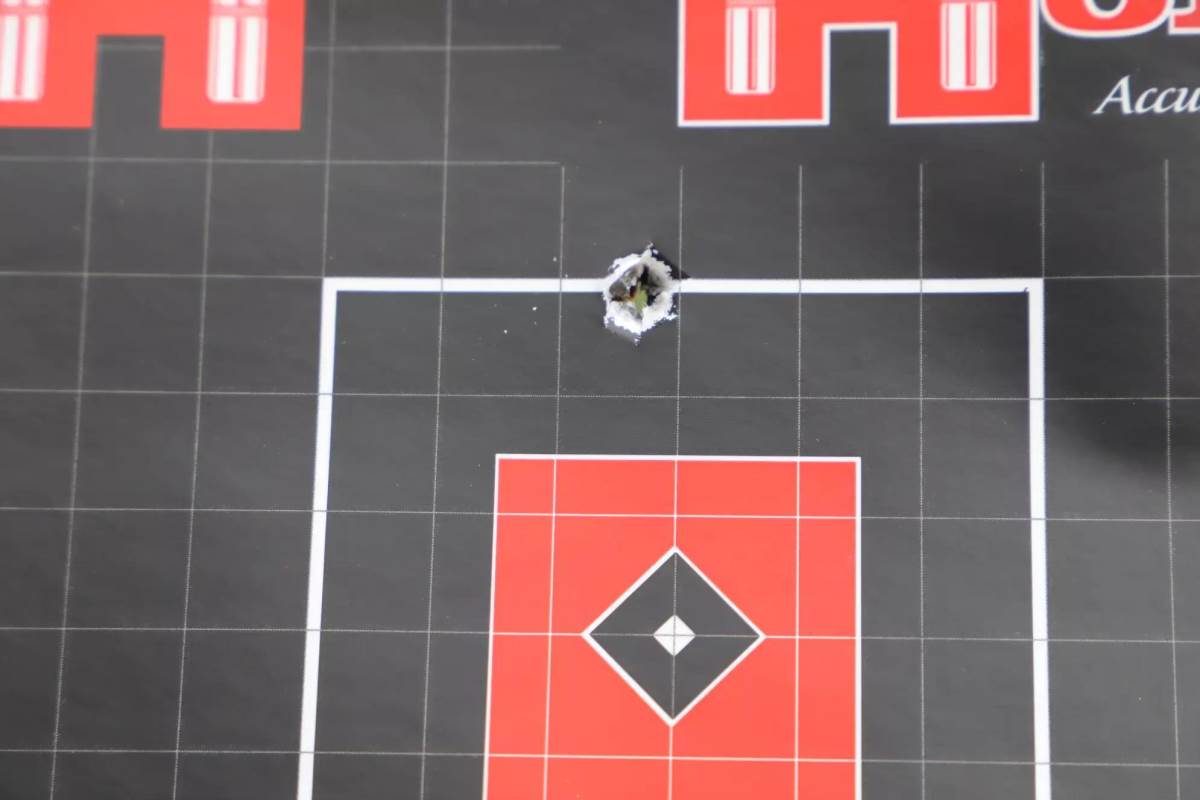
With a scoped, flat-shooting rifle, Boddington likes to zero about 1.5 inches high at 100 yards, on game animals a good zero to 200 yards. This shot at 100 yards was a perfect time to call this sight-in session complete.
Where To Zero?
That’s up to you. Being a bit old school, I usually conclude zero a bit high at 100 yards. Jack O’Connor’s (very old school) solution was about 2.5 inches high at 100 yards, which took his beloved .270 out to nearly 250 yards without holdover. Another friend insisted on a full 3 inches high at 100, figuring that made him okay on game to 300 yards. I don’t like that, because of greater risk of shooting too high at middle distance. With a modern, fast cartridge, I usually leave it 1.5 inches high at 100 yards, which will be close at 200 yards. Beyond that distance, I’m probably going to use a rangefinder, and may well dial.
Turrets that are intended for dialing the range are increasingly popular, and there are numerous options. Many are based on starting with a dead-on 100-yard zero, and that’s totally fine. The system I use most is Leupold’s Custom Dial System (CDS), with turret calibrated to your load. My CDS turrets assume a 200-yard zero … which puts me right back to starting about 1.5 inches high at 100. However, if you’re serious about shooting at longer ranges, it’s necessary to go beyond sighting-in … and beyond this discussion. Today’s systems (and supporting data and apps) are better than ever, but it’s still essential to verify your settings by shooting at actual distances.
How to Clean a Rifle Barrel the Effective and Harmless Way
Here are the tools, chemicals and the step-by-step process to easily and safely clean a rifle barrel.
February 14, 2022By Joseph von Benedikt
Two types of fouling build up in rifling. The least detrimental to accuracy and the easiest to clean out is carbon fouling. It’s the soot-type residue left by the burning gunpowder. The other type is copper fouling. It’s copper residue that’s basically smeared off the bullet into the pores and microfractures of the steel barrel.
Typically, the faster the velocity of your cartridge/bullet combination, the faster fouling builds up (both carbon and copper) and the heavier it builds.
At some point, accuracy begins to degrade, and to regain top performance you’ve got to clean all that fouling out. Just how many rounds you can fire before degradation occurs depends on the quality of your rifle’s bore. Very smooth bores with minimal machining and tool marks usually can be shot far more times before accuracy begins to drop off.
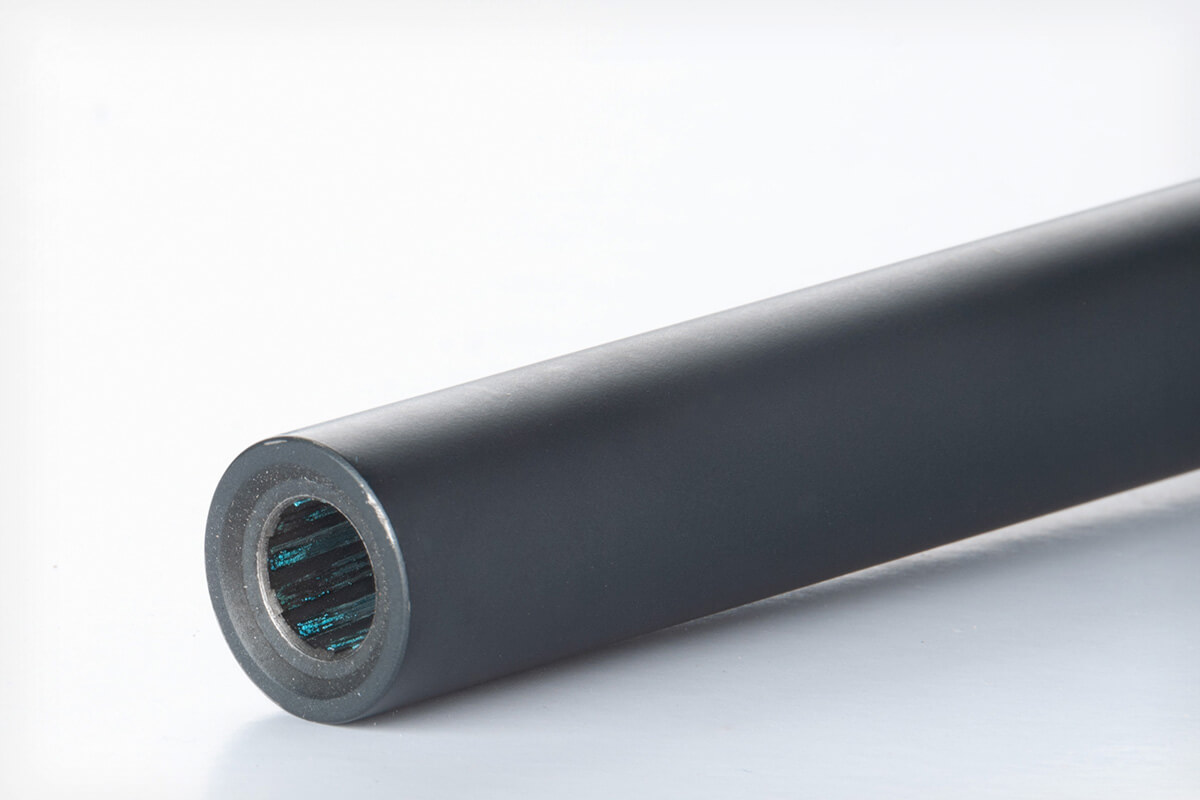
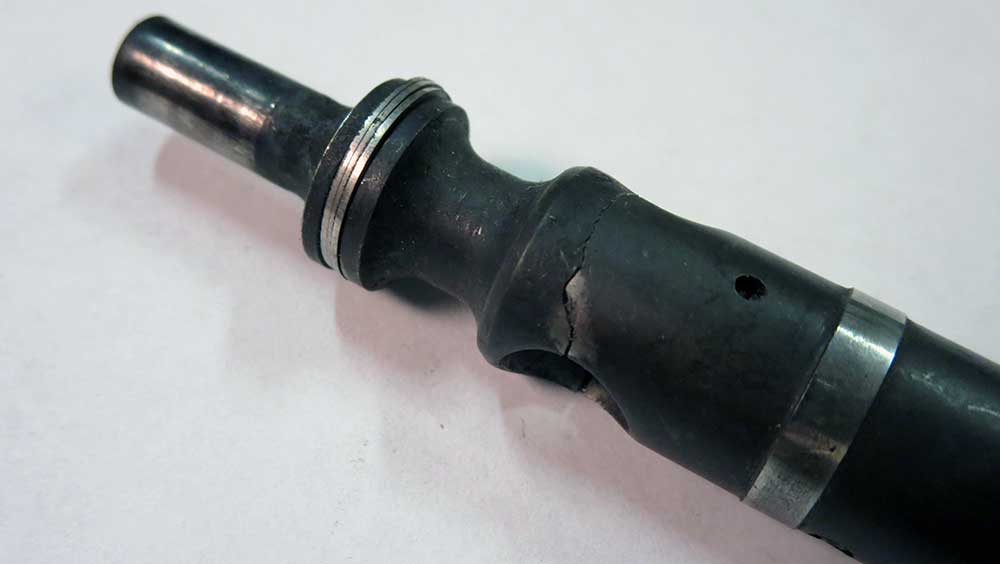
Gunpowder residue and copper bullet jacket residue both periodically need to be removed from your rifle barrel. The bluish streaks inside the muzzle are copper fouling, which oxidizes over time. This barrel needs a proper cleaning.
Once you notice a reduction in precision, or maybe before you begin working up and tuning a new handload, or even just because you like knowing your rifle’s barrel is in good health, occasionally you need to give your barrel a good deep cleaning.
Here’s how to clean most effectively, using tools and solvents that are safe for your bore and enhance accuracy.
Tools, Solvents and Oils
For starters, always clean from the breech. Unless you can’t, that is; for example when cleaning a pump-action or semiautomatic or lever-action design that doesn’t allow access to the back of the barrel.
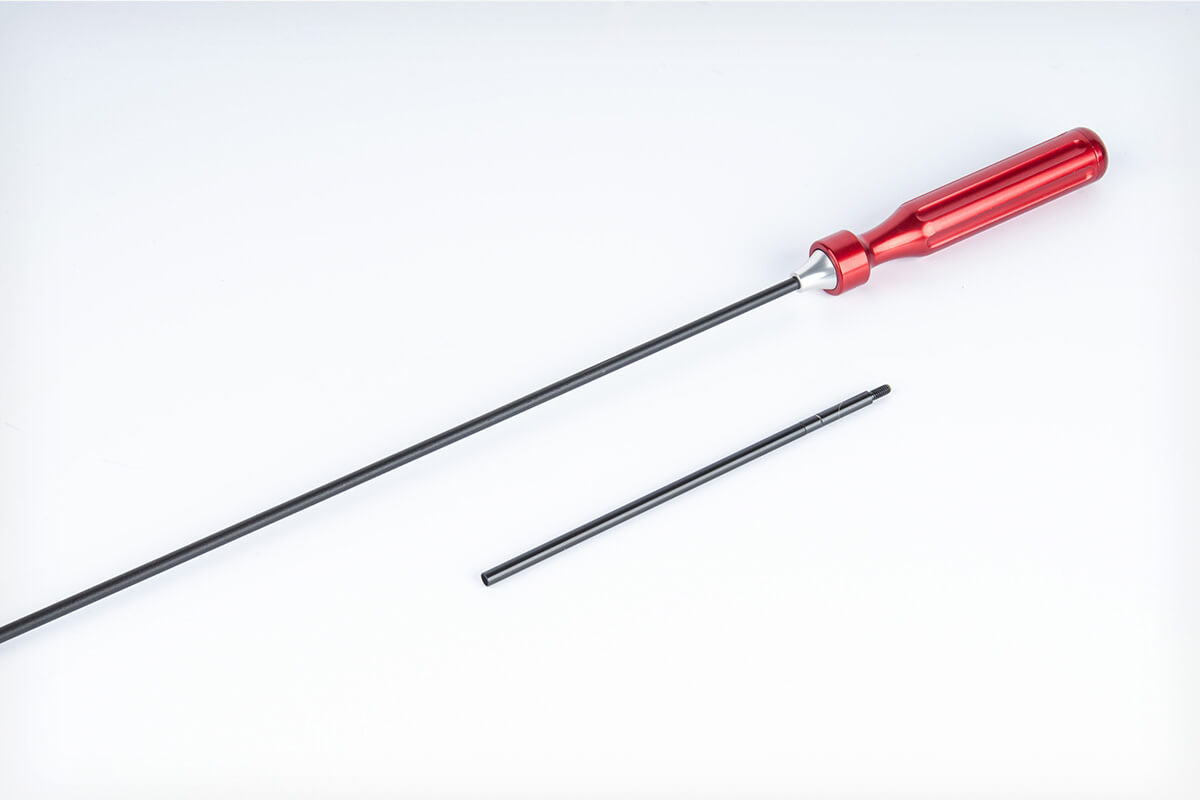
Once-piece cleaning rods are much easier on barrels than jointed, multi-piece rods, because there are no joints to flex and rub against the rifling inside. Be sure your rod has a good, non-abrasive coating.
Always use a coated, one-piece cleaning rod. Coatings can be of Teflon or any other non-abrasive finish. They prevent the sides of the cleaning rod from wearing on the rifling. This is particularly critical around the chamber throat and rifling leade area, where the rod is most likely to contact firmly and for extended length. One-piece rods don’t have flexible joints that rub unevenly up and down against the rifling inside your barrel.
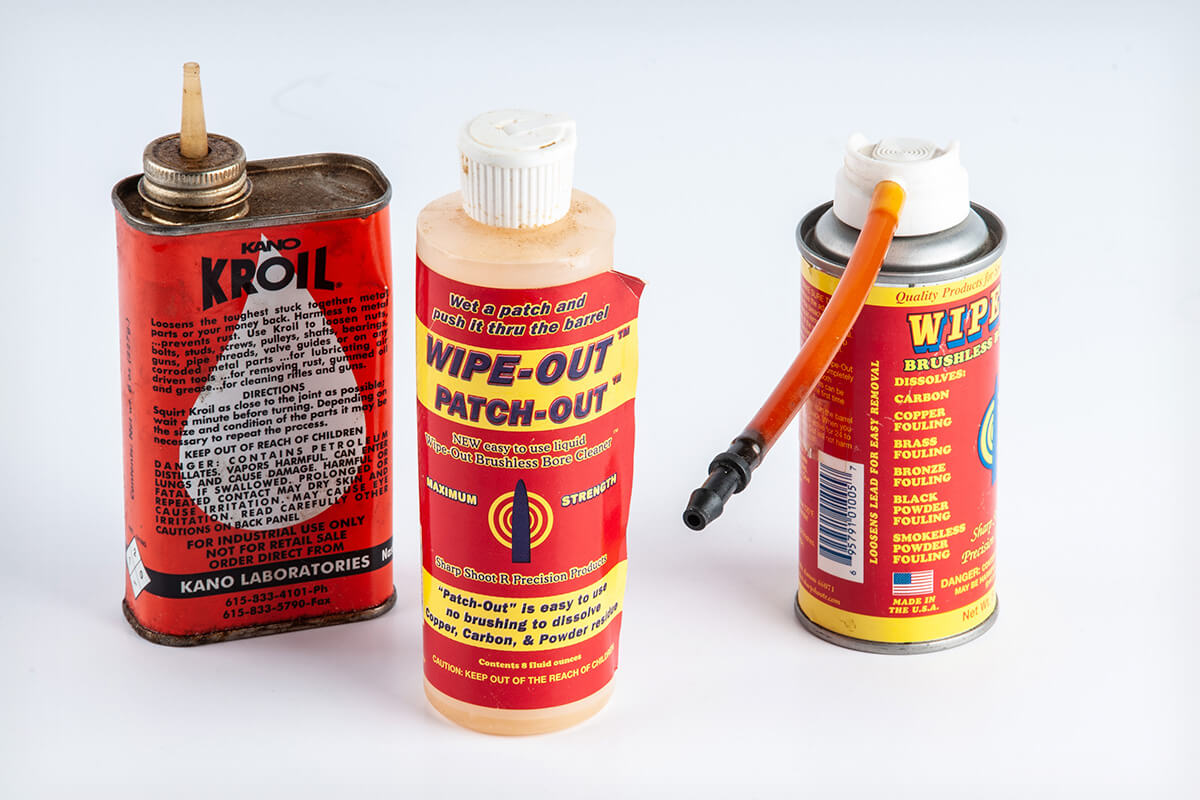
Carbon fouling can be removed pretty quickly, using cleaning patches on an appropriate-size cleaning jag. If you’re not worried about copper, use a classic mild solvent such as Hoppe’s No. 9 (properly pronounced, “Hoppy’s”). Brush with a bronze or nylon cleaning brush to loosen heavy carbon fouling and speed up the process if necessary. Hoppe’s is also an anti-corrosion agent, and a thin layer may be left in the bore as a protectant.
Copper fouling is more difficult. Because the process of removing copper automatically deals with carbon fouling as well, I generally just go straight after the copper.
If your rifle is of suitable design, always clean from the breech and use a good bore guide to protect the rifling leade from abrasion caused by the cleaning rod.
Choosing a good copper fouling solvent is critical to the health of your bore. Traditionally, the active ingredient in most dedicated copper solvents is ammonia. It works great on copper, dissolving it in pretty short order. However, it can etch the steel in your barrel, too, particularly if it’s left in for more than 10 to 30 minutes, depending on the strength of the solvent.
Modern “gentle” copper solvents utilize chemicals that are harmless to steel, and won’t harm your bore even if left in for extended periods. They take a little longer to dissolve the copper, but it’s well worth it.
It’s difficult to drive home strongly enough the risk inherent to ammonia-based solvents. Once, while touring the Norma Ammunition facility in Sweden, I had the opportunity to visit with one of the company’s lead product managers. This gentleman had qualified for four consecutive Olympics during his career. In other words, he knew shooting, and he knew rifle barrels.
He told me he’d never use any ammonia-based solvent. I asked why. “It gets into the microfractures of the steel, and keeps on working, eroding,” he responded. “Eventually, like a crevasse in a glacier, the inside of those microfractures get hollowed out, leaving pockets in the steel.
Cleaning from muzzle is sometimes necessary because there’s no access from the breech end. Use a muzzle-end bore guide to prevent the rod from wearing on the rifling around the muzzle crown.
“Plus, it’s very hard to get out,” my friend continued. “It migrates into every pore, and can’t just be wiped out with dry patches. And a coat of oil on top of it doesn’t neutralize it; it just traps it inside the pores of the steel.”
That wasn’t a pretty picture, particularly because I’d cleaned the bore of my favorite custom 6.5-284 rifle with an aggressive ammonia-based copper solvent just before flying to Sweden. “Can you get it out?” I asked.
“Yes…” came the response. “Flush your bore with hot water for 10 minutes every day for five days after using ammonia in it.”
I haven’t used ammonia-based copper solvent since. By the by, you can always tell an ammonia solvent by its sharp, astringent smell.
Once your bore is clean and well dried out, you’ll want to lay down a thin layer of rust and corrosion preventative, particularly if you live in humid climates. Any quality gun oil will serve, but a thin, penetrating oil called Kroil is a magic ingredient for protecting and “seasoning” a bore. More on seasoning in a bit.
Many types of copper-removing solvents contain ammonia and are quite aggressive. If left in the bore too long, they’ll etch the barrel steel, causing irreparable damage. Opt instead for a non-ammonia solvent such as Bore Tech Eliminator or the Sharp Shoot’R Wipe Out and Patch Out shown here. Use Kroil—a premium penetrating oil—to season the bore and as an anticorrosive.
Barrel Cleaning Process
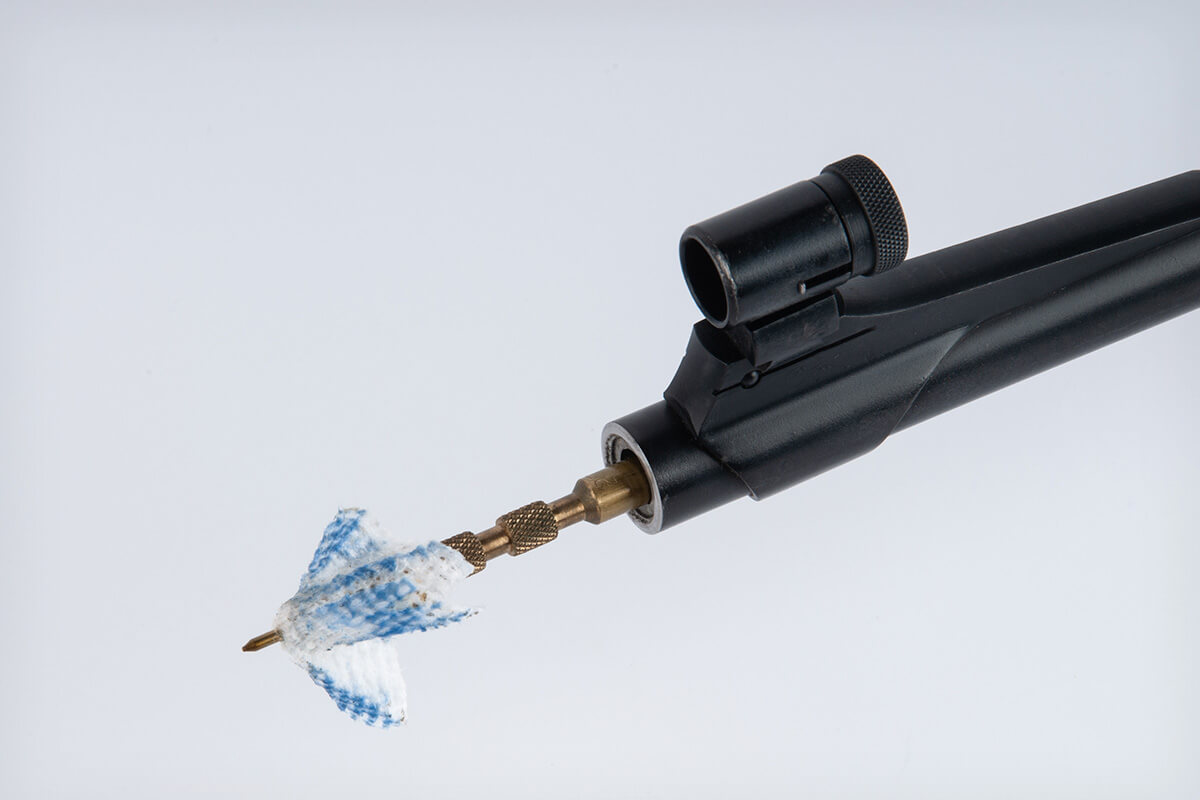
My first step in cleaning a badly fouled rifle is to squirt Wipe Out foam in from the chamber end. Put a Ziploc bag over the muzzle to catch drips—it’s powerful soapy stuff.
About 30 minutes later I wipe the foam residue out. Most of the carbon fouling comes with it. If there’s significant copper in your bore, the liquid residue will be blue, as will your patch.
Next, I insert a bore guide to protect the chamber throat from wear, and push three to five patches wet with Patch Out solvent through, using a snug-fitting jag. Then I wrap a patch around a nylon brush that’s one bore size too small, wet it with Patch Out, and scrub the bore. I make about 20 passes from breech to muzzle and back.
Back to the jag, and patches wet with Patch Out. A half dozen or so should have the bore pretty clean, and patches should be coming out nearly spotless.
If not, you may have a really dirty bore. Not to worry; just start the process again. Even stubborn fouling should dissolve and scrub out after two or three cycles.
Once wet patches are coming out perfectly clean, I remove the bore guide and dry the bore out with a series of dry patches. When truly dry, the bore should get almost a rubbery feel, and the dry patches should become slightly more difficult to push through.
As long as your solvent-soaked cleaning patches keep coming out blue, there’s still copper fouling in your bore. Keep working until they come out clean.
Finally, dampen a patch with Kroil (obtainable from some hardware stores and online) and push it slowly through the bore. Turn the patch over on your jag, presenting a fresh surface on the outside, and push it through again.
Kroil, like a fine seasoning oil applied to a high-quality cast-iron pan or Dutch Oven, gives the surface of the steel a non-stick attribute. Treat with Kroil after every cleaning, and your rifle will foul slower, and clean easier.
Wipe down your bolt body and bolt face with the Kroil patch, put a dab of bolt grease on the bolt locking lugs and cocking piece camming surfaces, and you’re done.
If you hunt humid climates, particularly in areas with salt-sea air, you’re ready for the field. However, the thin protective layer of oil in your bore can cause a slight point of impact shift and minimal change in velocity for the first shot or two, so if you hunt dryer, open-country areas, it’s worth firing a few fouling shots before heading afield.
With your bore clean and protected, your rifle is kept healthy and prepped to perform its best at the moment of truth.
How to Set Up and Use Your Bolt-Action Rifle Sling
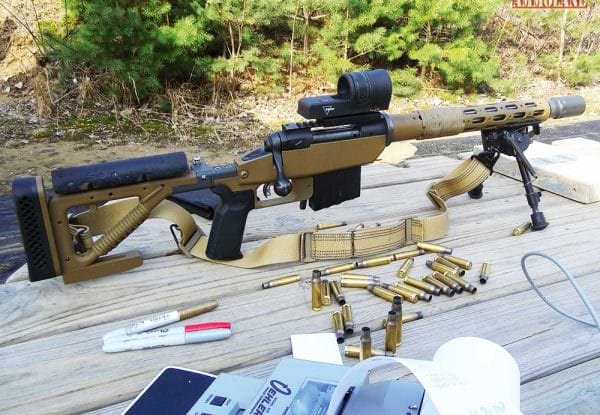
Let’s talk about bolt-action rifles and their slings. Many times at classes and competitions, I’ve noticed that shooters simply took the sling off their AR-15 and used it with their bolt gun. Depending on the circumstances that’s perfectly fine as there are slings specifically designed for precision shooting that can bring a lot to the table. So, I’m going to approach this subject from the perspective of “that’s okay, but this is better”.
The “OK” Solution
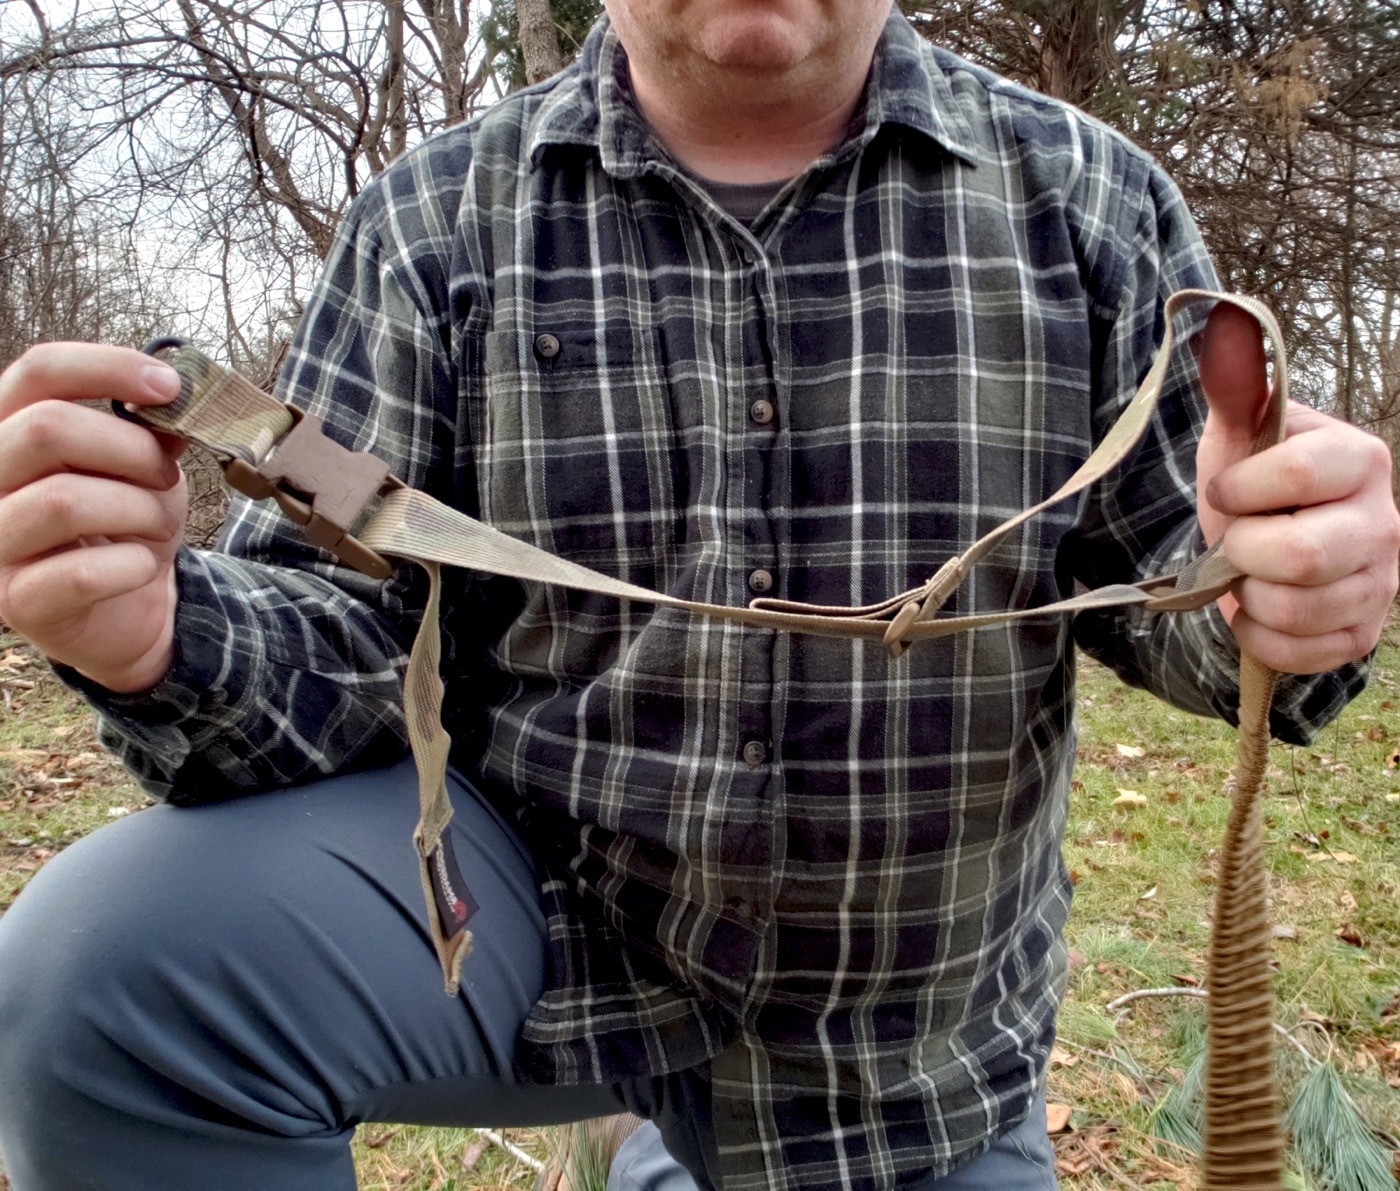
A two-point sling taken off an AR and used on a bolt gun is probably going to be an acceptable solution for most situations. I tried it by taking my sling off the SAINT Victor and attaching it to the Model 2020 Waypoint, and by coincidence the length of the sling was just right.
We can use slings differently on a bolt-action rifle than how we might use them on an AR. Here, the author is showing a sling loop and adjustment tail.
This won’t always be the case and, while it’s unlikely I would carry the Waypoint like an AR, I could use the same methodology to make the carbine sling work. The body mechanics are largely the same and I want the sling to pull tension across my back to help anchor the rifle in my shoulder and use bone support to steady my shot.
A Better Solution
When it comes to being as stable as possible with a sling, I find AR slings to be lacking with heavier bolt guns or precision rifles. I like to have a sling that is still easily adjusted with one hand and uses some sort of quick disconnect feature, but is also wider than a typical AR sling. The adjustability makes it easier to compensate for different shooting positions or clothing items being worn.
In years gone by, dedicated precision rifle slings took some trial and error to get set up and even then were only good for use in one or two positions. I also want it to have a shooter’s loop that I can pass my arm through and cinch down to help get it even more stable. For me personally, using the shooter’s loop stabilizes the rifle much better than if I was just using the sling pulling tension across my back.
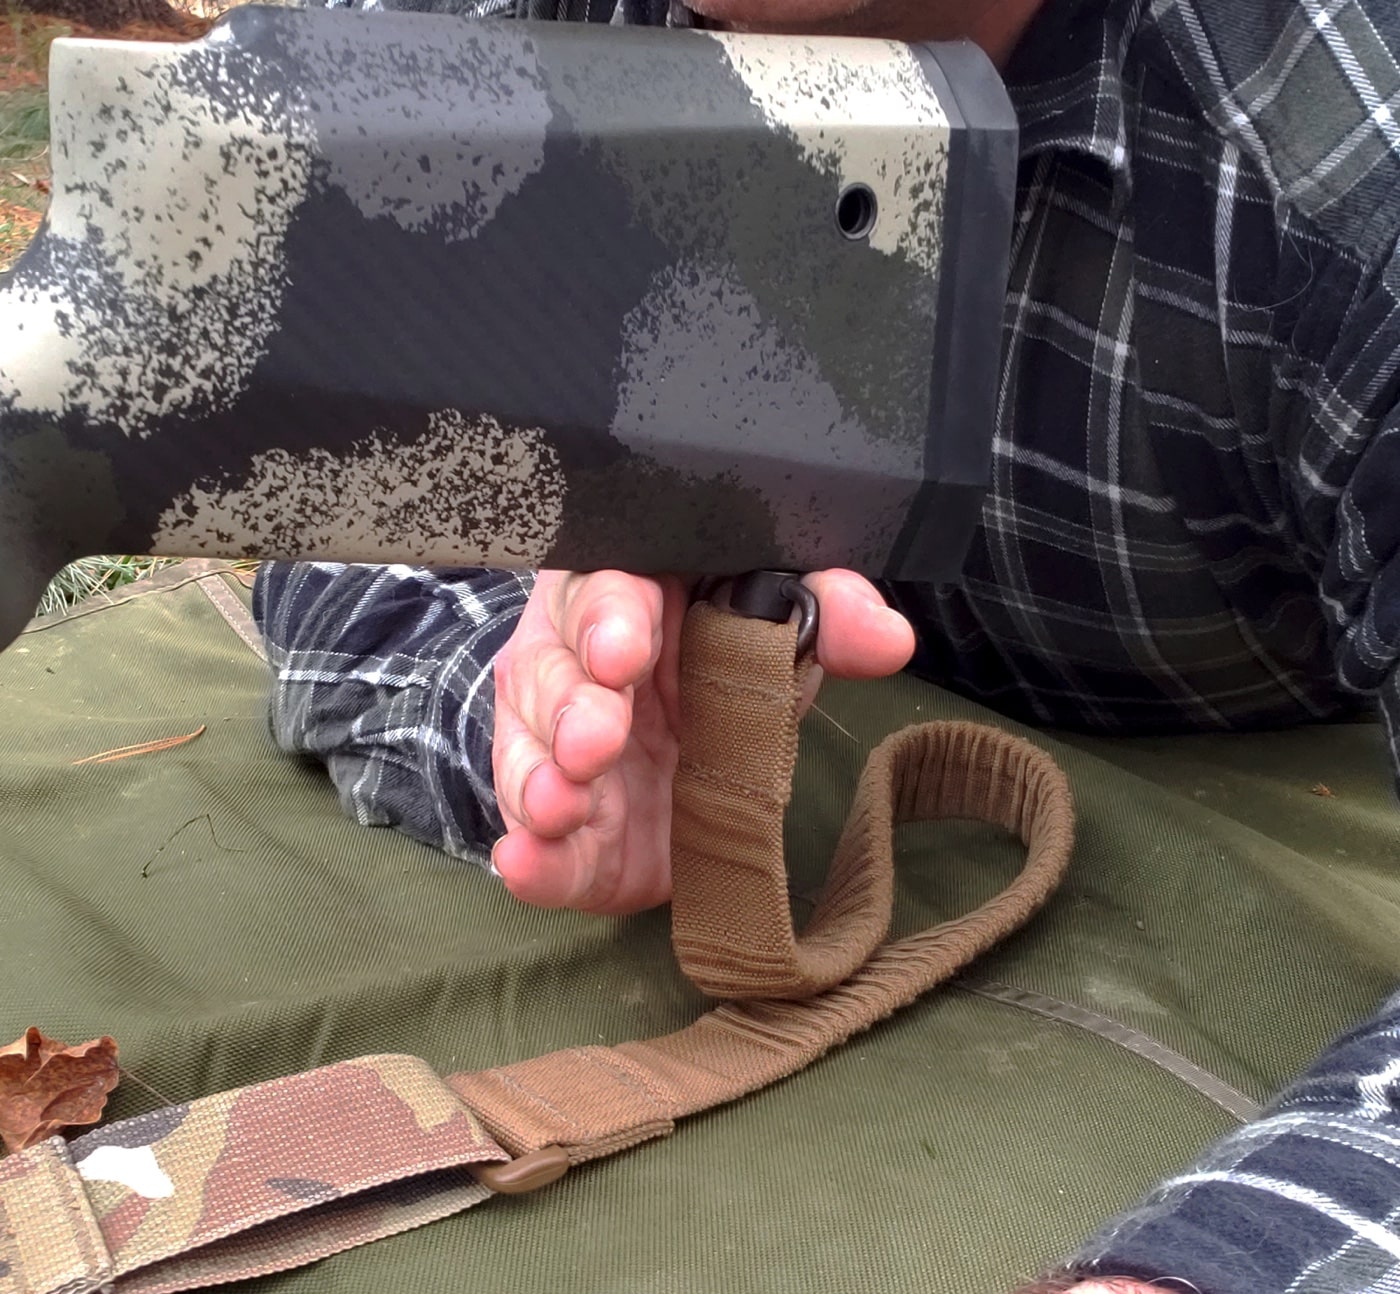
Looping Up
Sadly, learning to loop up in a sling is a dying art outside of specific shooting disciplines, but it’s a worthwhile skill to pick up in my opinion. The Waypoint has sling attachment points on both sides of the stock and the bottom if you add an M-LOK QD mount.
“Looping up” is a bit of a lost art. However, it’s a technique worth learning as it can provide good sling tension and a stable platform.
If you’re a right-handed shooter and the front is connected on the left side or the bottom of the stock, the sling needs an outward twist before passing your arm through the sling loop. This is so the sling runs flat across the hand; otherwise it will have a twist in it. If the sling is connected to the right side of the stock, then it’s not necessary to give the sling any twist, just pass the arm through the loop.
Get the sling as high up on the bicep as possible and then tighten the loop. Some slings tighten automatically as you push the gun outwards, some slings require a keeper to be slid down — it just depends on the design. The added width of the sling is more comfortable around the arm and back of the hand in my experience.
Adjust the tension to the point where it takes a little effort to get the rifle into the pocket of the shoulder. I know I have good sling tension when I can let go of the grip and the rifle stays in place without input from my muscles.
Shooting With the Sling
Prone: You can loop up to shoot from a prone position, but most modern long-range rifles have a bipod so it’s not usually necessary. A sling can be helpful in those instances where you may have forgotten your rear bag, because I’m sure most shooters have done that at one time or another. It’s a simple technique.
The prone sling hold can help you when shooting prone without a rear support bag.
Grab the sling at the rear connection point and hold it firmly so that the stock rests in the “V” formed between your thumb and fingers. Gripping the sling helps anchor the stock to my hand and for me, it’s better than having no bag at all.
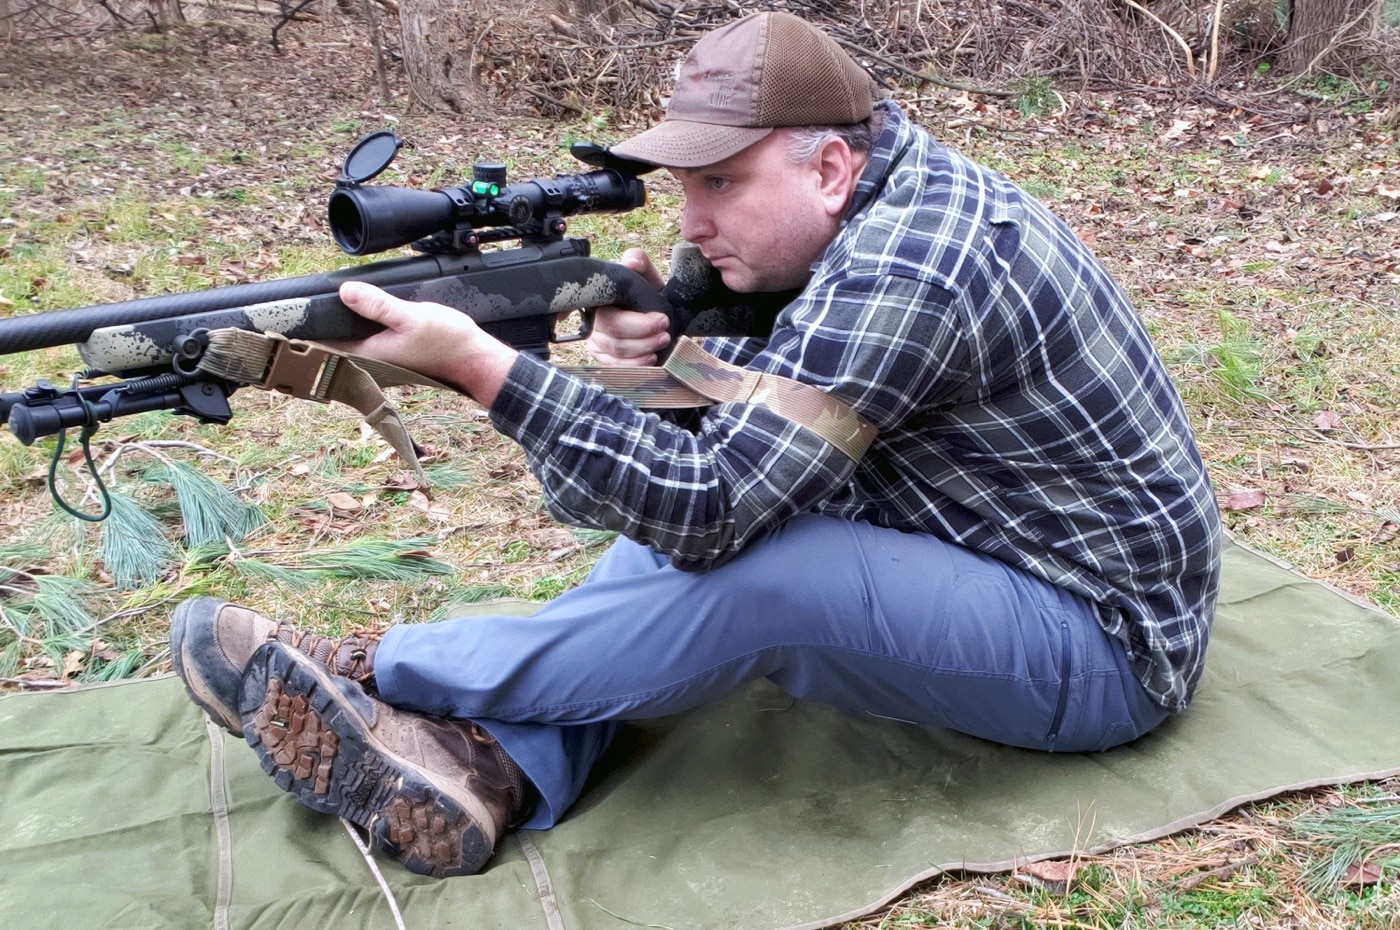
Sitting: When using the shooter’s loop the sitting position can be very stable, and there are variations on this position depending on the situation and your flexibility. If the terrain is pretty flat and I need to go into a sitting position, I like to use a crossed ankles position.
Combining a sitting position with being looped up can provide a very stable shooting platform when being prone isn’t possible.
This position gets me low and allows me to get my support-side elbow forward of my knee for good bone support. For some extra stability, I’ll put my rear bag under my right leg to take up some of the dead space between it and the ground.
In rolling terrain where I may have to shoot uphill or downhill, I’ve found that an open-legged sitting position works pretty well. The legs are spread about shoulder width apart and the elbows are either rested against the inside of the knees or forward of them to get bone support.
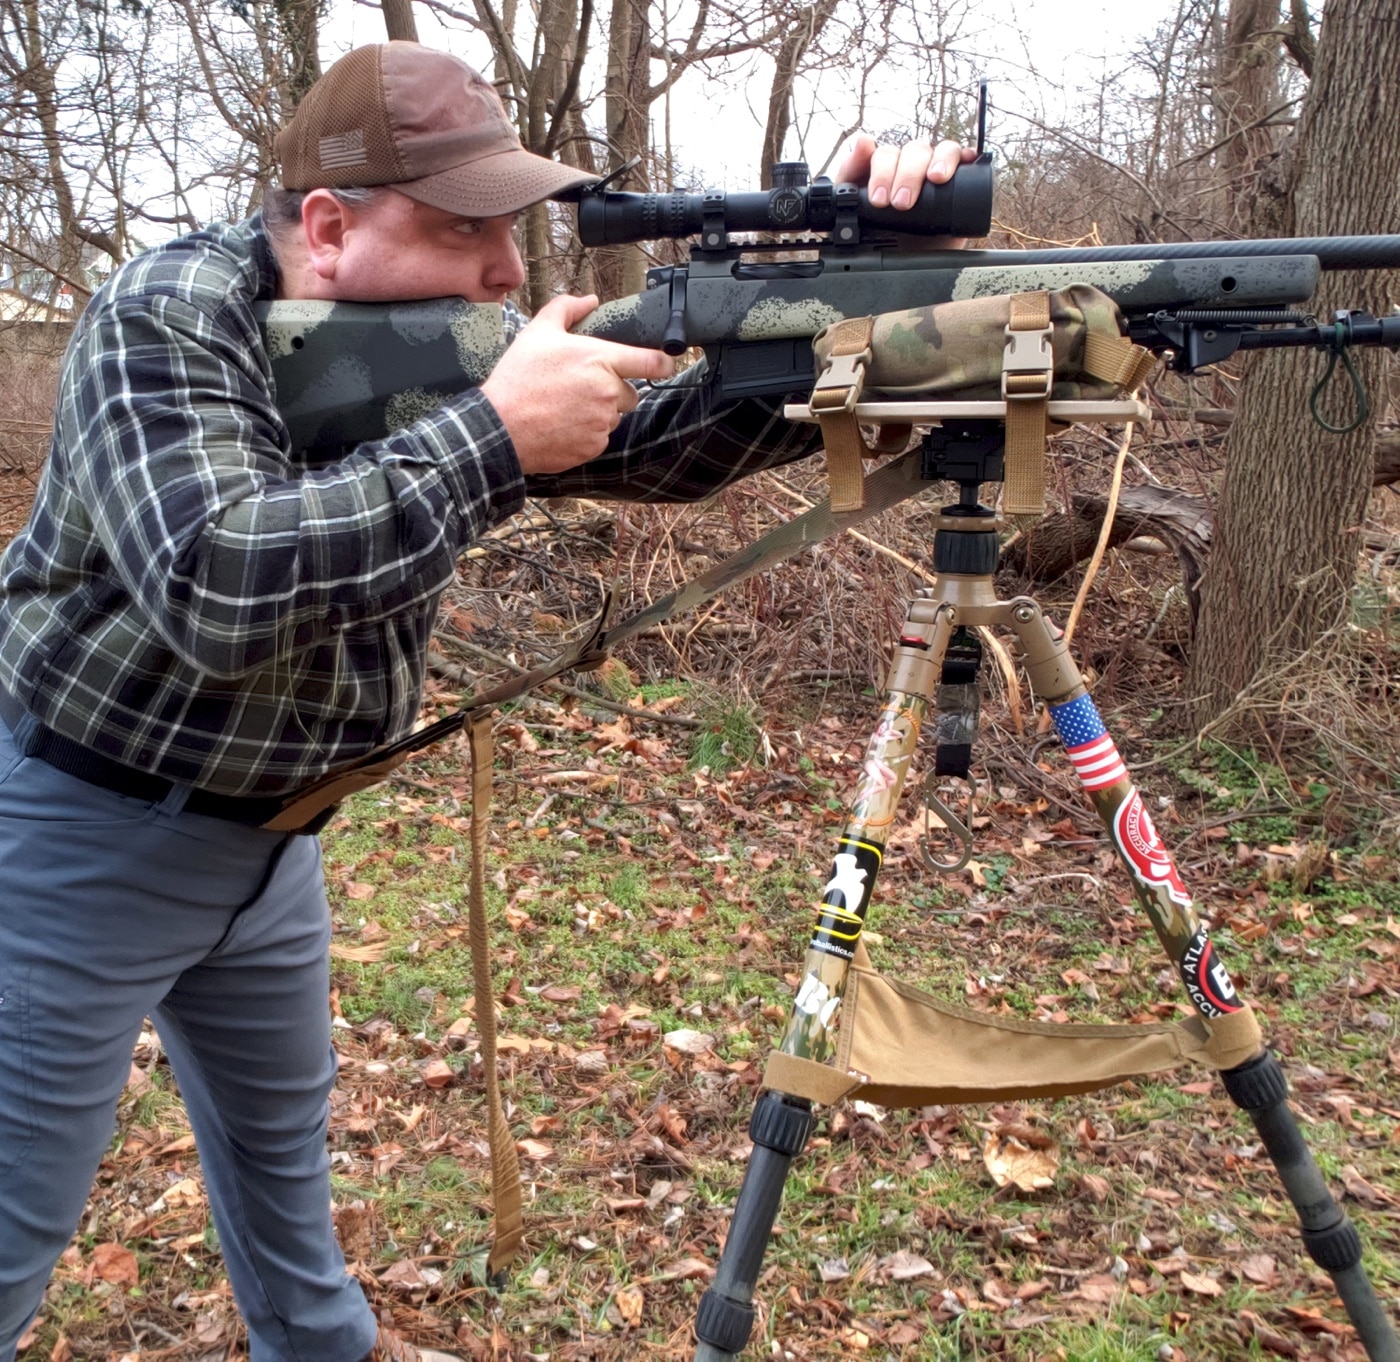
Tripod Shooting
Tripods have become popular tools for the long-range hunter and marksman, while probably also contributing in part to the decline of the sling being used as a shooting aid. The sling can be a supplemental accessory that makes shooting off of a tripod more stable from most positions.
One technique is to wrap the sling around the tripod leg opposite the front attachment point at least two times. When I’m in position, I can use my support hand to twist the sling tighter around the leg and suck the gun down into the tripod. This helps to reduce my wobble zone and be very stable, even for a standing shot.
Combining a sling and a tripod can give you a very stable platform from which to shoot. Here, the author demonstrates clipping the sling to the body.
This next technique will depend on how far the loop portion can be run out, but if the loop can extend from the front connection back to the recoil pad, it’s probably long enough. Take a climbing-style carabiner and attach it to the belt, not the belt loop as it’s not strong enough. I used a Velcro strap from an Armageddon Gear bag to do this, but even 550 cord will work.
Clip into the loop on the sling and squat a little to pull the gun down, tightening the sling as necessary. I’ve found this method also works well in situations where the gun needs to be at a weird height that wouldn’t allow for normal sitting, kneeling or standing shooting position.
Basically, my weight is partially supported by the rifle since I’m connected via the sling, which can take some of the stress off my legs as I crouch, while also sucking the gun down into the front support. It’s not for every occasion, but I have been successful in hitting small pepper poppers at long distance using this method.
Storing the Sling
Just like with an AR-15, there are times when you want to keep the sling attached to the rifle but need to keep it tidy so it doesn’t snag on everything. The easiest way is to S-fold the sling, using a rubber band to hold it together, and finally tightening the sling so it stays tucked into the rifle. Just like with the AR, the rifle is still usable and the sling is ready for use with a quick tug.
Closing Thoughts
The sling is a traditional tool and, like many traditions of late, they seem to be going by the wayside for more modern solutions. That doesn’t mean the sling has become antiquated; it still has a lot of value for those that choose to maximize its utility and potentially lead them to be better shooters.
The techniques I’ve discussed in this article are somewhat universal; they’ll work with everything from historical military rifles or modern-day sporting rifles. I encourage all shooters to learn how to shoot with a sling and even if you only need to use it once to make a shot, it would’ve been worth it.
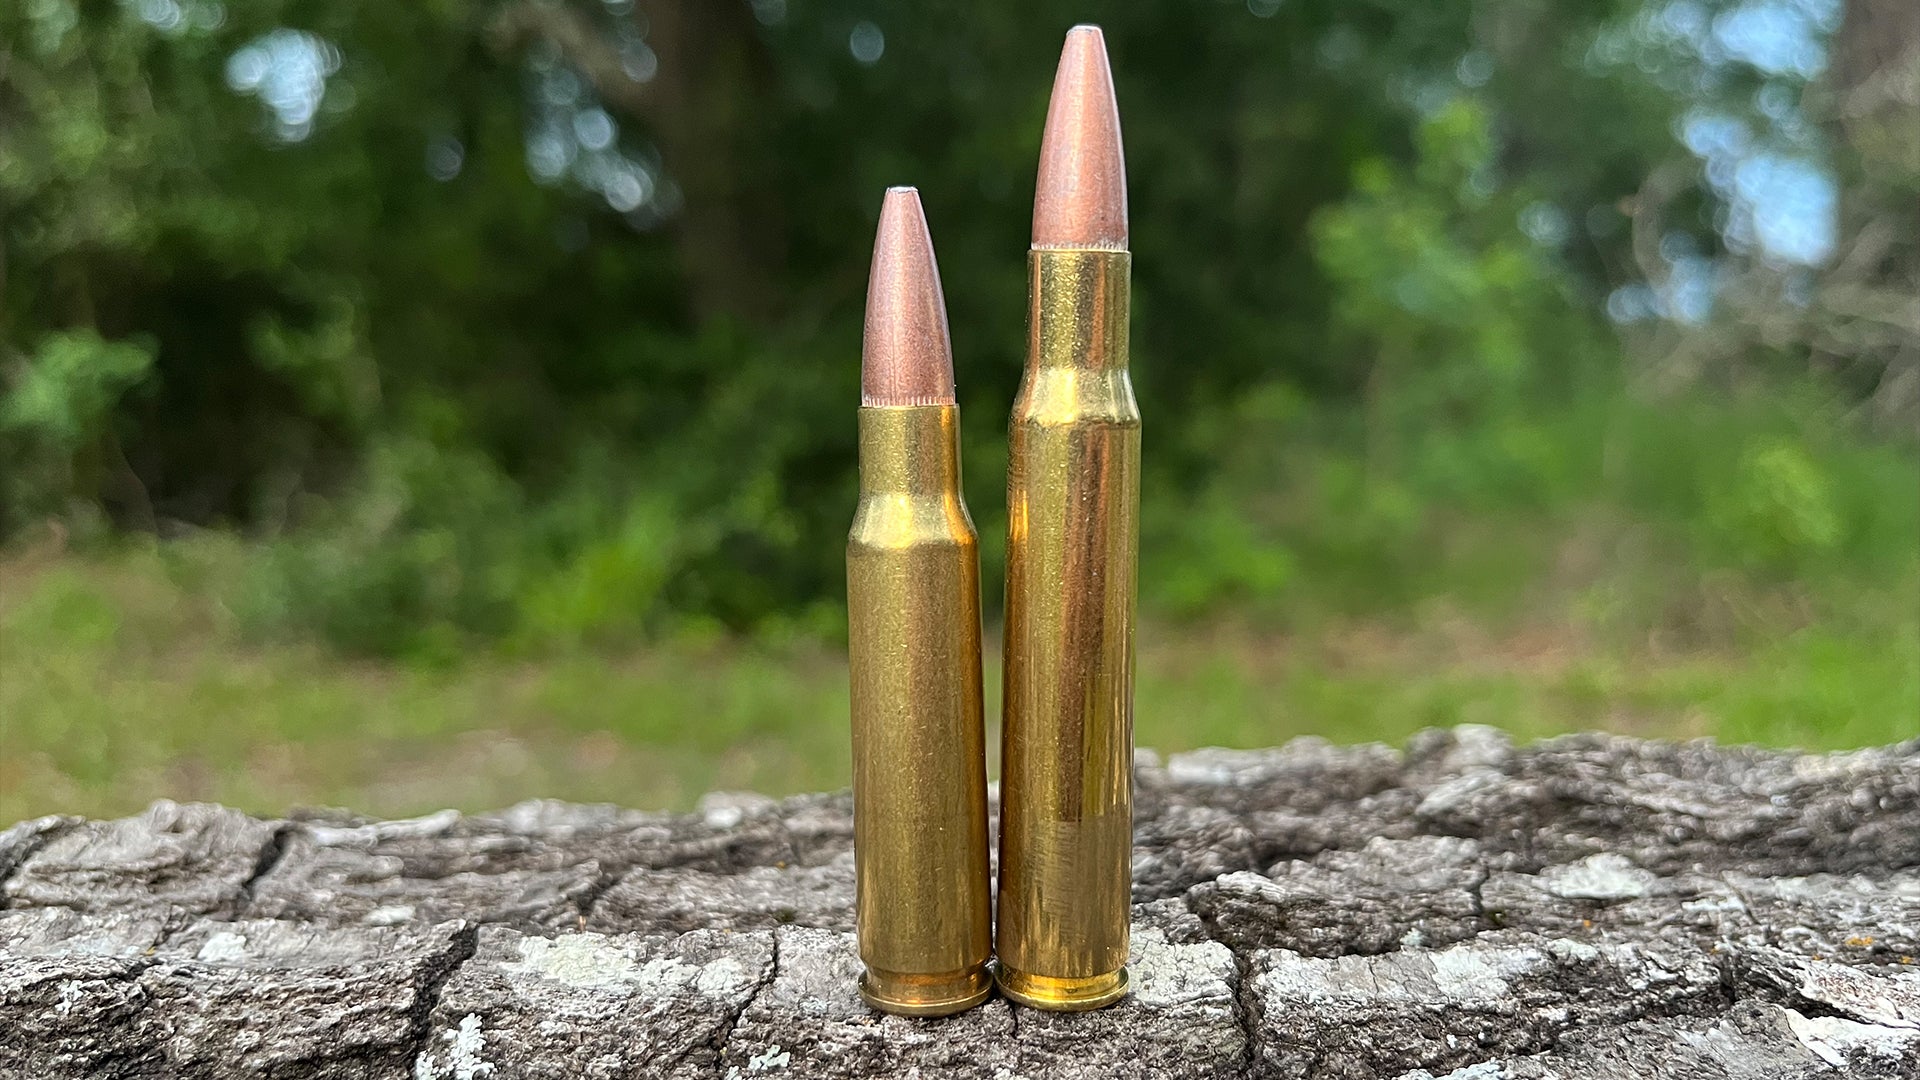
Since its inception, there has been an ongoing debate as to whether the 308 Winchester is a superior cartridge over the 30-06. Although this article will not settle this age-old debate once and for all, it should shed light on some of the benefits that these cartridges have over each other.
Similarities
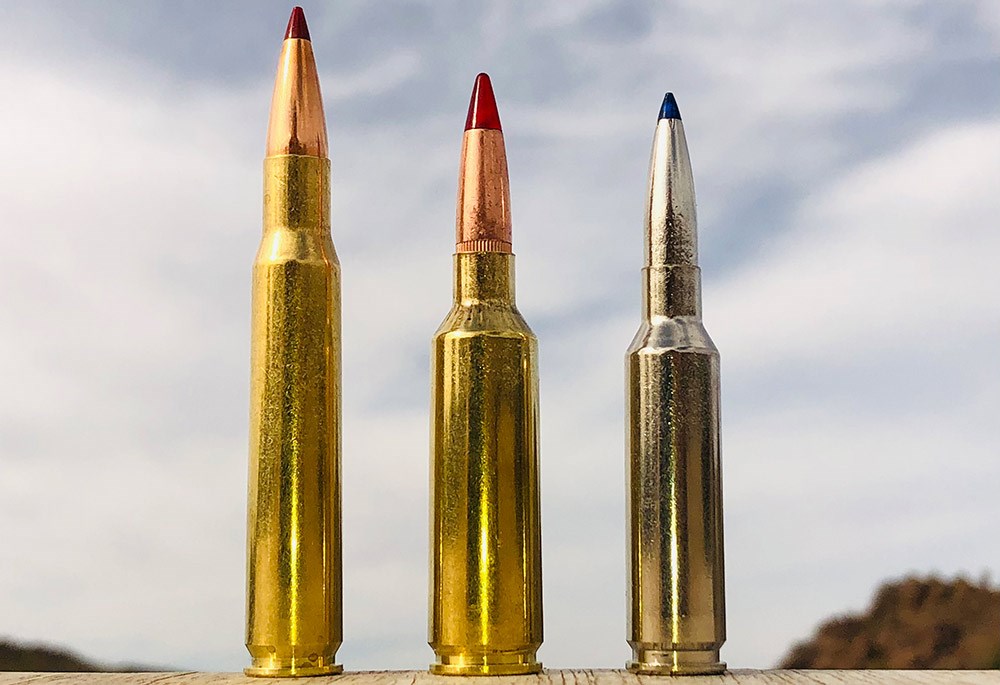
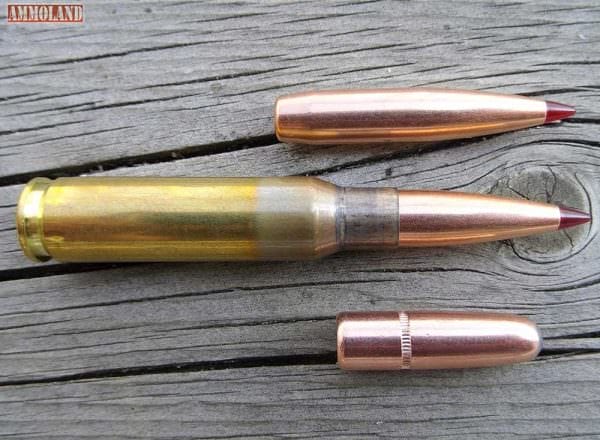
As far as similarities go, the 308 Winchester and the 30-06 do not share many. Perhaps the biggest similarity, which is primarily why there is even a debate in the first place, is that they share the 30 caliber bore size. Both cartridges utilize 0.308” diameter bullets, meaning that stocking up on this size would be useful for reloading either cartridge.
Along with sharing the same bore size, the 308 and the 30-06 share the same rim diameter (case head) of 0.473”. This is the same case head size used by many standard short action offerings as well as nearly all standard long action offerings. With this case head size, both cartridges almost exclusively use large rifle primers.
Now that we have the similarities out of the way, how do these cartridges compare?
Physical Differences
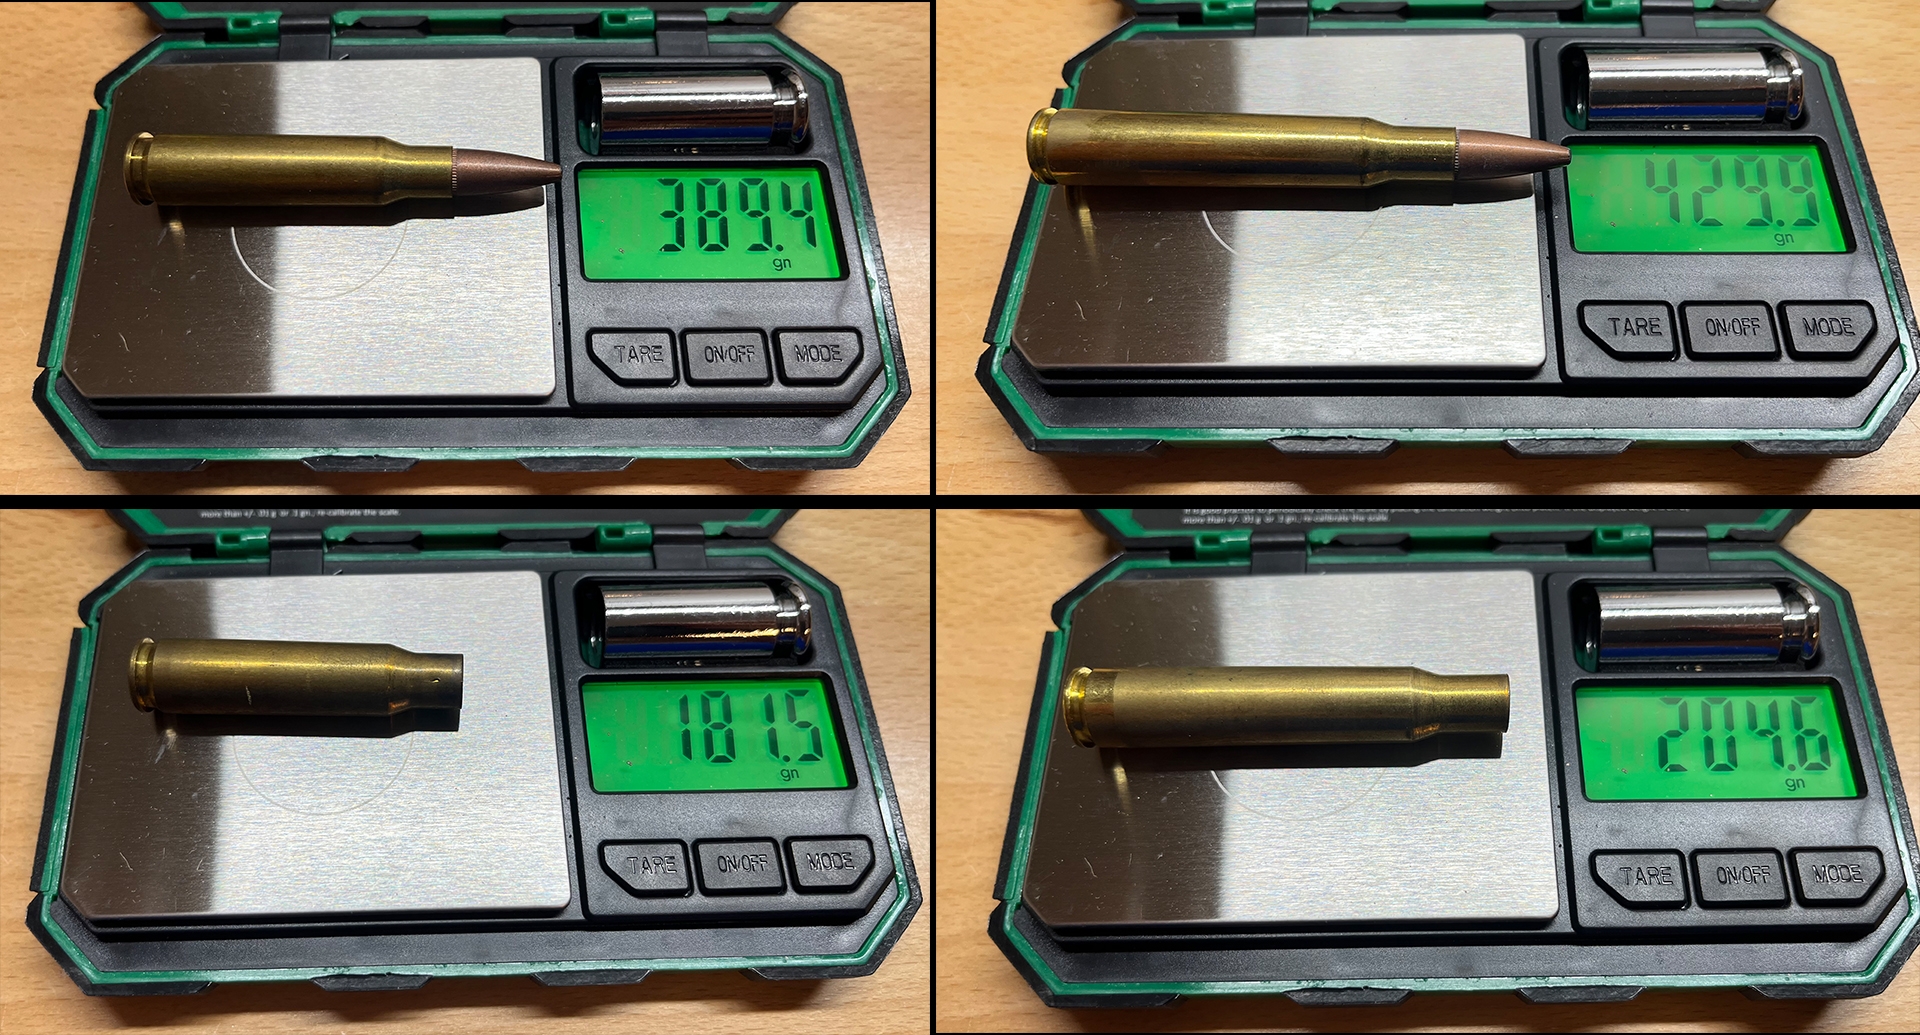
In terms of appearance, it is obvious that the 30-06 stands much taller than the 308 Winchester. At a nominal case length, an empty 308 case stands at 2.015”. An empty 30-06 case on the other hand, stands at 2.494” which translates to a 23.8% increase in length over the 308.
As you might expect, this additional length gives the 30-06 a large edge in terms of case capacity. The 308 Winchester has a case capacity of approximately* 56 grains of H2O. The 30-06 on the other hand, will hold approximately* 68 grains of H2O, or 12 grains more than the 308. This translates to an increase in capacity of H2O (not usable capacity) of about 21.4% more than the 308, which is substantial.
Contrary to common belief, however, extra length is not always a benefit. All this extra length comes at a cost, which is primarily weight. A spent 30-06 casing weighs approximately* 12.7% more than a spent 308 casing. A factory loaded 30-06 cartridge weighs approximately* 10.4% more than a 308 with the same components.
Due to its increased length, the 30-06 is limited to long actions whereas the 308 is almost exclusively chambered in short actions. Short actions provide less bolt travel for faster follow up shots, along with the added benefit of weighing slightly less than long action counterparts.
Now that we have gotten these specs out of the way, how do these cartridges compare in terms of performance?
Factory Ammo
Typically, factory loaded 30-06 ammo will land somewhere between 100-150 feet per second faster than the 308 Win when using the same bullet weight. Some load offerings may fall slightly outside this range, though it should be a good estimate. In general, lighter projectiles will fall on the low end of this range, whereas heavier projectiles typically fall on the higher end of this range.
If we take a look at a 150-grain soft point fired from the Federal Power Shok line of ammo, we see that the 308 Win has a muzzle velocity of 2820 feet per second. Using the same line of ammo and bullet weight, the 30-06 has a muzzle velocity of 2910 feet per second. This is only an increase of 90 feet per second or about 3.2% over the 308.
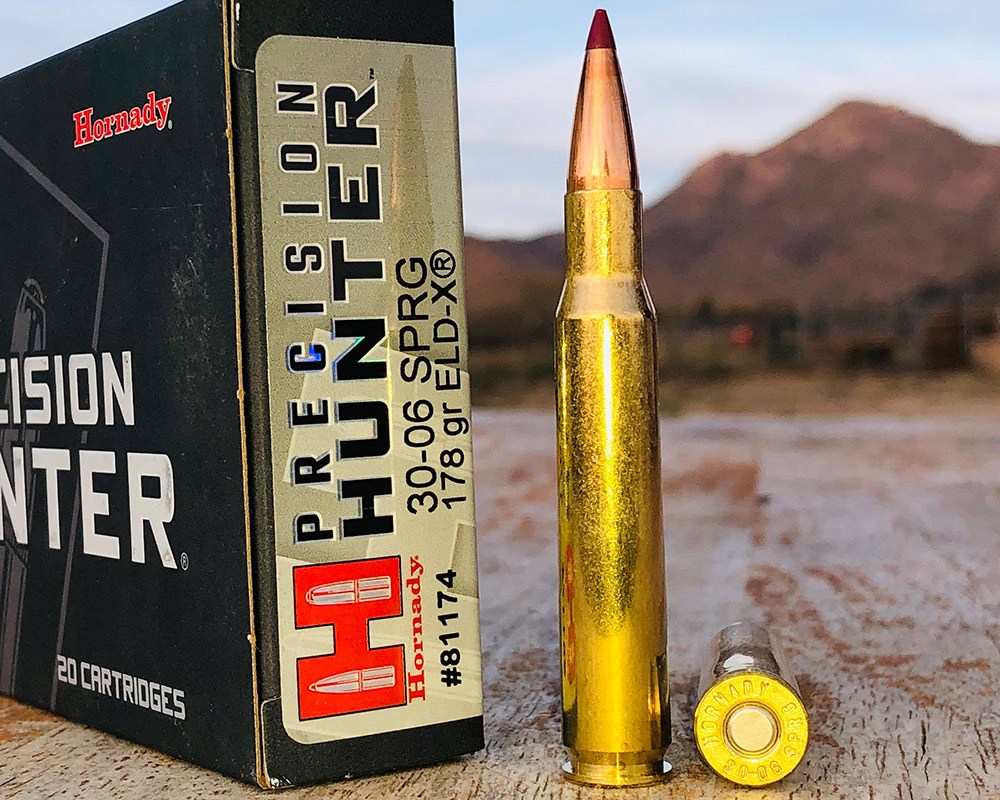
With a 178 gr ELD-X fired from the Hornady Precision Hunter Line of ammunition, the 308 Win has a muzzle velocity of 2600 feet per second. Using this same line of ammo and bullet weight, the 30-06 has a muzzle velocity of 2750 feet per second, which is an increase of 150 feet per second or about 5.8% over the 308.
A 5.8% increase does not seem like all that much, so how does it translate in the field?
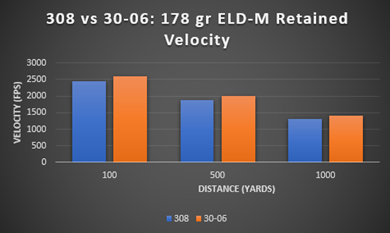
At 100 yards, the 30-06 retains 5.9% more velocity than the 308. At 500 yards this number jumps to 6.7% and at 1000 yards the 30-06 retains 6.8 % more velocity than the 308.
At 100 yards, the 30-06 retains 12.2% more kinetic energy than the 308. At 500 yards this number jumps to 13.7% and at 1000 yards the 30-06 retains 14% more kinetic energy than the 308.
With a zero value of 100 yards, the 30-06 is 13.2% flatter shooting than the 308 at 500 yards. At 1000 yards, this value drops slightly to 12.7%.
*Values were gathered using a ballistic app with a reference value of sea level at 80 degrees Fahrenheit with 78% humidity.
Reloads
Compared to factory-loaded ammunition, the 30-06 generally gains slightly more velocity when reloaded. With standard load recipes from reputable sources, the 30-06 is generally between 150-200 feet per second faster than the 308.
With its somewhat limited case capacity, the 308 Winchester is not optimal with bullets weighing over 175 grains. Typically, the heavier a bullet, the longer it will be. This increased length must go somewhere, which starts to eat into the 308 Winchester’s somewhat limited case capacity.
With a healthy increase in case capacity, the 30-06 shines over the 308 when using heavy projectiles. With a proper powder and bullet combination, the 30-06 can fire projectiles up to 220 grains at reasonable velocities. Bullets of this weight can be more effective on larger game, though they will not have as flat of a trajectory as most lighter projectiles.
Rifle Options
When choosing a rifle cartridge, one of the biggest factors to consider is whether there is a rifle offered that will fit your needs. Although, it would be hard to walk into a gun store and not find a rifle chambered in either one of these cartridges, the 308 Winchester has a major advantage when it comes to options.
When it comes to bolt action rifles, both cartridges are very popular chamberings. Although the 30-06 is a very popular bolt action offering, it is limited to standard long actions which are not produced by every manufacturer. As a short action cartridge, the 308 Winchester is offered in a wider range of bolt action rifles.
In terms of semi-auto rifles, the 30-06 is not a very popular offering, especially in new production rifles. The 308 on the other hand, is currently one of the most popular calibers chambered in semi auto rifles. With the vast number of AR-10 style rifles, along with many other platforms, it is easy to see why.
Summary
When it comes to ballistics, there is no denying that the 30-06 outperforms the 308 Winchester. Regardless of bullet weight, the 30-06 will be faster than the 308 (though it may only be marginally with lightweight bullets). If you are dead set on using bullets heavier than 175 grains, the 30-06 is a clear winner if ballistics is the only metric you’re after.
The question becomes whether this slight advantage in ballistics is enough to compensate for the weight savings and compactness of the 308. Along with these benefits, the 308 Winchester has an almost endless number of rifles (especially semi-auto) available to fit almost exactly what you need.
Either way you look at it, both cartridges have some benefits over each other. It would be hard to make a bad choice with the 30-06 or the 308 Winchester as both cartridges have earned an excellent reputation over the years.
*The case capacities listed represent the approximate amount of H2O that will fit inside an empty case. These values can vary based on the manufacturer as different companies will typically result in slightly different case capacities.
The case weight percentage difference is based on Federal Champion head-stamped casings. The ammunition weight percentage difference is based on Federal Fusion 165 gr soft point loads in each cartridge.
–Banana Ballistics
Banana Ballistics
Banana Ballistics is a YouTube channel based around firearms related content. Whether videos involve penetration testing, cartridge breakdowns, or anything else firearms related, Banana Ballistics is dedicated to making the content as entertaining and educational as possible.
The Best Pistol Zero: What It Is & What Goes Into It
IT IS YOU, NOT THE GUN
A frequent topic of discussion and the occasional internet shitstorm is that of the pistol zero. Let’s peel back a layer and examine what it is and what goes into it.
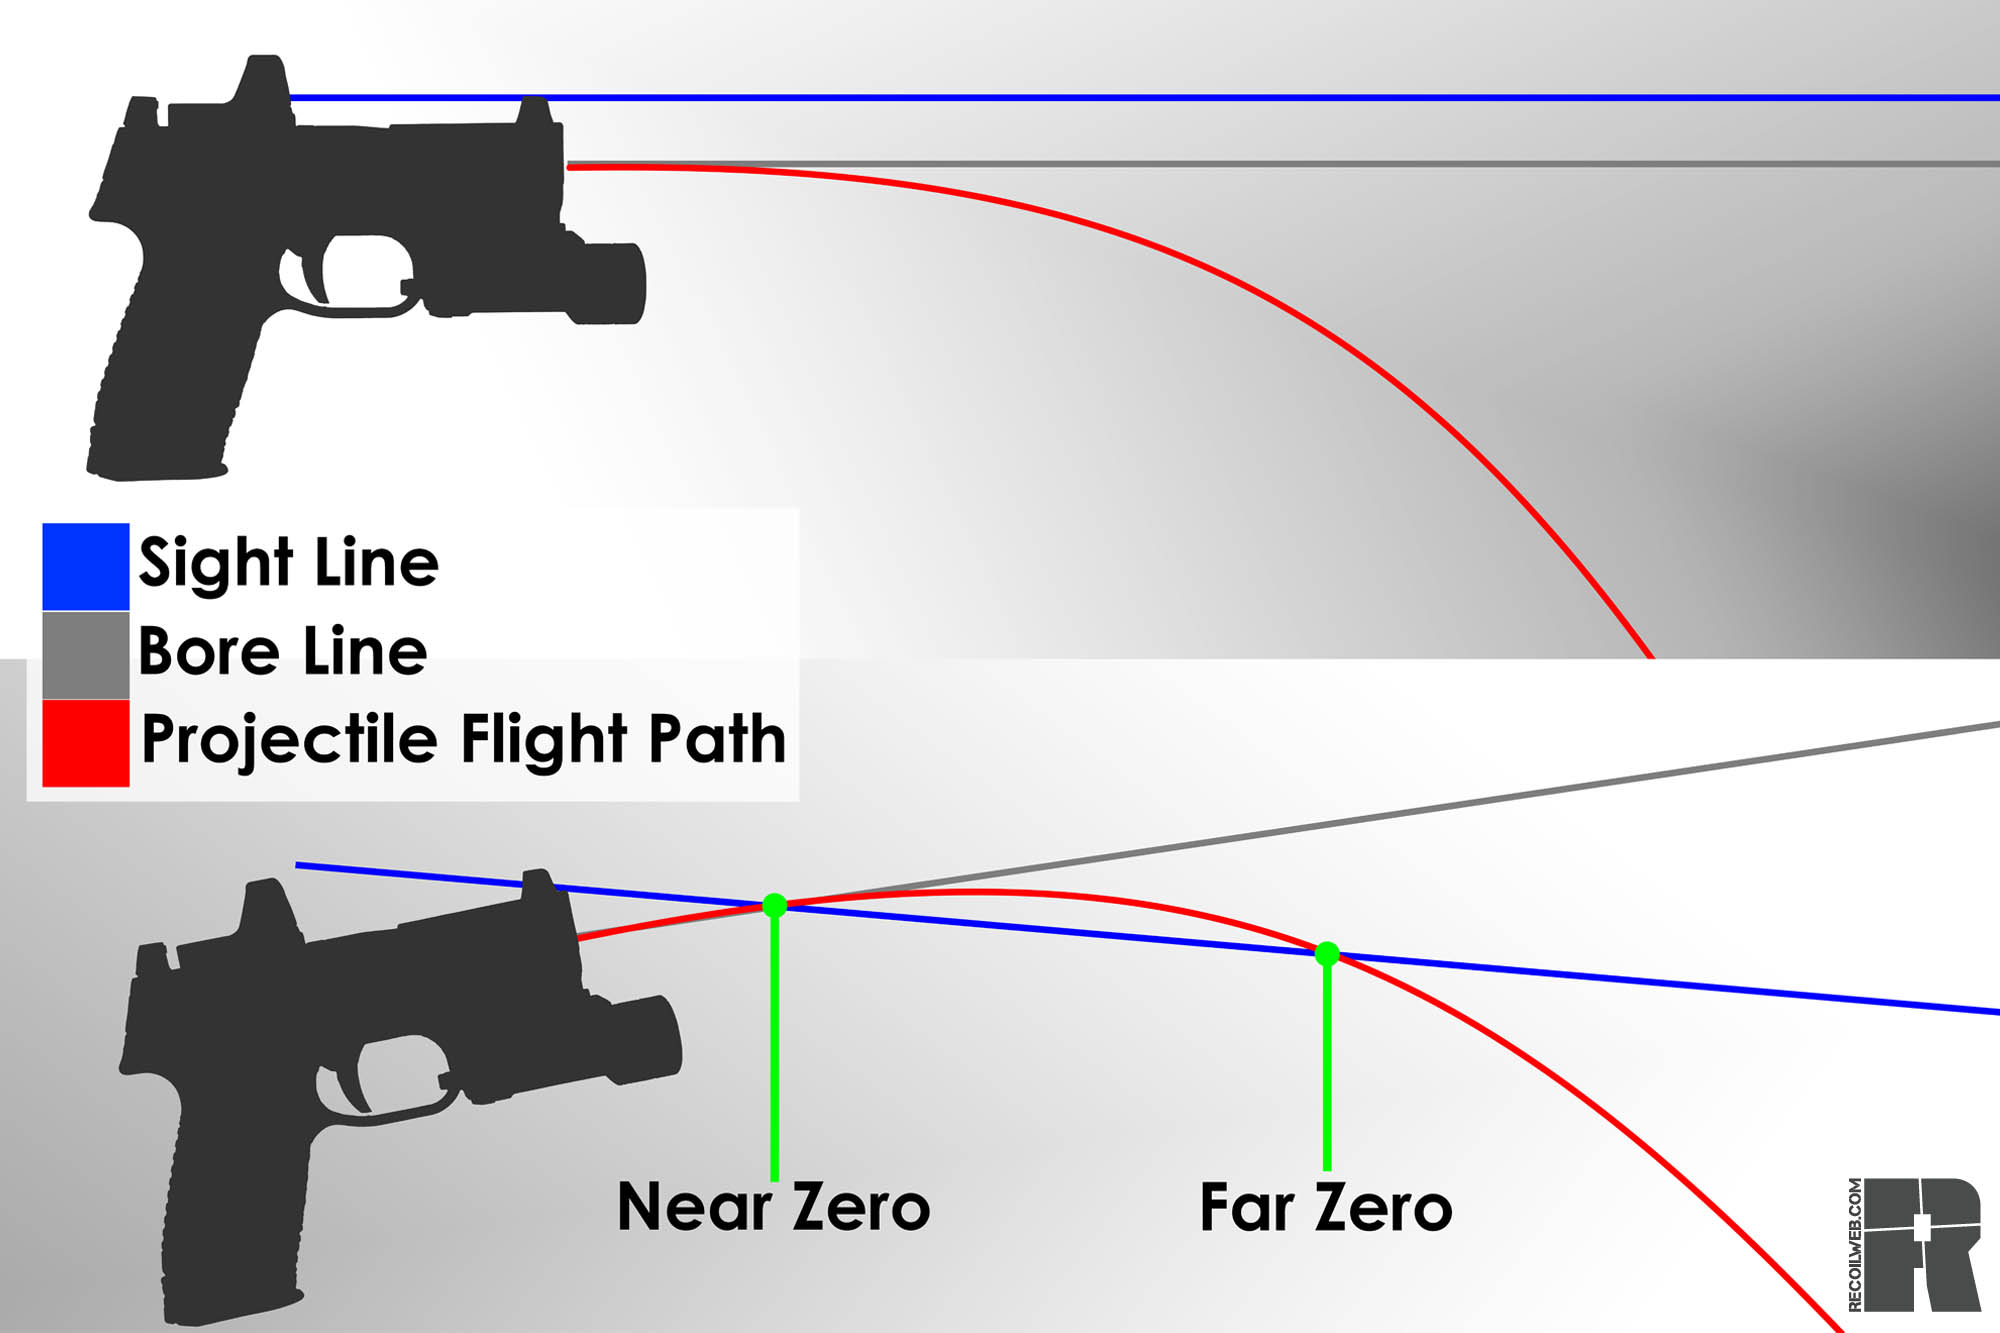
In the simplest terms, when you zero a gun, you adjust the sights or optic so your point of aim matches your point of impact at a specific distance. This convergence is the zero; the intersection between your line of sight and bullet trajectory. Bullets aren’t laser beams like in the movies and are subject to gravity. If your bore and sight lines were both perfectly parallel, their paths would never cross, and thus no zero could be obtained. Instead, it’s like throwing a football — the bullet travels up and back down again.
1/9
Fundamentally, the role of a zero is the same regardless of the weapon: to make it easier to hit where you aim.
AN OLD TOPIC WITH A NEW TWIST
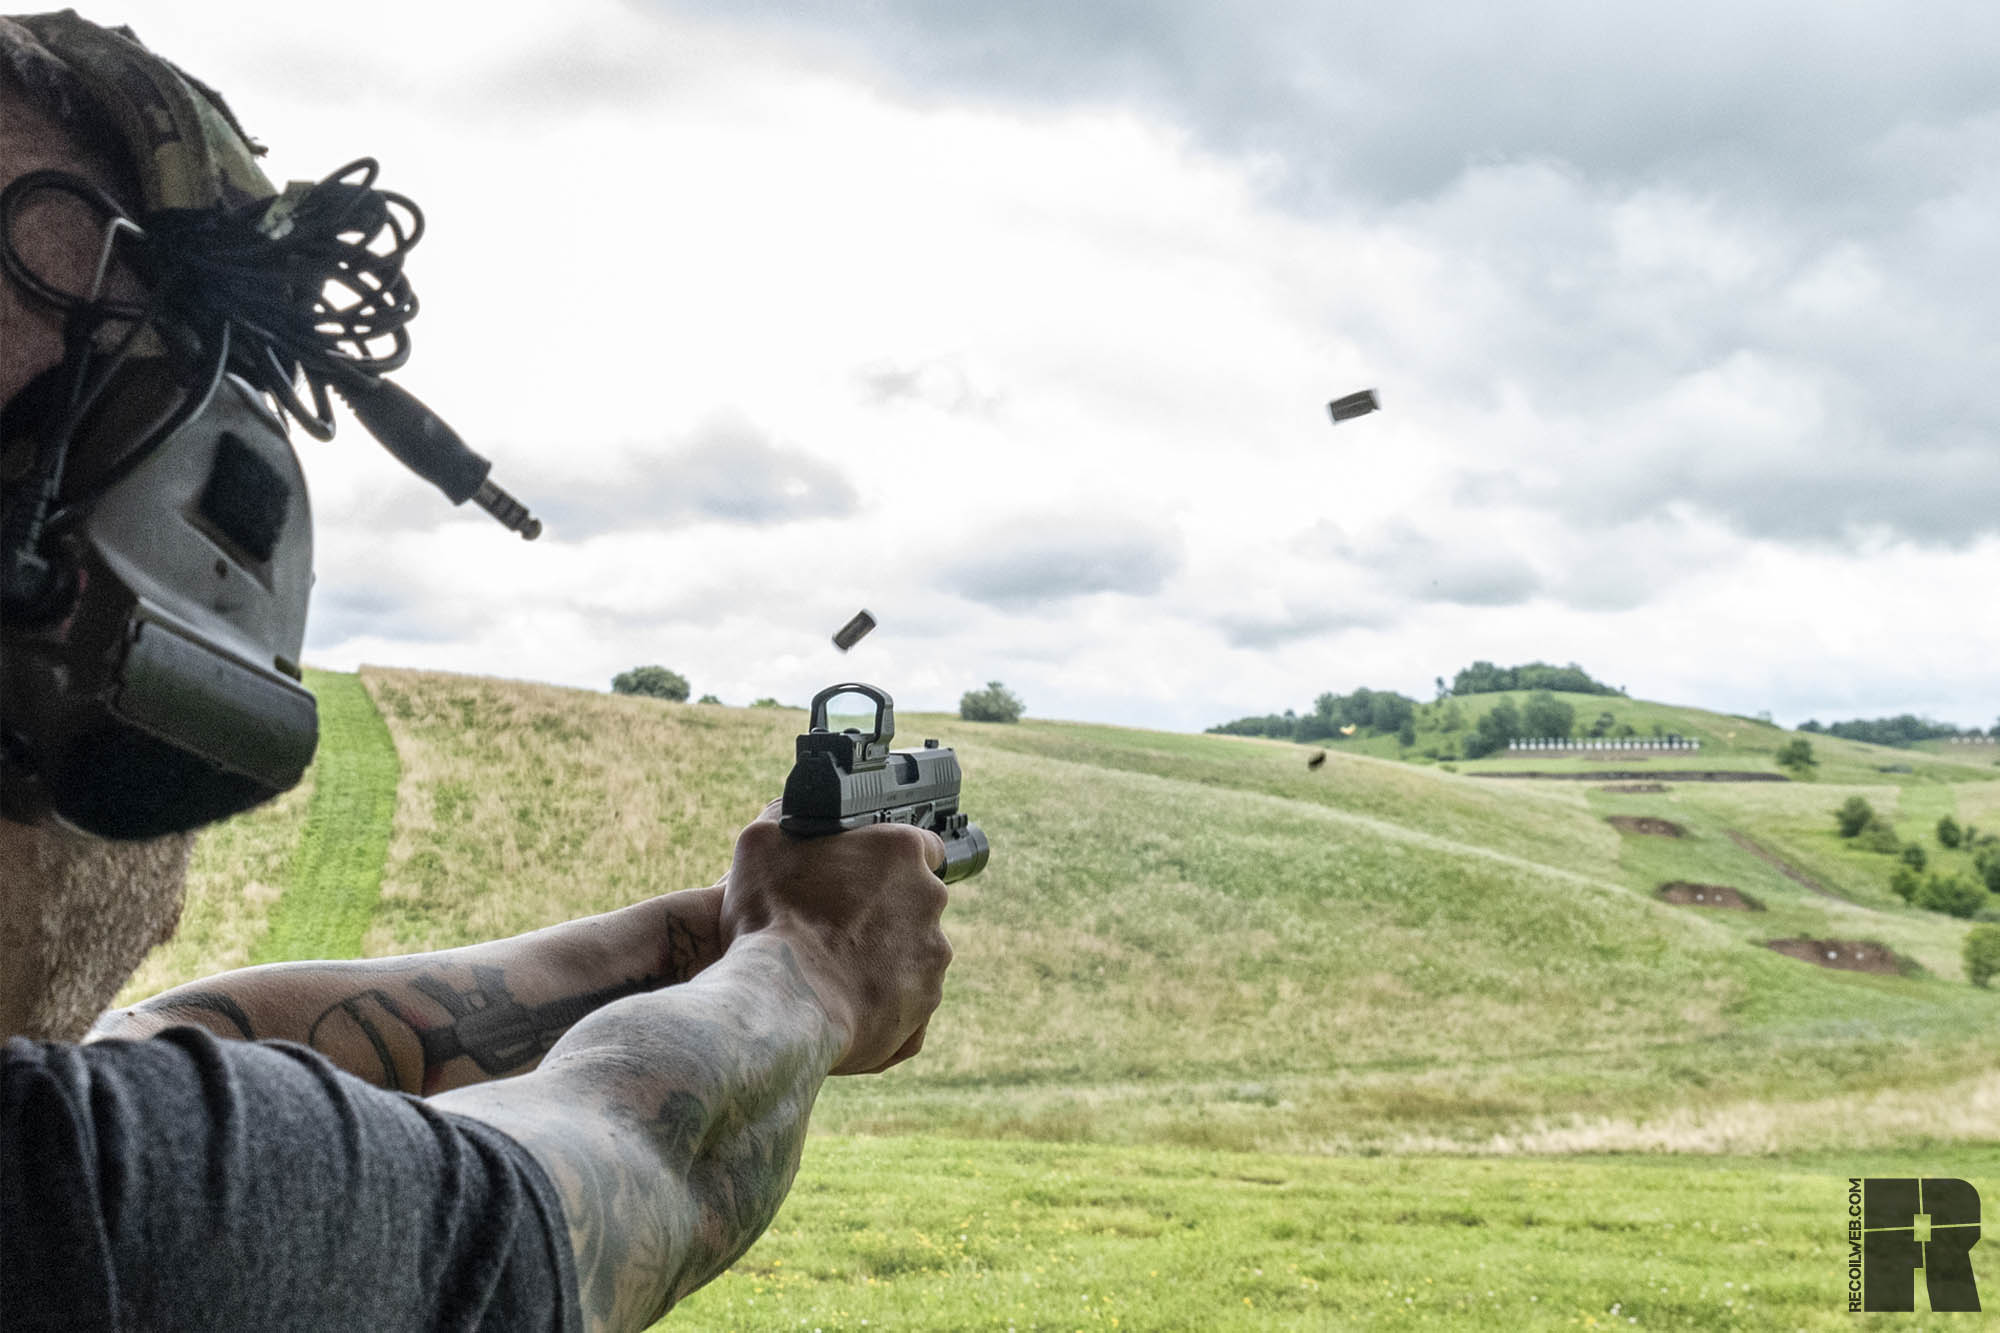
Dots on serious pistols are a relatively new phenomenon, but one that has rapidly matured and democratized. We effectively have both brand-new and experienced shooters learning about dots together.
With pistol iron sights, this discussion is often more academic than applicable. Unless you’re rocking an adjustable tangent sight or similar, refining your pistol zero sometimes requires a punch, file, hammer, and other tools. While mounting a miniature red-dot sight (MRDS) might take a torque wrench and thread locker to perform properly, once installed the windage and elevation are easy to adjust — no hammer required. This means you can more-easily tailor and personalize your pistol zero.
WHAT ARE YOU SHOOTING & WHY ARE YOU SHOOTING IT?
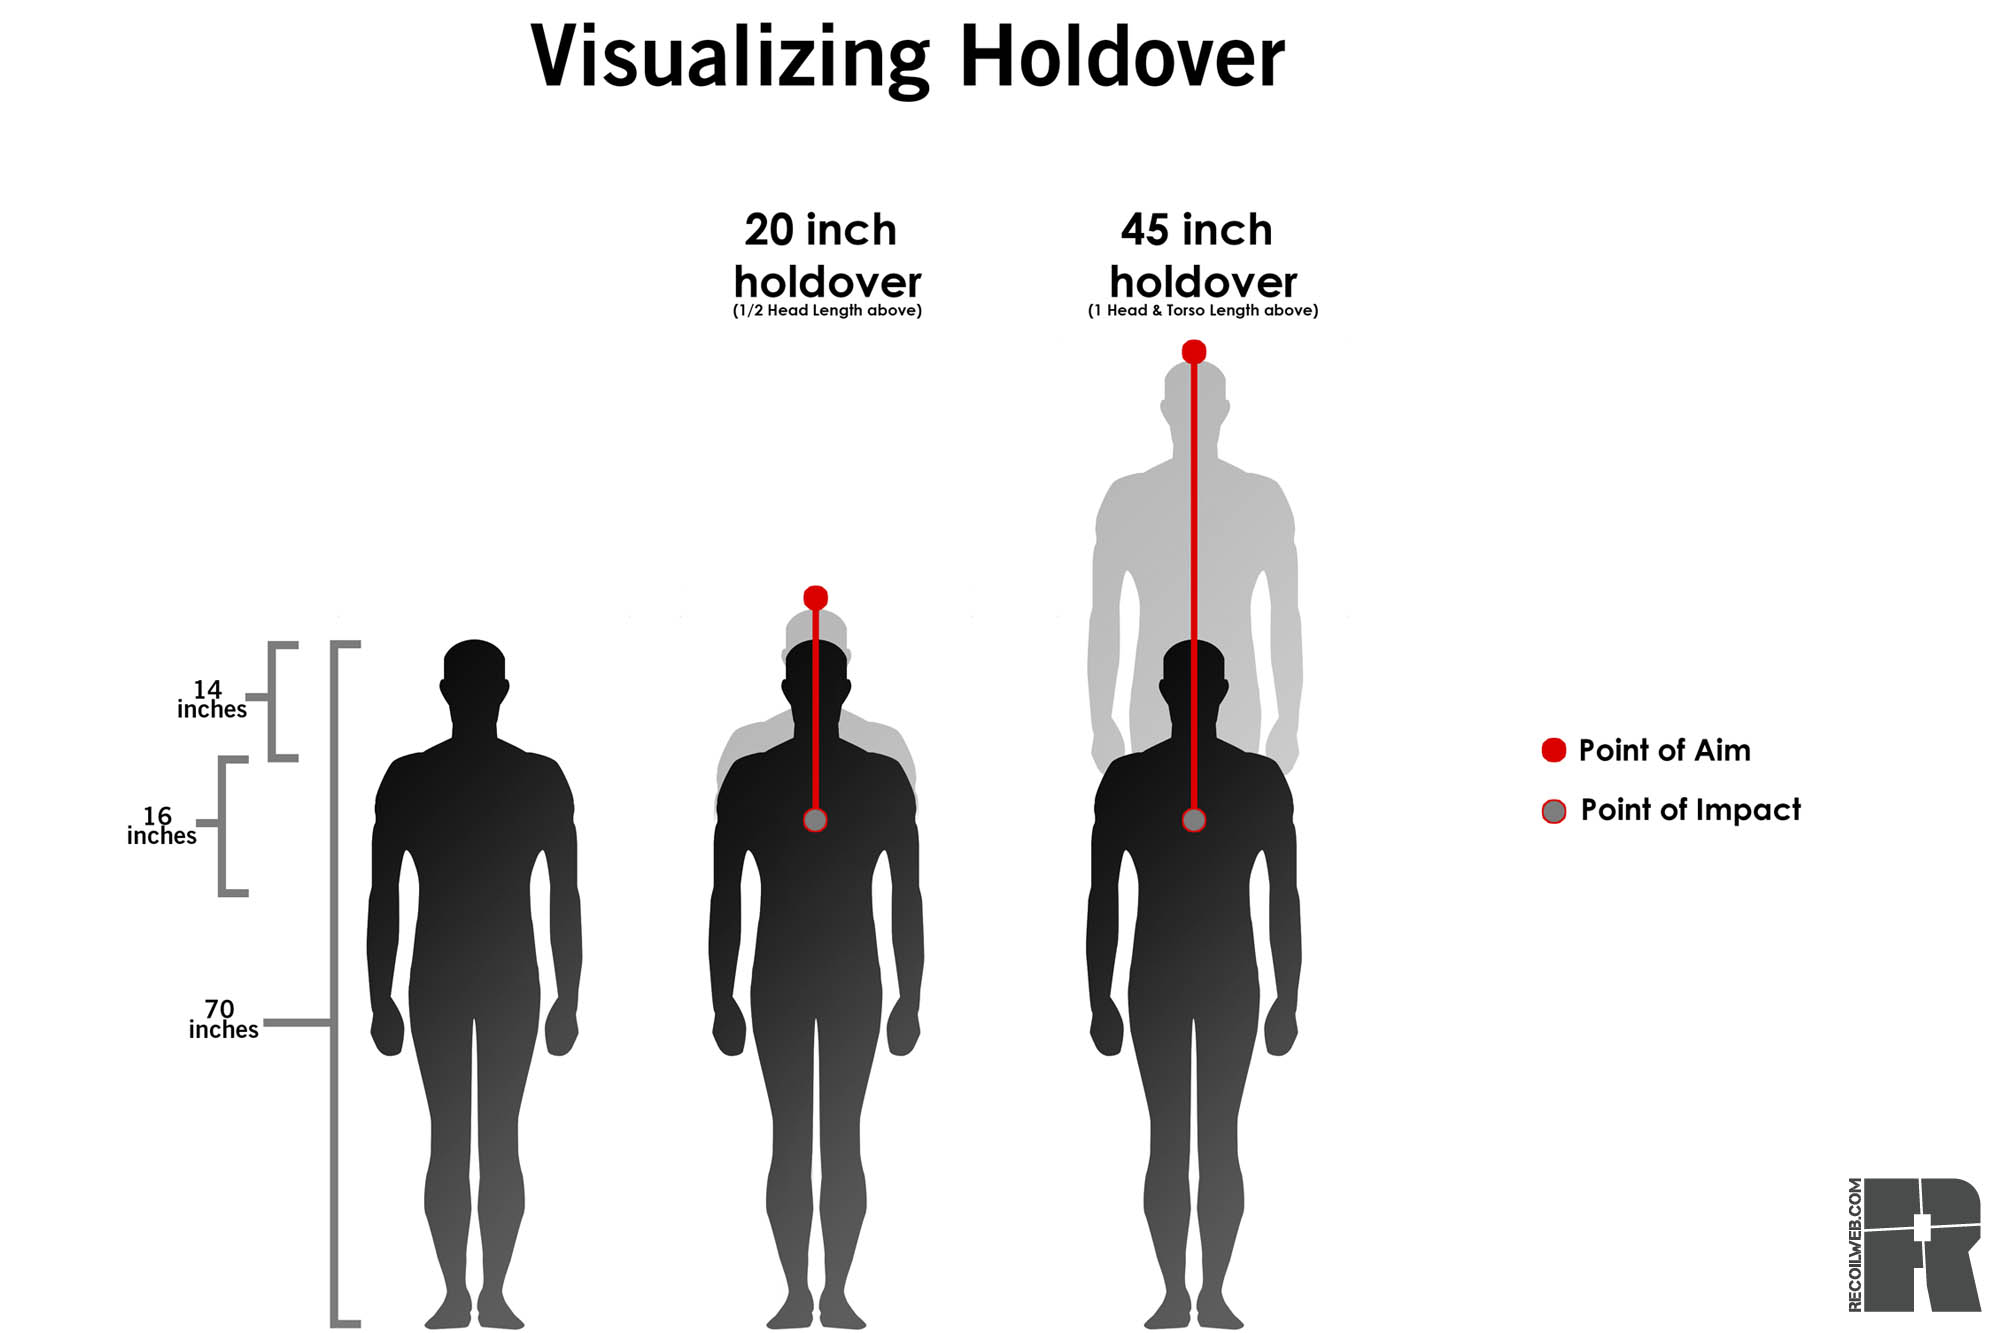
Target size and distance are our primary considerations when it comes to a zero. You want a zero that gives you the most range with no need to aim high or low, within your accuracy standard. Here we define that as no more than 4 inches above or below our sightline. This is roughly the size of a human heart as well as the brain when viewed from the front, but you can choose any arbitrary standard.
This doesn’t mean that all of our shots will always be in a tiny group, and the ever-enlarging human torso is certainly much larger, but this defines our desired limits when it comes to the ballistic path.
SCIENCE IT OUT
All the same, variables affect and apply to the pistol as the rifle, but there are many we can safely ignore. Speaking practically, pistols are short-range, low-accuracy weapons that are harder to shoot compared to rifles. You don’t have to concern yourself with the rotation of the Earth.
You can always get as nerdy and granular as you want, but with handguns we’re primarily concerned with velocity and projectile weight, with sight height and ballistic coefficient as bonuses. Because we’re not talking tiny groups at a kilometer, it’s OK to copy someone else’s work from the internet … at least to get started.
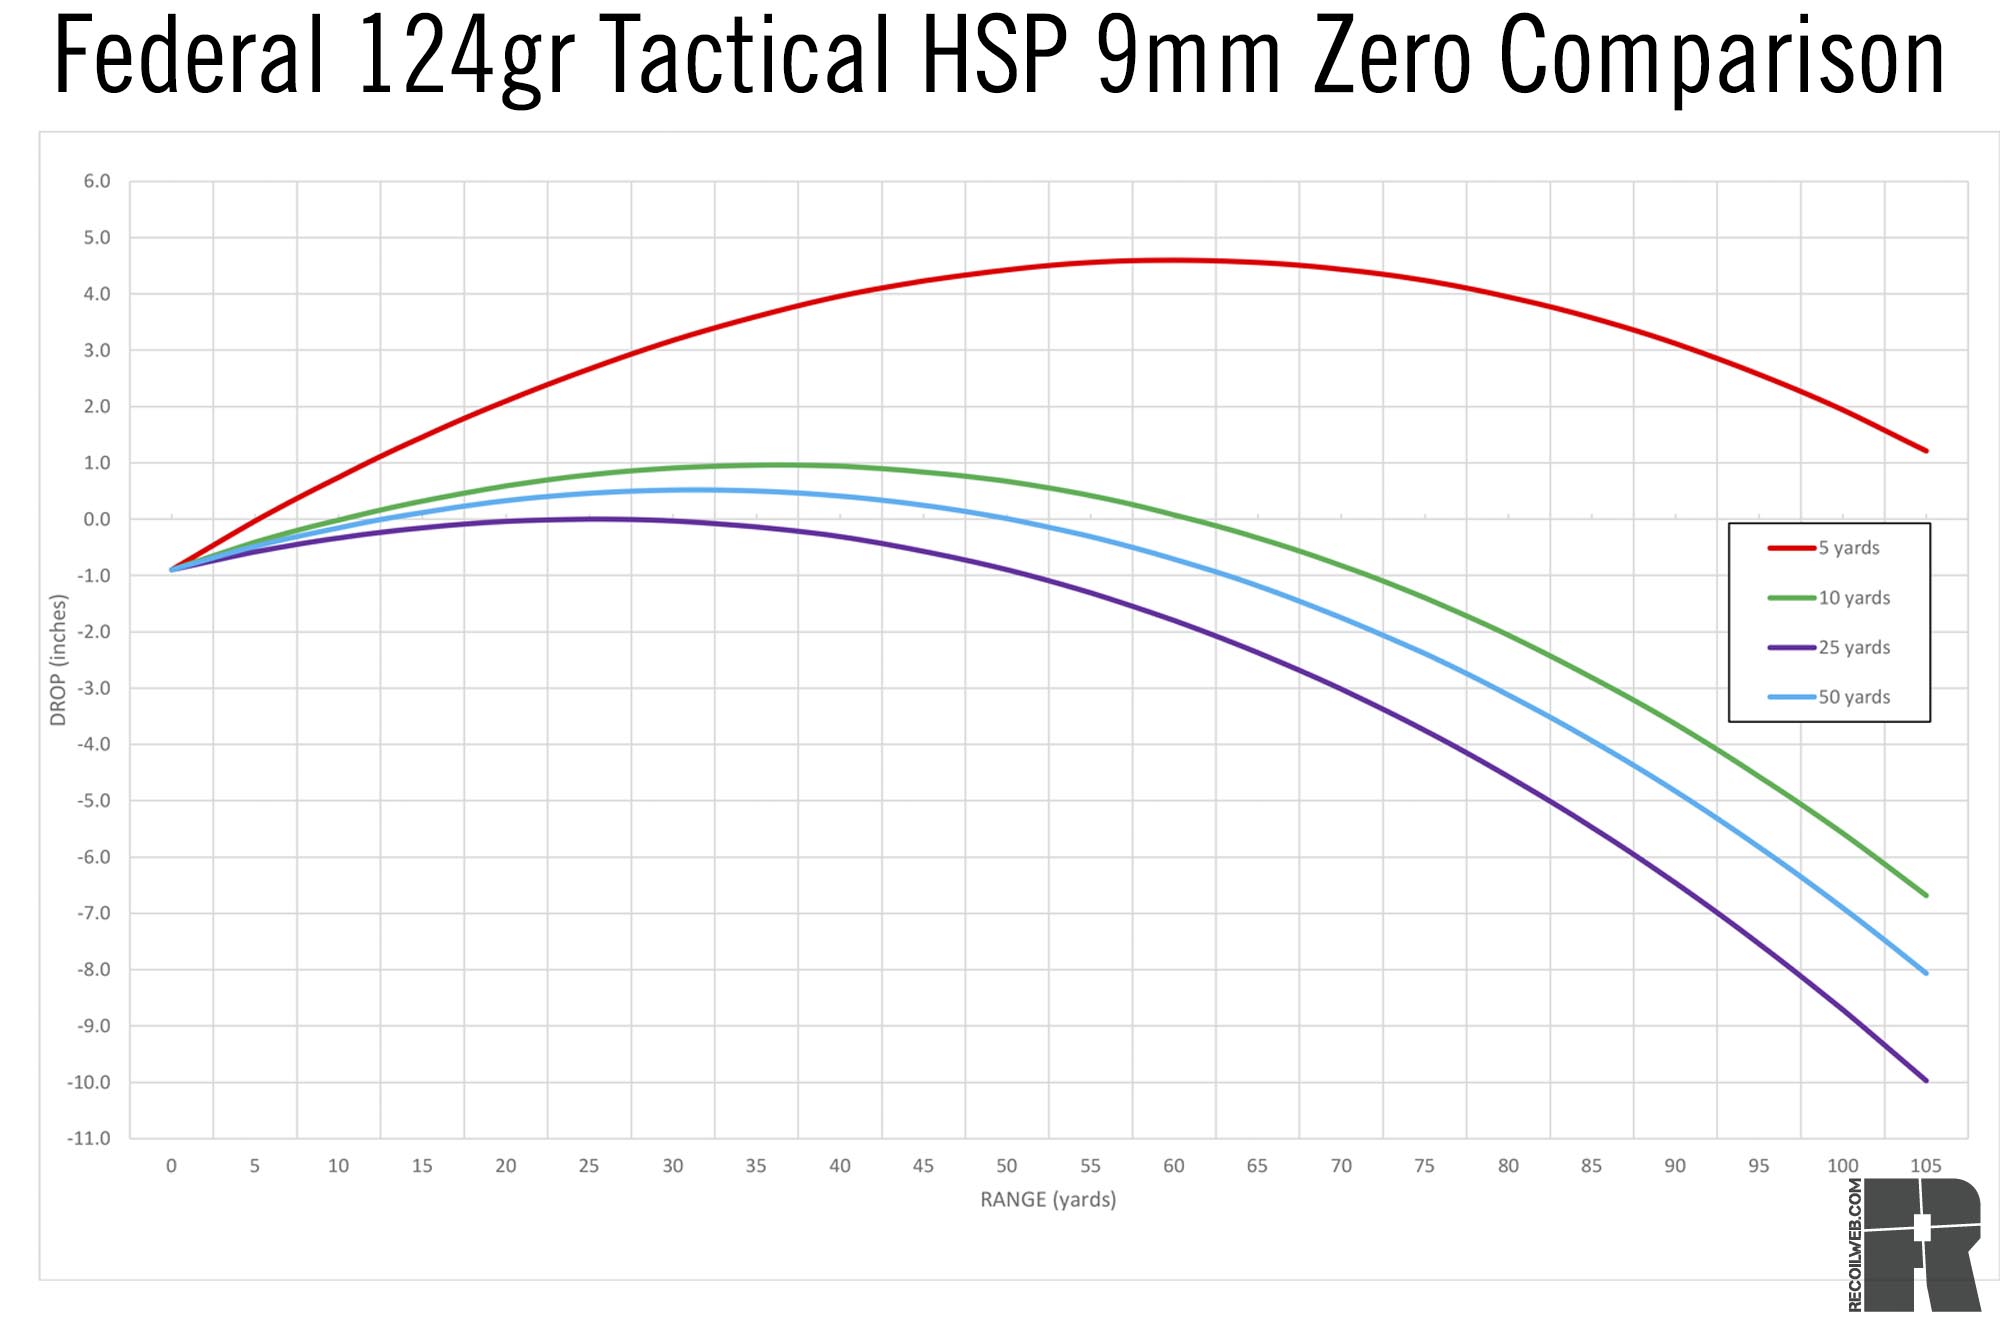
While it’s always nice to have a dedicated ballistic calculator and chronograph, it’s really not needed here. There are plenty of free online tools that can get you started. Here we went with 124-grain Federal Tactical HSP 9mm with data collected from a carry gun.
ZERO DISTANCE
Here’s where the biggest debate happens, and we’ve seen people advocate for everything between 5 and 50 yards. To be clear, the largest variable anytime you pull a trigger is you, the shooter — by a ridiculous margin. Any angular deviation of the muzzle has an exponential effect downrange. The learning curve of a pistol is much higher than a rifle, but red dots can help straighten it out a bit.
Find an initial range where you can comfortably zero. Shoot a three- to five-round group clustered closely enough to discern how much adjustment is required. If that range is your desired zero range, all the better. If not, use that closer distance to lock in your windage and adjust from there.
4/9
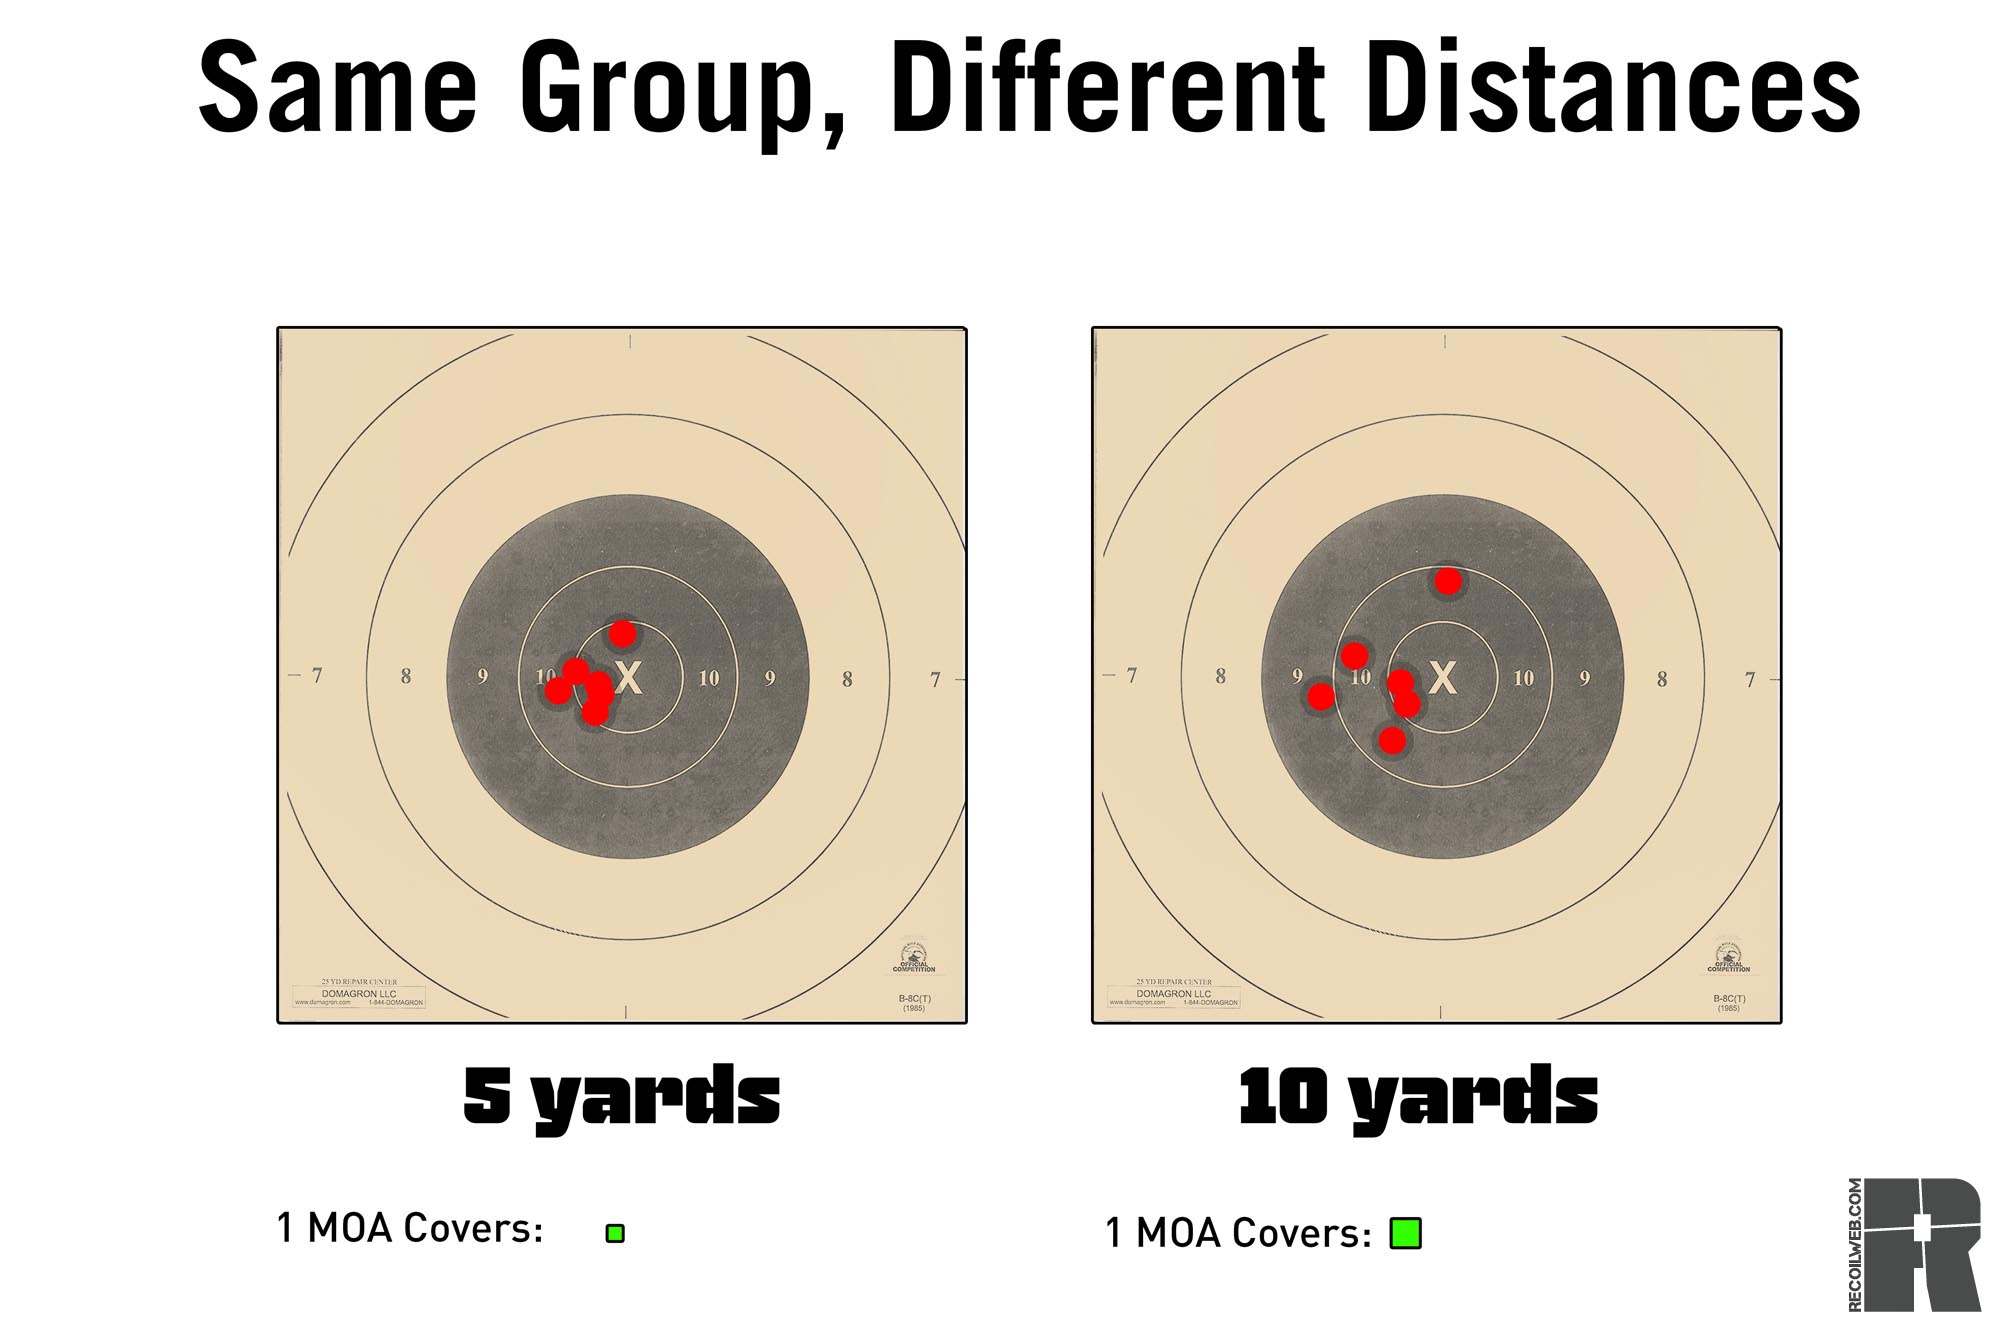
Many people like a 25-yard zero, because it’s both accessible and more difficult to perform. Twenty-five yards is the most common length of an indoor range — so most anyone can find a way to make it happen — and shooting a group small enough to make fine adjustments is much harder. It demonstrates a level of proficiency, and with that sometimes comes some boasting.
As a practical matter with trajectories, we find 5 yards to have more curve than we’re comfortable with, but the others really only drift far apart at distance. Someone who drills out B8s at 25 yards can zero wherever they please, as the most important thing is making your hits.
You’re responsible for every round out of your gun, so make them count. Even a rough zero within the confines of your skill level is better than none.
PISTOLS AT 100 PACES
Even if you’re not shooting tiny groups or anticipating taking long shots, there are still advantages to shooting at distance. Pistols are really hard to shoot because any deviation of the muzzle is exacerbated with range. Stretching out to 100 yards and beyond may not be terribly practical (though it’s been done in the field), but it’s an excellent way to expose weaknesses in your grip, trigger pull, and follow-through as well as to practice your target holdovers.
It’s also not as difficult as it initially appears, especially with a red-dot sight, causes you to think, and can be a tremendous confidence booster. It’s also just fun as hell.
ON PAPER FASTER
When you first pair a dot with a pistol, like any new marriage, the next steps can be either smooth or rough. You want to ensure your dot is at least a semblance of reality close to your bore. The good news is that most manufacturers of OEM-dot-equipped pistols have finally realized it makes sense to at least make sure it’s pointing straight. Similarly, when you have a factory-fresh quality pistol dot, normally everything is centered up — but not always.
If you have any other sighting systems on your pistol that are zeroed, such as a laser or iron sights, you can perform a rudimentary alignment. We’re also fans of using laser bore sights as an aid for your initial alignment.
TIPS
If possible, turn down your dot so you have a more refined point-of-aim.
If you can shoot a tight enough group to identify your adjustment direction off-hand, then you’re strongly encouraged to do so. But sandbags or other supports aren’t shameful at all, since you’ll always be the cause of the largest variance with every shot. A rolled-up range bag can work too.
The major downside to most support systems for handguns is that they’re awkward and uncomfortable to use. You find yourself in a half-squat at the firing line or holding your pistol in a funky way when seated. A ransom rest will do a great job, but it’s totally overkill for most practical applications. And to top it off, regardless of your method, you should double-check it offhand anyway.
Our common advice is to zero with your carry ammo and train with the cheap stuff. They won’t always precisely track with each other, especially as range increases, so be mindful. You can also purchase or roll your own ballistically matched training ammo.
Many of the problems with pistol dots result from improper installation–a dot that works loose won’t hold zero, and you’ll have a bad time.
LOOSE ROUNDS
A pistol zero isn’t a one-and-done evolution. Your zero can and will shift with environmental factors, impacts, and a host of other situations. It may not shift much, but the best way to tell is to confirm and adjust regularly.
The best-calculated chart in the world doesn’t mean a damned thing if it doesn’t represent reality. After you eyeball charts and perform your zero, the most important thing to do is check your work. Any chart, including the one published here, is just a starting point. These are just aids — none of them are replacements for getting out on the range and confirming for yourself.
So long as you can actually hit what you want to hit, where you want to hit it, you’re well ahead of the curve.
Aiming – Sight Alignment, Sight Picture and Focus
Getting your sights on target and keeping them there is one of fundamentals of marksmanship.
by Dennis Dechan tposted on February 28, 2023
Aiming is a fundamental marksmanship skill that is essential to consistently shoot accurately with a firearm. Properly aiming a rifle or a pistol with iron sights consists of two distinct steps or processes. The first step is creating proper sight alignment. The second is obtaining a correct sight picture. Most pistols are outfitted with Patridge-style sights, which have a thick front blade for the front sight and a square notched rear sight. For the purpose of this article I will be referencing Patridge Sights.
First Up: Sight Alignment
The first step, sight alignment, is achieved when the front sight of the firearm is centered in the square notch of its rear sight. Depending on the type of firearm that is being used, the front and rear sights may be shaped a bit differently, but the purpose of the sights will remain the same.
Once proper sight alignment is achieved, the second step in the aiming process is acquiring a proper sight picture. A proper sight picture is when the front and rear sight of the firearm are properly aligned and oriented onto the target correctly to produce an accurate hit. In essence, it is sight alignment, with the target added into the equation. It is what a picture will look like if taken from the shooters eyes just before and during the firing process.
It is important to note that the perfect sight picture for your Glock G17 could be different for your 1911 if each firearm is not outfitted with adjustable sights. There are many different reasons for this, but one common reason is the front and rear sights from varying manufacturers differ in sight height in relation to the bore of the firearm. The solution to this problem is using what is called a hold.
Get A Good Sight Picture
To determine the correct hold for your firearm you should fire a series of shot groups at a target from varying distances. For example, when I acquire a new handgun that I am unfamiliar with, I will set up a blank paper target at 10 yards with a 1 inch square pasty affixed to the center. I will then fire a grouping of 5 rounds using a bench rest position. The use of a bench rest allows the shooter to maximize bone support and allow muscle relaxation which minimizes unwanted movement and in turn creates a stable shooting position that will allow for consistent accurate shots. Once I have studied the shot groups I can quickly identify the proper hold I should be using to hit my intended target. I will start extending the range of my target out to 25 and then 50 yards. There will be no need for a 1-inch pasty at these extended distances. I will use a pie plate circle target at 25 yards and an IPSC body target at 50 yards.
When I use a rifle I will do the same process but shoot at extended distances. As I extend my range, my holds will change and be elevated on my target. Extending the range of the target allows me to fine tune my holds and begin to create an accurate mental chart for where my rounds will impact the target. I would suggest that the shooter also keep a data book for their firearm and make notes that include a drop chart and the correct holds to be used so that the shooter can reference it at a later date. This is very important data to know and understand because we as shooters are responsible for every bullet we fire down range. The only way we can truthfully ensure accurate shot placement is to intimately understand the aiming process of our firearms.
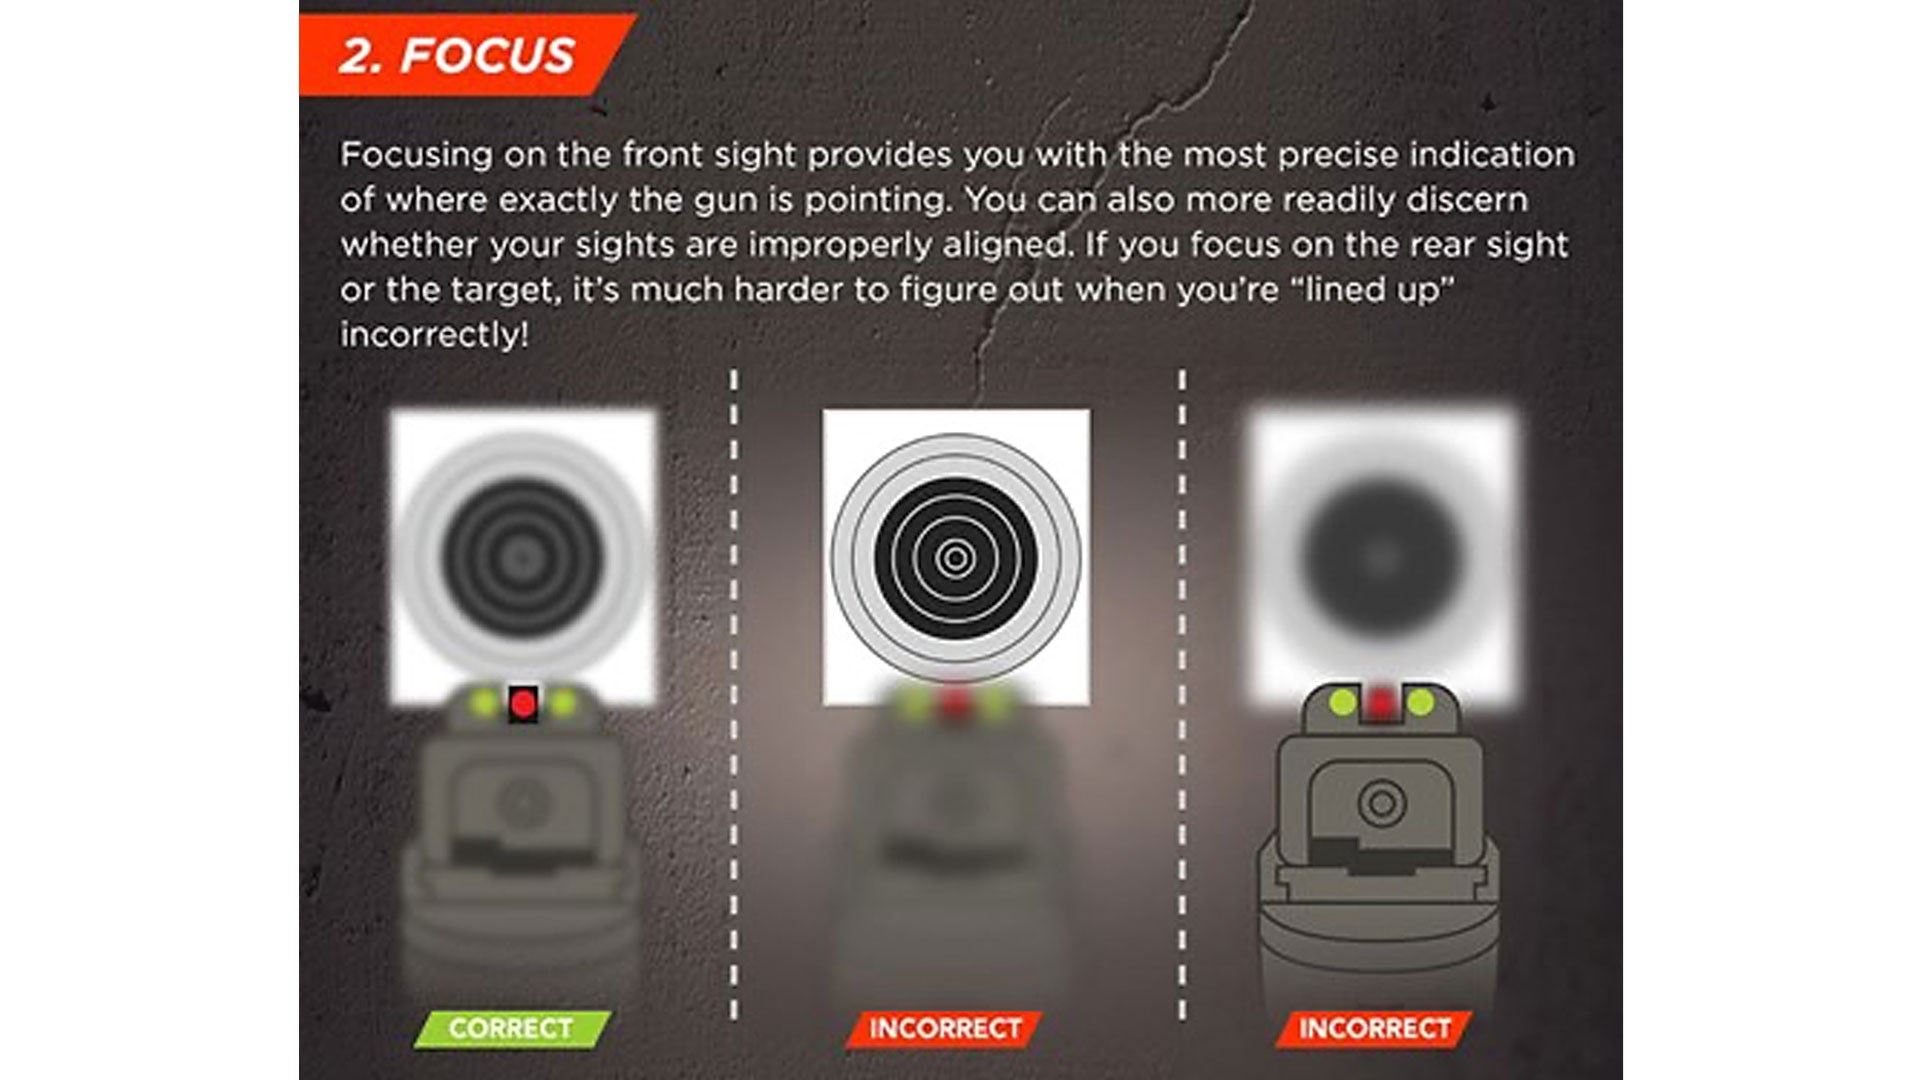
Lastly, it’s important to understand that focus is vitally important to the fundamentals of aiming. When it comes to our eyes focusing on an object, they are limited to only being able to focus on one object at a time. Because of this limitation, it is impossible for our eyes to focus on the entire sight picture. The good news is we do not need to focus on the entire sight picture. As shooters, we need to be concerned with putting all of our focus on the front sight at the time of the shot. Our peripheral vision will aid us in sight alignment and where we place our front sight in relation to the target. One of the biggest mistakes a beginner shooter will make is focusing on the target and not on the front sight when they engage a target. If a shooter is focused on the target and not the front sight they will have a tendency to shoot around the target. A lot of time I find myself bouncing my focus from the front sight to the target and then back to the front sight. This is acceptable to do, however, it is critical that when we take up the last bit of slack in the trigger, we need to have all of our focus on the front sight when the trigger breaks and the firing pin strikes the primer.
Start It All Over With The Next Shot
After the shot breaks the shooter should make a mental snapshot of the sight picture and where their front sight was in relation to the target when the firearm was fired. This can be done with meaningful practice and become second nature after a short bit of time. This is a critical habit to get into and one that competent shooters will master. Calling your shot each and every time will help you focus on the front sight and help you build correct training habits. It will also aid the shooter in self diagnosing marksmanship errors. For example, if a shooter is anticipating his or her shots, the front sight will dip down just before the firearm is fired. If a right handed shooter is jerking the trigger, the front sight will be pulled to the right just before the firearm is fired. A left-handed shooter will pull the front sight to the left. If the shooter is properly focusing on the front sight and calling their shots they will see the front sight moving out of alignment and be able to self diagnose their marksmanship error and in turn, correct it.
Maintaining sight alignment and sight picture for multiple shots is only done by applying all of the fundamentals of marksmanship. The shooter needs to have a proper stance to control recoil and orient the firearm to create natural point of aim. There are no shortcuts to becoming an accurate shooter. One must practice regularly and correctly to build solid fundamentals.
5 Instances When Reloading Is Not Beneficial
by Frank Melloni posted on November 17, 2022
There are few things that I enjoy more than handloading ammunition. What started as a simple economic measure blossomed into a passion for accuracy and a quest to fire some of the most hard-to-find ammunition. While I can handload nearly anything that was once fired, I learned first to question whether or not I should. I have spent countless hours at the bench rolling off my own range fodder, only to come to the conclusion that the entire endeavor was nothing more than a waste of time and resources. Here are five instances where I don’t consider handloading to be worth the trouble:
1: The Ammunition Isn’t Used Often
Once we have a loading bench up and running, it’s tempting to buy a set of dies to make ammunition for every gun we own. With the major investment behind us, it only seems logical to get as much bang for our buck as possible. So why not? Well, once you figure in the price of components to conduct load development, and the sheer amount of residual investment that will sit on the shelf, it might not make sense to build rounds for something that you’re only going to fire a dozen times a year. I, for one, don’t reload for my hunting rifles. Instead, I find a round each one likes and then set aside a few boxes. Considering I only fire a three-shot group to confirm zero and then maybe two shots when afield per season, a standard 20-round box of ammunition lasts me at least four years. If stored properly, these rounds will last indefinitely, so there’s no harm in purchasing larger quantities when the price is right either.
2: The Rounds Are Inexpensive
When the ammunition market is good, it’s important to calculate in your time investment before setting out for a voluminous ammunition-production run. Although making range fodder doesn’t pull us away from earning a salary, it does keep us from enjoying other things in life. Many years ago, I spent a three-day weekend churning out 9 mm Luger loads, later realizing that I’ve only saved a minimal amount during the process. If I trimmed back another expense that year, even just a bit, that could have been an extra weekend camping, fishing or even traveling to one of those out-of-state matches I’ve been trying to make. This phenomenon isn’t limited to metallic cartridges either; most retired 12-ga. shotshell loaders will attest that the recent boost in the price of lead has pushed them back to dealer shelves to resupply their favorite scatterguns.
3: Some Guns Won’t Notice It
While it’s true that handloads can be tuned to provide accuracy that exceeds factory munitions, not every gun will see these effects. This statement is intended to resonate with the surplus-rifle collectors among our ranks, as well as those of us that enjoy taking well-used heirlooms to the range. Some rifles just weren’t designed to be sub-m.o.a. performers or have experienced wear beyond their serviceable life. In these instances, even the most carefully crafted ammunition will yield unsatisfactory results. For firearms like these, it is better to accept them as they are, instead of chasing an imaginary dragon down a rabbit hole. Sometimes picking a different rifle to hunt with or hanging a larger piece of steel downrange makes more sense and might even preserve your sanity.
4: Some Cartridges Are Hard To Make
Speaking of sanity, reloading isn’t always a relaxing experience, and I’ve found myself regretting decisions that I’ve made while bellied up to the bench. Some cartridges are just extraordinarily hard to load in either the process, development or both. As I write this, I am reminded of a project that I undertook, handloading 5.7×28 mm. This minuscule bottlenecked round leaves the factory with a polymer coating to aid in cycling, and it needs to be respected. These cases must be cleaned by hand, as mechanical methods can remove enough of it to cause feeding issues. If you successfully remove the fouling without taking off the polymer, your next step is to resize each case. Again, this must be done carefully, as it is easy to disturb the headspace. After sizing and re-priming are complete, a precise charge must be funneled through the 0.224” case mouth, and you have less than 28 mm worth of case to hold on to. In other words, expect to fumble. For those that suffer from dexterity issues, this cartridge is most likely a nonstarter. Don’t get me wrong, I still keep my brass, but handloading it is a last resort.
5: You’re Planning To Use It For Self-Defense
This one might just be the most tempting on the list, but I assure you, it’s not worth it. A prospective defensive ammunition handloader might be somebody who is in the practice of consistently rotating out expensive carry rounds to assure reliability (which is a good practice). Considering how even jacketed hollow-point rounds can be made for pennies on the dollar, it seems like a great idea at first glance. However, factory ammunition comes with an added value: a liability shift. Major manufacturers have run their products through extensive legal considerations and are prepared to handle anything that might come up through its use. Should you use your homemade ammunition in a life-or-death encounter, you might have to prove that you didn’t make it any more lethal than something commonly available at a sporting-goods store. Self-defense ammunition is expensive, but not nearly as expensive as paying a lawyer for the extra time to (hopefully) prove that you didn’t fire anything “enhanced” on the day of the incident.
Gun ownership is supposed to be enjoyable, and it’s easy to lose track of why we spend all that time at the range, out in the field or even just relaxing at our reloading bench. Before giving up range time or other pursuits to sit at the reloading bench, ask yourself if it is worth it or even if it’s a good idea. If the answers are no, then it’s best to stop at your local sporting-goods store, pick up a few boxes of factory ammunition and enjoy some quality time with your precious firearms.
When it comes to choosing 5.56 NATO ammo for home defense and general all-around use, I would love to say that ammo brand “X” can hit the bullseye at silly distances, drop a monster buck on the spot, knock over a distant popper, tumble a quartering coyote and stop an attacker with one well-placed shot every time. Unfortunately, variables such as distance, inherent accuracy, bullet design, barrel twist, shooter skill, stress, fear, sweat, eyesight, darkness, cold fingers and a whole bunch of other stuff gets in the way of one bullet for all needs. Many loads are capable of meeting general-purpose roles, but once we start drilling down to mastering specific tasks—like performing home defense duty—things start to get complicated.
The exact circumstances for when a rifle or carbine comes into play in the home are going to be different for each of us. Since the proliferation of semi-automatic sporting rifles is both far and wide across our country, and since many of those rifles happen to be chambered in 5.56 NATO / .223 Rem., it is worth taking a look at ammunition in this chambering that is well-suited for use inside the home.
But before selecting 5.56 NATO ammo, you have to consider your unique environment. A house full of family members requires different planning than an empty-nester pad. Rural dwellers have more flexibility than those who share common walls with neighbors. Residential interior construction is not well-suited to stop bullets. We have to assume that any shot that misses or passes through its intended target with little upset can harm someone or something we want to protect. This is a good time to point out that proper shot placement is as critical here as it is for any distant shooting pursuit. The fact is that even well-placed shots can penetrate through the human body in spite of our best efforts to prevent it.
Over-Penetration and Frangible 5.56 NATO Ammunition
Blanket concerns about rifle bullet over-penetration date back to the days of heavy, slow-moving, solid-lead and FMJ bullets. Many modern rifle-bullet designs actually perform well at the close ranges commonly encountered in the home. The key is to use the right projectiles for the task. Where over-penetration is a concern, we want 5.56 NATO bullets that quickly fragment into a small number of large pieces or expand enough to stop before exiting the other side.
In addition to reducing the risk of harming family members elsewhere in the house, these bullets usually damage more soft tissue and organs than their non-expanding or non-fragmenting counterparts, leading to faster incapacitations.
Frangible projectiles that are designed to fracture into small pieces once they encounter resistance inside a target limit penetration well. However, the wound channels they create tend to be short and often less damaging than needed. They are tailor-made for environments where a high incidence of ricochet is present—such as around machinery or inside bare concrete, brick or metal structures. The frangible 5.56 NATO loads of 20 years ago were notorious for coming apart in mid-air. Firing them through suppressors was not even an option.
Today’s frangible-ammo options are much better and tend to stay together until they make impact. Unfortunately, I know a couple guys that learned the hard way how even frangible ammunition can penetrate thin, interior walls and hurt good people on the other side. Like any other new ammunition you try, you should ensure frangible ammunition functions correctly in your rifle and that projectiles go where you aim them before relying on them for defense purposes.
5.56 NATO / .223 Rem. Hunting Ammunition: A Good Home-Defense Option?
Modern hunting bullets designed to expand for maximum wound channels in medium-size game seem like an obvious choice for defensive use. However, typical hunting-bullet designs also continue to penetrate after opening up in order to do as much damage as possible after going through thick hides and glancing off or breaking bones. Exit wounds can be beneficial to hunters tracking wounded animals but pose a problem for home dwellers, so what works in the field may not be the best choice in the residence.
Thinly jacketed varmint bullets are at the other end of the spectrum. They tend to come apart easily in tissue—often violently—making them less likely to go through-and-through. In large mammals, though, these projectiles have less-than-desirable wounding characteristics. Soft-point ammunition often works under the right circumstances, but it tends to penetrate fairly deeply in spite of having exposed lead at the nose. Soft points are also more finicky when fed over AR-15 feed ramps.
“Blind-to-Barrier” and Bulk 5.56 NATO Ammo Drawbacks
So-called “Blind-To-Barrier” projectiles are designed specifically to go through sheetrock, plywood, heavy clothing, thin sheet metal and even windshields while still retaining the ability to penetrate soft tissue and cause damage on the other side. They have their place in tactical circles but may not be as well-suited for use indoors where other family members or neighbors may be at risk.
Full-metal-jacket (FMJ) projectiles, typically found in bulk plinking ammo, are definitely not the preferred route for indoor use. An exception would be when nothing better is available and there is no chance of hitting someone else on the other side of your intended target. Another time FMJ could work well is when a bullet that is designed to fracture when yawing is combined with a loose rifling twist that stabilizes the projectile just enough to reach its intended target. Such bullets yaw, tumble and cause significant wounds when paired with the correct rifle barrel.
Velocity and Bullet Stability in Home-Defense Ammunition
Keep in mind that velocity and stability are key to making expanding bullets do what they are designed to do. Expanding projectiles need to hit in a generally head-on attitude in order to fill their voids with soft tissue to the point of forcing expansion. Ensuring the length of a bullet—normally viewed as a component of its weight—is matched to the correct barrel twist will keep it moving point first and gyroscopically stable. You can see this well enough by testing bullet weights and designs in your firearm at realistic distances against cardboard or paper targets. If you do not see round or mostly round holes, you need to change bullet weights until you get good stability at the distance(s) needed.
We are fortunate that modern bullet technology has widened the range of acceptable velocities for optimal performance significantly. But the movement toward ever-shortening barrels means we have to pay more attention to velocity than with the longer barrels more common in days’ past. Normally I take manufacturer-provided ballistic test data with a large grain of salt, but this is one place where it can be helpful.
If an ammo or bullet maker has data available on how their projectiles perform in 10-percent ordnance gelatin, pay attention to the muzzle and impact velocities and the barrel lengths used for obtaining that data. Oftentimes barrels ranging in length from 20 to 26 inches are used to obtain impressive results. Just because a projectile will expand at a specific muzzle velocity from a long barrel does not mean the same will be true from a barrel half that length.
The Benefits of Low-Flash Propellants and SBRs
Bullet performance is not the only indoor concern. Muzzle flash is a huge problem during the hours of darkness. Not only does it make your location clear to anyone not dispatched by the flash’s source, it tends to temporarily make things difficult for your own eyes. In a life-or-death situation, you need to be focused on assessing threats, not a huge bright spot imprinted on your retinas. I build guns for other people for a living. Most of those gun owners intend to use their arms for self-defense shooting, among other pursuits.
The heavily increased demand for short-barrel rifles (SBRs) and rifle-caliber, semi-auto pistols tells me this is a trend that is not going away. Short barrels are notorious for belching bright balls of flame, or secondary muzzle flash, as hot gasses and unburnt powder crash into the atmosphere outside a gun’s muzzle. Thankfully, today we can all benefit from low-flash propellant technology that was once reserved for specialized military and law-enforcement elements.
Combating Concussion in 5.56 NATO Ammo for Home Defense
The concussion that is produced by firing full-power 5.56 NATO ammunition in tight confines can be deafening and disorienting to unprotected ears. Unless you sleep with ear protection in place, there is a fair chance you are going to have to deal with immediate threats with ears wide open. I recommend trying to reduce the blast you have to deal with indoors. Conventional muzzle-brake equipped rifles or carbines amplify the problem through side ports and baffles. Directional muzzle brakes help to a small degree by pushing everything out to the front. But a good, prong-style flash hider is better in this environment. Sound suppressors deal with both muzzle blast and flash and although they add length in most common rifle configurations, are great tools for indoor use. I used a sound suppressor for CQB operations whenever possible while in the Army and was always very happy to have them indoors and out.
How to Clean your AR-15: The Beginner’s Guide
Posted by Patrick “BabyfaceP” James on March 11, 2021
So you just picked up your first AR-15, you’ve put some rounds through it, and now it’s time to give it a cleaning. However, you are new to this and you don’t have any experience cleaning it. Well, you’ve come to the right place. We’re going to give you all the advice an ol’ timer would, without him trying to steal all of your brass. But first, I want to emphasize something before we start and that is if your AR is going to be a tool that you use for self-defense, make sure it’s clean. Clean it after every range trip. Add the cleaning process into your shooting routine.
AR-15 Cleaning Tools
So what do you need to get started? Gun maintenance tools! Jags, cleaning rods, patches, and maybe some cool accessories. You can always improvise with a screwdriver and a cut up tee-shirt, but why bother when you can get the good stuff.
Hoppe’s Universal Cleaning Kit – The best for a budget. These universal kits come with everything you need to clean pistols, rifles, and shotguns. Make sure you pick up the true universal one and not a rifle or pistol-specific kit.
Brass Cleaning Jags – These are a real improvement over the plastic jags that come in most of the universal kits. The plastic jags tend to bend if you push on them too hard whereas these work on even the dirtiest barrels.
Patches – A cut-up white tee-shirt works well in a pinch but nothing beats a big bag of patches. I usually get the larger-sized ones and cut them to size.
Chamber brush – Gunk in the barrel extension (where the bolt locks into the barrel) can cause trouble so make sure you have some chamber brushes sitting around.
There are also some great AR-15 tools that help with take down and cleaning certain parts of the firearm:
Ready for some controversy? Don’t blow your wad on overpriced gun oils, solvents and lubes and don’t believe their hype. My personal picks are Break FreeCLP and Hoppe’s No. 9 (standard, NOT the synthetic). The Hoppe’s helps break down the carbon build-up and the CLP is great for re-lubing as you are done reassembling.
Safety First
Heavy metals are toxic and can harm you over time. A box of nitrile gloves will go a long way to keep lead from seeping into your skin and causing long-term issues.
Once you are done cleaning, ALWAYS wash up after, and don’t eat or drink while cleaning your guns; seriously, it’s not worth risking your health due to laziness.
Let’s Get Started
Let’s get that rifle apart and start the cleaning!
Gather all of the above supplies. A standard 5.56 AR-15 is .22 caliber, so dig out the cleaning rod and .22 caliber marked jag and put them together.
The AR-15 comes apart really easily. Push your rear pin out until the upper and lower pivot apart; it’s just behind your safety selector. The pin is captured so don’t try to remove it completely. You can clean your gun like this or you can push the front pin out too and take the two halves completely apart.
Pull back on your charging handle gently to release the bolt carrier. Slide your bolt carrier out the back of the upper receiver and set it aside for later cleaning. Pull the charging handle backward until it drops down into the upper receiver and remove it for later cleaning.
Wipe down the inside of the upper receiver and chamber with solvent. Run a solvent-soaked patched down the bore and set your upper aside for a couple of minutes so the solvent can do its job.
Cleaning the Bolt and Carrier
Next, let’s focus on your bolt and carrier. This is where your extra tools come in really handy. The front “geared” looking part is the bolt, the rear is the carrier. With the bolt facing forward, remove the cotter pin on the left side of the carrier. Some nicer carriers have an upgraded pin but they all function the same, they keep the firing pin from falling out.
With that pin removed, tip the front of your bolt carrier up and let the firing pin fall out of the rear. If your rifle is really dirty, it may take some gentle persuasion to drop free, just tap it against your workbench a couple of times.
Next, we will remove the bolt cam pin. On the top of the bolt carrier, you’ll see the gas tube pointing forward. Below the gas tube is the bolt cam pin. With your bolt pushed in, you’ll see that the cam pin cams to the left side of the carrier. Twist the cam pin 90 degrees and pull up to remove it. Without the firing pin in the bolt carrier, the cam pin will spin freely, don’t worry it’s not broken. Pull forward on the bolt to remove it from the carrier.
This is typically the furthest you need to disassemble your bolt and carrier for cleaning. If need be we can go into further bolt disassembly and cleaning next time.
Wipe down the inside and outside of the carrier with a solvent-soaked patch. The inner chamber of the carrier tends to build up carbon so focus your efforts there.
Wipe down the bolt with a solvent-soaked patch. Clean the bolt head and check that the extractor claw is free of debris and that eject piston can move; I usually just push on it with the firing pin to make sure that it moves freely.
At the base of the bolt are 3 gas rings. Make sure that they can spin freely, are clean of any carbon or lead, and that the slots on the rings don’t overlap.
Below the gas rings are where most of the carbon will build up on the bolt. If you have a tool with a carbon scraper, remove what carbon you can. This area doesn’t have to be new, just clean it to the best of your ability.
Quickly wipe down your charging handle and make sure it’s mostly free of carbon, it’ll probably be filthy.
Upper Receiver Cleaning
Now that the bolt and carrier are clean, let’s turn to the upper receiver. Grab a rag or shop towel and clean out the inside of the upper receiver and scrub out the chamber with your chamber brush. Soak some patches in solvent and run them through the barrel until they come out clean; your bore doesn’t need to be factory new, just fairly clean. Run a dry patch or two after to make sure all of the solvent is removed. Lastly, run a patch lightly soaked in CLP down the bore and follow up with a dry patch. You want the barrel to have the slightest bit of oil on the lands and grooves to keep corrosion out, especially if you plan to leave your rifle sitting around for any period of time, looking at you safe queen owners.
Cleaning the Lower Receiver
The last bit of cleaning to do is the lower receiver. Not a whole lot here. Wipe down the fire control group area and your magazine well and make sure the buffer is clean.
Reassembly and Lube
It’s now time to reassemble and lube your gun. Let’s start with the bolt carrier.
The bolt goes into the front of the carrier with the extractor on the right side. Look down from the top at the cam pen slot to make sure that the holes line up. Insert the cam pin and twist it 90 degrees. Put in your firing pin from the rear of the carrier. Insert the cotter pin on the left side of the carrier and make sure that the firing pin moves freely within. Pull forward on the bolt and make sure it’s in the extended position, this is how it needs to be to go back into the upper receiver.
Run a little bit of CLP down the rails on the bolt carrier, they are the flat sections on the bottom and top of the carrier. The AR15 likes to run a bit wet so don’t feel bad if you get a little extra oil here and there. Wipe a bit of lube on the charging handle as well.
Your charging handle goes in first. Remember that it has to go in and up, not just straight into the rear of the upper receiver. If you look in, you’ll see the slot that the charging handle fits into. Don’t go pushing your charging handle all the way in yet though, the bolt carrier has to go in as well. Push the charging handle part of the way in then fit your bolt carrier in under it. Push both forward until the charging handle clicks in place and the bolt locks in. If you can’t get your carrier to seat fully, remove it and make sure that your bolt is extended, not compressed.
Reassemble your upper and lower and reinsert your pins.
Last thing to do is function check your rifle. Make sure you don’t have any ammo or magazines around, we don’t need any trouble at the final stage. Charge your rifle and put it on safe. Pull the trigger to make sure it doesn’t go click. Put it on fire and pull the trigger to make sure it does go click.
Your rifle is ready for life and liberty, and the pursuit of happiness at your next range trip.
Patrick “BabyfaceP” James is a garage gunsmith who loves anything mechanical. His motto is “With enough time and patience we can build anything and together we are learning the best way to build all things gun related.”
AR-15 Inspection: 15 Wear & Failure Points to Check
by Steve Adelmann
<
Regular maintenance of machinery is important to ensure it functions correctly and with minimal wear and tear on its components. Like any other tools that are used heavily, AR-style firearms’ parts occasionally wear out or fail under stress, even with a strict maintenance and cleaning routine. Some parts are more likely to give out than others, so staying ahead of them and keeping a spare (or two) on hand are keys to minimizing down time and maximizing trigger time.
Much of my work involves performing technical inspections (T/I) of AR-15s and fixing problems or improving overall performance of these popular firearms. So I encounter a wide variety of brands and models—from bargain-basement-priced, basic carbines to exclusive rifles that set their owners back a month’s wages (or more). Some parts failure trends have emerged over the years and are reflected here in the order of frequency or likelihood that I encounter them.
I have grouped them into two categories, those components likely to fail prematurely and those that tend to wear out faster than other parts through normal use. The distinction may be irrelevant when your firearm stops working unexpectedly, but parts that fail typically do so without warning and usually cause a complicated malfunction. Parts that wear out tend to do so gradually and may be observed through their decline and avoided through preventative maintenance.
AR-15 Failure Points
Extractor: If I had to pick one part that is most likely to fail without warning, it would be the extractor. That goes for most firearm types I encounter but in the case of ARs, extractors are the number one component I see that crack, chip or fracture—especially where steel-cased ammunition has been used steadily. This tends to happen in the thinner, extractor groove portion or on the lip itself, leaving little or nothing to grab a case rim.
Burrs in the groove can also cause problems so regularly cleaning your extractor and inspecting it closely is a good idea. While subsurface cracks require Non-Destructive Testing (NDT) that is out of reach for most shooters, visible cracks or chips are signs of imminent failure and the need for immediate replacement. Extractor springs and their buffers also need replacing once they remain so compressed (often appearing smashed to one side) that they no longer provide adequate extractor tension.
Check your extractor spring and buffer to ensure it doesn’t look like the worn-out component on the right.
Firing Pin Retaining Pin: Although the cotter-type of FPRP is more likely to bend from the firing pin slamming into it as a result of high pressure loads, they do occasionally fracture one or both legs. I replace bent pins whenever I encounter them just to be safe. The T-shaped firing pin retaining pins commonly found in large frame ARs sometimes lose one of their forks on the split end. A firing pin retaining pin that is missing a leg or which is severely bent loses its spring tension, allowing it to fall out of the carrier easily. Though rare, it is possible for a FPRP to work out just enough during the firearm’s cycle of operation to get bent between the bolt carrier and receiver wall, causing a very difficult-to-clear malfunction.
Gas Rings: Direct Impingement (DI) AR gas rings withstand a great deal of heat and pressure, necessitating eventual replacement. Occasionally one or two rings will fracture and leave a much wider gap than is normally seen. I have had a couple gas rings completely fail (usually when new) and bind up the bolt inside the carrier with mangled pieces of gas ring, but that is fortunately very rare.
Most often, the rings simply wear down over many thousands of rounds fired, letting enough gas sneak around them that the AR starts to get finicky. While one-piece gas rings are far less likely to fracture, they also wear out much faster than do 3-piece ring sets. If your bolt flops in and out of the carrier through gravity alone when turning the bolt carrier group end over end, it’s time to replace your ring(s).
Firing Pin: Though infrequent, a broken firing pin tip will shut down your shooting as fast as any other part failure. The most common that I have seen are in non-standard AR calibers such as .22 LR and 7.62×39, where the firing pin tip geometries are altered to allow proper function. I have never spotted a cracked firing pin that is on the road to breakage, but I have seen them with enough tip damage (usually due to gas jetting from pierced primers) to require replacement.
Carrier Key Screws: Bolt carrier key screws keep the gas seal needed for DI guns to operate correctly. Some piston and blowback operated ARs also have gas keys or carrier protrusions in the key area that are bolted in place. The latter serve as bolt carrier guides and operating rod/rod end impingement surfaces. The carrier key needs to be securely attached to the carrier’s body in order for the bolt to cycle correctly.
A good thread-locking compound combined with correct torques (per manufacturer specs) and staking normally keeps the mounting screws tight but when steps are skipped, these screws can loosen and compromise the key. The screws can also break, though it tends to happen to one and not both at the same time. Drilling out a broken screw is not for the faint of heart but a ‘smith can usually do it to salvage the carrier. The open end of the carrier key also takes a beating if a DI gun’s gas tube is not correctly aligned, so keep an eye on this spot during maintenance and have the situation remedied if you see it getting chewed up.
Operating Rod: Piston-operated ARs sometimes develop problems with their operating/pusher rods. I have repaired one such gun that actually had a fixed operating rod which had bent just enough to bind as it passed through the barrel nut and upper receiver. Replacing the bent rod is the only reliable fix there. I have also noticed some operating rods develop rough spots or slight burrs where they pass through steel bushings in the upper receiver or near the front where they slide in and out of a piston cup. Careful polishing of the rough spots (and corresponding areas they pass through) has fixed the problems I have encountered so far. Neither issue is technically a breakage but either of them can halt proper function. Regular inspection of the operating system from gas regulator back to bolt carrier is a good way to spot any developing problems.
Bolt: Your AR’s bolt takes a lot of abuse but fortunately it was designed with just that in mind. Several different steel types are used for bolts and some last longer than others. Regardless though, the failures tend to be in one of two areas. Bolt bodies can fracture adjacent to the cam pin hole—usually on one side but occasionally breaking on both sides and separating into two pieces. This is typically a long-term wear issue and can sometimes be spotted as a hairline surface crack through close inspection with good light and magnification or once again through the use of NDT equipment.
Locking lugs are the other potential breaking point. Unless a lug breaks off into the chamber area and jams things up, shooters often do not realize a lug breakage has happened until they clean the AR’s bolt. Even if your AR is still functional with a sheared bolt lug, if you are not in the middle of a pitched battle you should replace the bolt with a new one that has been properly head-spaced before shooting further.
Forward Assist Pawl Roll Pin: This little pin is among the tiniest parts in an AR and in the unlikely event it fails, you will most likely know as soon as it happens. The roll pin joins the two halves of the forward assist assembly (button and pawl) together and holds captive a small detent and spring. When it fails, the small parts seem to evaporate but the pawl—that tooth that sticks through the upper receiver wall and impinges on the bolt carrier when pressed—will wedge itself between the bolt carrier and receiver wall.
The only way I have managed to get such an upper apart was to remove the lower receiver’s buffer group and receiver extension, then separate the two and carefully drive the bolt carrier out with purpose-made tooling. It is a painful process and is due to a simple material failure in an area that is not easily inspected. Fortunately this is a very rare event. In my three-plus decades of AR-15 use, I have heard of it once, seen it once and had it happen to a rifle I built for someone else once.
Gas Block Roll Pin: This is another small pin that thankfully does not often fail. It is easy to keep an eye on when the gas block is exposed outside the handguard. If the pin is covered by your AR’s fore-end, you can use a set of needle-nosed pliers to gently tug the gas tube rearward from time to time to ensure it is firmly in place inside the gas block or remove the handguard during maintenance to visually inspect the pin. My Knight’s Armament SR-25’s gas tube roll pin disappeared during a string of fire while I was in SF sniper school. I simply reseated the gas tube, inserted a small Allen wrench through the hole, bent it into a “C” and proceeded to finish my shooting for the day before an armorer replaced it properly.
Gas Tube Roll Pin Hole: This is the weakest portion of the stainless steel gas tubes used on direct impingement systems because it is through-drilled for the afore-mentioned roll pin. Gas tubes do not often fracture here but it does happen, allowing the tube to float freely out of the gas block and halting function. Because this is the front end of the tube, it is inserted into the gas block and completely concealed from visual inspection.
AR-15 Gradual-Wear Issues
Barrel: If you do a lot of shooting, you may have already experienced the “joy” of a shot-out barrel. An internal inspection via bore scope combined with regular throat measurements can often track a burned up barrel in the making but when it goes out for good, it happens in an instant. By that I mean one day your barrel is as accurate as it ever was and then suddenly it turns into a shotgun. If that happens and you have ruled out bad ammo, sighting system failure and shooter error, there is a fair chance that your barrel is a goner. There is no set number of rounds when this happens but thankfully, most common calibers last at least into the thousands of rounds.
The AR barrel that shot the group on the left has a lot of life left, while the barrel that produced the group on the right should be replaced.
Common rifle and carbine barrels intended for heavy use will routinely go into the 15,000 to 30,000 round range before they need replacing. However some magnum chamberings can shoot out a barrel in just a few hundred rounds. How the firearm is used and maintained also affects barrel life. If you have a bore scope, watch for heat-checking from the throat forward. This condition appears similar to the cracked surface of a mud flat after water has dried up. Watching your barrel’s throat advance by measuring it regularly with a throat erosion gauge can also help you track long term wear. Both services can be provided by a gunsmith, preferably starting as early in a barrel’s life as is possible.
Action Spring: More commonly known as the buffer spring, this component needs a certain amount of “springiness” to drive the buffer and bolt carrier group forward in order to complete the cycle of operation. Buffer springs are pretty resilient, usually lasting many thousands or tens of thousands of rounds. I always check them when I perform a technical inspection an AR to ensure they are close to new length, which differs based on the size of AR and type of receiver extension used. My rule of thumb is that once the action spring has been permanently compressed to the point where it is around an inch shorter than a new spring or is permanently bent, I replace it.
Selector Detent: This stubby, nail-shaped pin is what helps keep your selector switch in the last position you rotated it to. A few gazillion cycles of the selector will round off the tip of the pin, allowing the selector rotate too easily. Removing the pistol grip will allow you to check the pin’s tip. If you replace it, put a drop of oil on the tip of the new pin and replace its spring while you are in there.
Buffer tip: The wedge-shaped, synthetic tip on at the rear of your AR’s recoil buffer should last many thousands of rounds but its life can be shortened by anything that increases the force or frequency with which it impacts the rear of the receiver extension. When new, the tip’s outer diameter is nearly the same as the aluminum buffer body. Once it mushrooms out, the amount of dampening it provides is reduced, affecting component wear, bolt carrier speed and overall system timing.
The tip shortens as it mushrooms out too, which can allow the carrier on .308-sized ARs to go too far rearward, impacting the front of the receiver extension, the lower receiver, or both. Replacing the buffer tip is not particularly difficult. Aftermarket buffer tips made of proprietary materials are available from KAK Industries and Blackjack Buffers for about the same cost as stock buffer tips.
Hammer Spring: Back in the days when match spring sets were used to lighten Mil-Spec AR triggers, it was not uncommon to have to replace hammer springs periodically. They still do wear out but the advent of very high quality, drop-in trigger assemblies has brought better springs to the game as well. When a hammer spring stops playing ball, the result is an increasing frequency of light primer strikes/failures to fire. Replacing the hammer spring is not difficult, just be sure you install the new one exactly as the old one was installed.
Handy Spares to Have On-Hand for Your AR-15
Since the most-common failure points on an AR-15 are simple enough to fix, a few spare parts are worth having on hand. An extra extractor (including spring and rubber buffer) is probably the number one item to have. After that I recommend having an extra set of gas rings (if needed on your bolt), firing pin, firing pin retaining pin and extractor pin (because they get lost easily) are worth having. Some pistol grips will hold that complete ensemble but even if yours will not, having them in your range kit is not a bad idea and cost is minimal.
Some of my military and law enforcement customers require a spare bolt assembly for their critical parts kits. I always ensure spare bolts are properly head-spaced to the specific barrels they are intended for and you should do the same. A bolt that fails to headspace can create a very dangerous condition and should not be used with that barrel. Those are the items most easily replaced if broken, worn out or lost but you can expand your parts kit outward from there based on your budget and skill level.
When in doubt, be sure to have someone qualified to work on your AR-15 give it a professional once-over to be sure it remains in top working order.
6.8 Western: A Candid Look at the New Cartridge
by Aram von Benediktposted on June 16, 2022
When a brand-new cartridge is announced, there are always “the celebrators”; those who shout “hurrah!” and throw their hats in the air. There are also “the naysayers”; those who claim we’ve never needed another cartridge since the .30-06 and trash-talk the new round all over the web. And then there are the folks who observe with interest, evaluating the new cartridge to see what it’s made of.
In time, most new cartridges dwindle in popularity. Others, like the venerable .270 Winchester and the 7mm Remington Magnum, prove themselves and develop a sturdy reputation for reliability, accuracy and performance. Still others, like the .30-06 Springfield and 6.5 Creedmoor, become superstars, immortalized by their performance and popularity.
Recent decades have seen unprecedented advancements in cartridge design: Accuracy standards have tightened significantly. We can now analyze bullet performance during flight via doppler radar. Bullets are more streamlined and aerodynamic, riflescopes adjust for distance with the twist of a dial, and shooters have learned that they can consistently shoot three times further than they could a quarter-century ago. Cartridge development has indeed reached a new level.
Enter the 6.8 Western Early in 2020, I was informed of a new cartridge being developed by Winchester and Browning. As a gunwriter, that kind of news always captures my interest, especially since it had been some time since Winchester had announced a new round. A Browning X-Bolt was soon headed my way, chambered in the yet-to-be-announced cartridge. I was excited to see what it could do on the range and in the field. Initial accuracy testing was very promising, and that fall, I was fortunate enough to kill a monster public-land bull elk with the cartridge. Shortly thereafter I watched a buddy harvest a great coues deer buck with the same round, making a perfect first-shot kill at 496 yards.
Almost two years later, the 6.8 Western cartridge has proven itself to be remarkably accurate at the range and truly capable at long distances. Results in the hunting field have been equally impressive. So now the question is, will it last? In 10 years, will the 6.8 be just another has-been cartridge with a tiny corner spot on the gun-store ammo shelves? Or will it reach the respected status maintained by calibers like the .270 Win. and 7mm Rem. Mag.? Might it be capable of stardom like the “ought-six” and Creedmoor? Only time will tell.
Today’s Demanding Arena Fifty years ago, a cartridge in America simply needed to be capable of grouping under 1.5 inches at 100 yards, shooting fast (flat) enough to enable a dead-on hold to 250 yards, and hitting hard enough to kill a deer or elk. Meet those requirements and you had an all-American cartridge. Not so today.
Today in America, a cartridge must be capable of shooting long, aerodynamic, heavy-for-caliber projectiles that carry energy and velocity way out yonder. It must boast accuracy the old-time riflemen only dreamed about; if it won’t shoot into .75-MOA or less it’s going to get dumped along the side of the road. And it’s got to look cool. Meet all these requirements and you just might have a popular new American cartridge.
That in mind, let’s compare the four proven cartridges I’ve mentioned against the 6.8 Western. We’ll look at four practical elements:
Accuracy: I’ll give a subjective analysis here, based on 3½ decades of shooting experience.
Velocity: Here I’ll provide muzzle velocity in feet per second (fps) as well as velocity at 1,000 yards.
Aerodynamics: I’ll cover G1 ballistic coefficient (BC) numbers (higher is better), drop (which illustrates a cartridge’s ability to carry velocity and energy) and wind drift (wind-bucking ability).
Estimated Maximum Lethal Range: To attain this number I’ve simply looked at the maximum distance a bullet maintains 2000 or more fps of velocity. Some bullets will expand adequately at lower velocities, but we knowthat almost any hunting bullet will expand nicely at 2000 fps and faster. So, I’ve chosen that as my minimum velocity threshold. Yes, you can almost certainly hit a game animal at farther distances than those shown. But I’ve seen big game shot perfectly at long range when velocity was not adequate and the bullets did not expand. The outcome was not desirable.
*Author’s Note: These numbers are for comparison’s sake only. If you plan to shoot at game at extended ranges, do your research and learn exactly what your bullet’s minimum expansion velocity requirement is. Calculate at what distance your bullet drops below that threshold, and keep shots inside that range.
6.5 Creedmoor This is the favorite child of modern cartridge design. Originally built for 1,000-yard competitive shooting, the 6.5 Creedmoor is now widely accepted as an awesome hunting round as well, especially for deer-sized game. It has achieved unprecedented popularity due to what might be summed up as it’s “friendly nature”. It’s superbly accurate; with good ammo, most rifles will produce .75-MOA or better accuracy. Aerodynamics are the Creedmoor’s game: barrels are typically rifled with 1:8-inch twist and long, high-BC projectiles are the norm. Recoil is mild. It’s not super fast, which is a double-edged sword; barrel life is superb, but velocity drops below a reliable expansion threshold relatively early. Using long-range ammo, the Creedmoor’s 2000 fps range is just over 600 yards.
.270 Winchester The .270 Winchester has been an American favorite for nearly a century, and rightly so. It is mild tempered, accurate and shoots superbly flat out to 300 yards or so. It’s great for deer- and pronghorn-sized game, and with premium bullets and careful shot placement, is adequate for elk. Developed long before laser rangefinders were invented, it met the needs of the day by sending light(ish) projectiles downrange as fast as possible, to eliminate the need for hold-over as far out as practical. This necessitated a relatively slow rifling twist rate, around one turn in 10 or 12 inches. This is the lone fact that makes the .270 less capable at long range; those slow-twist barrels don’t stabilize long, high-BC projectiles well. Typical accuracy is in the 1 to 1.5-MOA range, though some rifles will shoot significantly better. With quality hunting ammo, this cartridge maintains 2000 fps velocity to around 600 yards. After that velocity diminishes very quickly.
7mm Remington Magnum The 7mm Remington Magnum has long been a favorite of Western hunters, providing flat-shooting performance like the .270 Win. on steroids. The 7mm, however, seamlessly made the transition to high-BC bullets, rapidly becoming one of America’s favorite long-range hunting rounds. It’s awesome for all big game, including moose. Barrel life is not awesome, nor is magazine capacity, but this cartridge flat-out gets the job done. Accuracy is as good as the rifle and the ammunition you feed it; most premium-ammo-fed modern rifles will shoot under 1-MOA, and some will shoot much better. Recoil is moderate, and 2000-plus fps velocity superb at around 800 yards.
.30-06 Springfield This is one of my all-time favorite calibers, and I’m not alone in that sentiment. For well over a century, it’s been America’s favorite go-to cartridge for big game. It served well in both world wars. The .30-06 Springfield is a noble round. It’s not as flat shooting as the .270 or 7mm, but it shoots flat enough and hits significantly harder. Recoil is on the upper end of moderate. But like the .270, most .30-06 barrels lack sufficient twist rate to stabilize long, aerodynamic projectiles. And it doesn’t have quite the powder capacity needed to send heavy, high-BC .30-caliber bullets downrange at significant enough velocities to perform well at very long range. Accuracy is generally in the 1- to 1.5-MOA range (which, back when the round was developed, was incredibly good), though high-end rifles can and often do shoot much better. With good ammo, the .30-06 will stay above 2000 fps to 500-plus yards.
6.8 Western Since it’s announcement in early 2021, the 6.8 Western has developed an inspiring reputation for accuracy. The cartridge was developed in collaboration by Winchester and Browning, and was initially chambered in Browning X-Bolt rifles. These rifles usually averaged 0.5- to 0.75-MOA accuracy—like I said, inspiring. The round looks good on paper too; not super fast, so barrel life should be good, yet fast enough to carry way out yonder. Standard barrel twist rate is suitable for long, heavy-for-caliber projectiles. Overall cartridge length is 2.995 inches, short enough to chamber in short-action rifle actions, which are slightly faster to cycle and lighter in weight. Typical bullet weights are adequate for any North American game except for the big bears. Recoil is moderate, and with long-range ammo, the round maintains 2000 fps velocity to beyond 800 yards. In the hunting field, the Western has exceled. Though I don’t care to brag about such things, I made the longest hunting shot of my life with the 6.8 on a quartered-away bull elk at dusk. The bull dropped in his tracks to an accurate first-round hit.
Conclusion Will the 6.8 Western become immortal as an American hunting round? Only time will tell, though in my opinion, it has all the makings. Could it become a superstar like the 6.5 Creedmoor and the .30-06 Springfield? Possibly, though only two hunting cartridges have developed that kind of superpower in history, so it’s not likely. Might it become an American standard, like the .270 Winchester and the 7mm Remington Magnum? I think so. It is accurate, forgiving, hard-hitting and superb at long range. It even has a catchy name. Early in this article we posed the question; “Is the 6.8 Western as good as it sounds?” Why yes, yes it is.
Comparison Table Data was collected via manufacturer-advertised BC and velocity numbers, which were then crunched in the author’s Ballistic AE app.
Cartridge/Bullet
G1 BC
Muzzle Velocity
Drop at 500 Yards in Inches
Wind Drift at 500 Yards in Inches
2000 fps Threshold
1,000-Yard Velocity
6.5 CM/Hornady 143-gr. ELD-X
0.623
2700 fps
42”
4.4”
615 yds
1618 fps
6.5 CM/Federal Premium 130-gr. Terminal Ascent
0.532
2800 fps
40.4”
5.1”
590 yds
1537 fps
.270 Win./Nosler 130-gr. AccuBond
0.435
3060 fps
35.3”
5.7”
620 yds
1483 fps
.270 Win./Nosler 130-gr. Partition
0.416
3060 fps
35.8
6.0”
590 yds
1430 fps
7mm Rem. Mag./ Federal Premium 155-gr. Terminal Ascent
0.586
3000 fps
33.7”
4.1”
795 yds
1777 fps
7mm Rem. Mag./Hornady 162-gr. ELD-X
0.631
2940 fps
34.6”
3.8”
805yds
1807 fps
.30-06 Sprg./Nosler 180-gr. AccuBond
0.507
2700 fps
44.5”
5.7”
495
1432 fps
.30-06 Sprg./Hornady 178-gr. ELD-X
0.552
2750 fps
41.6”
5.0
580yds
1539 fps
6.8 Western/Nosler 165-gr. AccuBond LR
0.620
2970 fps
33.9”
3.9”
820 yds
1812 fps
6.8 Western/ Winchester 162-gr. Copper Impact
Red Dot Hacks [The ONE Zeroing Tip You Need To Know]
3/23/2022 - Primary Arms Staff
New gun-owners, and even those who have been shooting a long time, can easily get confused and frustrated when trying to sight in their rifles. It’s not quite as easy as it seems like it should be.
We’ve got the answer for you, though. Here’s the simple, easy to remember hack that’ll save you time when sighting in your red dot sight.
MOVING THE POINT OF IMPACT
You’ve probably seen that, on any rifle optic, there will be a direction marked on the scope turrets. Usually little arrows placed next to a U for “Up” and an R for “Right” on the elevation and windage knobs, respectively. This indicates where your point of impact will shift when you turn the turret in that direction. That’s the ONE thing that confuses more people than anything else.
In a sense, it’s easier to think about it as if you’re using your turrets to steer the bullet hole on the paper to the target’s center.
If you’ve got your reticle centered on the paper target, and your bullets are hitting low, you want to turn in the direction indicated for “Up” to move the point of impact higher. If you are hitting to the left, turn in the direction indicated for “Right” to move the point of impact to the right.
It’s that easy. Just remember that you’re shifting the bullet’s point of impact and you’ll save a lot of frustration.
Here’s some more tips to maximize your range time when sighting in a red dot.
HOW TO MAKE ADJUSTMENTS
Make sure to bring a simple, medium sized flathead screwdriver with you. The flat blade matches up with the shape of the slot better than a coin or cartridge rim does, allowing you to feel each turret click and reducing the chance that you will damage the turret or scratch up the housing. Just take our word for it, it’ll save you heartache. Throw one in your range bag and don’t worry about needing to remember it ever again.
Because the internals of these turrets are very finely machined and tiny components, you should protect them by making your clicks smoothly and slowly. If the turret stops turning, don’t try to force it. You’ve reached the end of the turret’s travel and something is probably wrong with how the optic has been mounted to the rifle, accounting for the need for extreme turret adjustments. Trying to force additional point of impact adjustment beyond the turret’s travel will only break your red dot’s internals and ruin your day. Don’t do it!
ADJUST ONE DIRECTION AT A TIME
Fire a consistent 3-shot group and then decide whether you want to adjust elevation or windage first. Try to make all your adjustment at once.
Marksmen unsure of their click values or the math involved will often just count three or four clicks and shoot again, slowly working their way towards the center of the target in a long string of bullet holes.
While it’s fun to shoot through a lot of boxes of ammo, this high volume of fire method can heat up your rifle barrel, causing a point of impact shift issue. Once the barrel cools off again, the point of impact returns to a slightly different location and your rifle isn’t as perfectly sighted in as you originally thought. Instead, measure the difference between your shot group’s location and your point of aim, and divide it by the distance covered by each turret click.
1 Minute of Angle (MOA) covers 1.047 inches at 100 yards, with most users preferring to round that figure off to just 1 inch. Most red dots feature either 1 MOA or 0.5 MOA-per-click turrets, so at 100 yards a 1 MOA-per-click optic will shift its point of impact about 1 inch per click, and a 0.5 MOA-per-click optic will shift its point of impact about half an inch per click. You can use a sight-in style target featuring a 1-inch grid pattern or bring a tape measure and measure the distance between your point of aim and your shot group’s point of impact to determine how much adjustment is needed.
If you’re sighting in at less than 100 yards, some easy division will help you determine how far one click will shift your bullet’s point of impact at, say, 25 yards. You are 1/4th as far away from the target at 25 yards as you’d be at 100 yards, so your adjustment clicks will be 1/4th as “effective” at moving your point of impact. If a 1 MOA adjustment at 100 yards is roughly an inch, at 1/4th the distance it’ll be 1/4th of an inch. No brainer.
Here's a couple of quick reference charts that provide the number of clicks needed to move the point of impact 1 inch given a certain MOA Click value and distance, as well as the distance in inches, roughly, that one click will move the point of impact given a certain MOA click value and distance.
Get the accuracy you want out of your rifle and red dot sight. It’s not hard, just take it slow, shoot as accurately as you can, be safe and have fun!
Matching twist rate and bullet weight in rifles
The are many benefits to understanding and matching the twist rate of your barrel with the projectile weight you are using. Primarily, accuracy. This article is a high-level overview of the subject, and as such, a few concepts and terms are simplified. If you want a truly in-depth study of the subject – get Brian Litz’s series of books from Applied Ballistics. If you want functional information, read on.
Too fast a twist rate and the projectile can potentially damage the projectile jacket as the excessive force separates the jacket from the core. As we get faster and faster twist rates – this is becoming more of an issue. I personally know a few guys with 1:7.5 Creedmoors that are having the Hornady Match projectiles spinning their jackets off on them mid-air.
Twist rates and bullet weight are often understood, but there are some simple and practical guidelines.
But first, a little background.
TWIST RATE
You can read an expanded article on twist rate over here – but in summary, a twist rate is the number of times your rifling (the groove in your firearm barrel) makes a full revolution over a set distance – this is generally expressed in inches – so a “1 in 10” makes one revolution of rifling every ten inches of barrel length.
BULLET WEIGHT
Bullet weight has increased as we are reached out further and further with our rifles.
A heavier projectile (more grains) will often come with a better (higher BC) – that is, the ability of the projectile to buck wind – they fly truer, for longer.
However, it’s not just as simple as putting the heaviest bullet you can down the barrel. More weight requires more powder to move – and speed is still a priority as a slow-moving bullet spends more time in the air, has more time to be affected by the wind, and in the understanding that everything drops at the same speed (thanks, gravity!) the faster it moves, the further it can reach with less ballistic drop.
MATCHING TWIST RATES AND BULLET WEIGHT
So, in very simple terms, the heavier the projectile (it is actually a function of bullet length and sectional density, but we are simplifying things here), the faster (lower number) twist rate you are likely to want to utilise.
I know, I know, just tell us already – what do I put in my rifle?
Well – here is a very basic chart that will set you off on the right foot. Like all things reloading, there are always exceptions.
When shooting a firearm, one gets to experience Newton’s Third Law of Motion. It states, “For every action, there is an equal and opposite reaction.” In the firearms community, we refer to that motion as recoil, to some degree. Every shooter is made aware of recoil, no matter what type of firearm they are using.
Why use muzzle brakes?
Many people are very sensitive to recoil and their shooting suffers tremendously because of it. Machismo aside, the more powerful the firearm, the greater the recoil, and the more uncomfortable the firearm is to shoot. I have fired everything from .22 CB caps to .470 Nitro Express cartridges, and I am here to tell you, the big bruisers can be painful to shoot for extended strings.
A ported barrel on a P12 .45.
That is especially true when sighting them in or working up a handload off the bench where all human error must be eliminated. Another aspect of recoil is the tendency for the muzzle to rotate up. That rotation is a direct result of the design of the grip, stock, and human anatomy. It is especially noticeable with handguns because the gun is not supported on the shoulder and the wrist. If not locked, it will rotate up.
Depending on the type of handgun you are shooting, that rotation can be controlled somewhat with the correct shooting technique — depending on the type and size of the handgun, and the grip and strength of the shooter. This exaggerated effect is called muzzle climb or muzzle rise, although more recently some have coined the phrase “muzzle flip” which I personally don’t care for because “flip” connotes a lack of control.
Let’s first examine how this occurs. When a firearm is discharged, there are many forces that act upon it. The most significant are the gases generated by the burning propellant, which propel the bullet down and out the barrel. As previously stated, “For every action, there is an equal and opposite reaction.” Meaning that energy also pushes back on the firearm into the shooter.
It must be noted that the weight of the projectile also has an effect on the recoil energy generated. An example would be a shooter firing a 180-grain bullet out of a .30-06 would feel more recoil than if he fired 150-grain bullet out of the same rifle. E=mc2.
Lots of tinkerers have tried to tame these effects over the years and have come up with some pretty ingenious solutions, including shock absorbers that go in the stock. I never cared for those because they threw the balance of a rifle off and did not control the rising of the muzzle. As for handguns, some grips are purposely designed to allow the muzzle to rotate up as the wrist allows that rotation. Conversely, combat handguns are designed to be fired with a locked wrist, so the recoil is controlled, and the gun remains on target for fast follow-up shots.
A ported barrel on a Freedom Arms .454.
I tried porting and compensators early on and found that they did in fact keep the muzzle down. However, the flash was redirected up and was very distracting — especially in low light situations.
What one must understand is that everything you cut into or hang on the end of a barrel is equal in the sense that it is redirecting the gases to counter something. Ports, mostly found on handguns, direct most of those escaping gases upward, thereby pushing the muzzle down. However, they don’t do much about the recoil to the rear.
Ports are designed to counteract the torque on the pistol that is forcing your wrist to rotate up, while your wrist is in turn trying to push the muzzle down and point at the target. Porting basically, involves drilling or cutting precise openings near the end of the barrel, which allows some of the gases behind the bullet to escape.
A ported barrel S&W K-Comp.
Primarily designed for the gases to vent upwards as the bullet is exiting the barrel, thereby pushing the barrel down. Ports do that well, but again, they are less effective at addressing the forces moving rearward. There are many approaches to ports on handguns, and yes, I have tried several of them as shown by the photos.
Types of Brakes
As you can also see in the accompanying photos, compensators and muzzle brakes are different than ports in what and how they accomplish what they do. Muzzle brakes can be machined integrally, near the muzzle of the barrel, but most often consist of a barrel extension. The brakes usually contain several openings cut along their sides, top, and bottom.
These openings allow the gases to escape at various angles to the muzzle, which not only helps reduce the muzzle climb, but also counteracts and reduces the movement to the rear, i.e., the recoil of the weapon. As for ports, compensators, or brakes on firearms, there was a time when I felt like I had spent lots of time and money with nothing really effective to show for it.
Herb and I with a nice Cretaceous Pachyrhinosaurus taken on our trip together.
As faith would have it, back in the “Age of Dinosaurs” (See the proof in the accompanying photo) I was on a varmint hunt with friends and retired predator control officer Herb Brusman in Oregon when one day, we got rained out. Herb asked if I would mind taking a ride with him to pick up a rifle that he had made up in .338/378.
During the ride, I gave Herb some good-natured jabs about why he would want something that punishing to shoot. I told him that you could only kill something so dead. He replied he needed it for those really long shots on elk. We arrived at the shop of Wayne Davidson, and Herb was understandably excited about getting his rifle and shooting it.
I noticed a huge ugly thing attached to the end of the barrel and asked what in the world it was. Wayne replied that it was a combination muzzle brake and compensator of his own design, and he guaranteed it to work. Of course, in my smart-ass way, I exclaimed, Yeah Right! At which point, he took a handful of shells and challenged me to take it out back and shoot it with the statement, “Just place it on the palm of your hand, lightly against your shoulder, and press the trigger. I guarantee it will not move.”
No Thanks! How dumb do I look? Well, Herb was anxious to try it, so off we went. He loaded it up and touched it off, Now, I fully expected him to be knocked over, but I did not see any effect. He turned to me and said, “This is amazing you’ve got to try it.” I must admit, my curiosity was getting the better of me so I figured if he could, I could.
Now I had fired many express rifles and big boomers, so I assumed a stance and grip as if a .458 Lott was being mounted and pressed the trigger. To my amazement, other than it being loud, I felt almost nothing. I asked herb if I could try it one more time.
Two other muzzle brakes that look cool — especially the barrel with the snake pattern fluting — unfortunately, neither design works as good as they look.
For the second shot, I followed Wayne’s instructions, placing it on the palm of my hand and lightly against my shoulder. In the back of my mind, I thought it was a trick with a light load in the first round to pay me back for my big mouth. To my amazement, again, the rifle did not move.
When we got back to Wayne’s shop, I was offered up some humble pie and asked if he could provide some of his muzzle brakes for my rifles. One of the included photos shows the first such brake Wayne provided for my .338 Win Mag beater rifle. Wayne’s brake combined all three of those solutions in one device but it sure is ugly and very loud — if you’re standing to the side. He also solved the problem of using one of those devices prone — no dirt gets kicked up.
My next African Safari was to Zambia with PH John Coleman. On that Safari, I was armed with the .338 Win Mag and a .375 H&H — both sporting Wayne’s muzzle brakes. One evening, during Sundowners, John commented on how he had never seen anyone call his shots as accurately as I had been doing.
In this series of photos, you can see I just fired and there is no recoil occurring with my .375 H&H. Also apparent is the intensity of the redirected sound affecting John by his reaction.
I did not have the heart to tell him that I wasn’t calling my shots, I was seeing the bullets hit. He was also pretty vocal about not liking the muzzle blast he was being forced to endure, which was VERY loud as you can see by John’s reaction in the photos.
When I returned from Africa, I called to thank Wayne. He put me in contact with gun scribe Earl Etter who was doing an article on brakes for Gun Digest, if memory serves. He was also taken with Wayne’s work and stated that of all the compensators and brakes he had tested, Wayne’s was the only one that really worked.
A good photo of the Davidson brake on my Beater .338 Win. Mag. Also included in the photo is your humble scribe… OK, not so humble with a nice Luangwa Hippo.
Final Thoughts
As long as I am talking about brakes, could someone please explain to me why the state of Komiefornia thinks brakes are less lethal than flash suppressors? Flash suppressors only suppress the muzzle flash. Brakes keep you on target enabling faster follow-up shots… Politicians… Go figure! That said, I discourage the use of brakes on tactical (AR) rifles, because of the disruptive muzzle blast that will affect anyone near you — even with the best hearing protection.
Perhaps you already know why it’s important to have an appropriate rate of twist for your rifle barrel. If that’s the case, please bear with us for a moment while we briefly cover the essentials of rifling and twist rate. Don’t worry, we’ll skip any lessons in history or physics.
Inside every modern rifle (or pistol) barrel, you will find rifling. The lands and grooves of rifling are arranged in a spiral formation. Rifling enables the bullet to engage with the barrel’s bore, exit the muzzle rotating, and continue to rotate as it flies forward. Like a football, a bullet is more accurate when you put a little spin on it.
A barrel’s rate of twist describes the spiral of its rifling. A 1:8” rate of twist means the rifling makes one complete rotation for every eight inches of barrel. If a foot-long barrel has a 1:12” rate of twist, then a bullet fired through it will make exactly one full rotation before exiting the muzzle.
The correct rate of twist is necessary for accurate performance. A bullet which does not receive adequate rotational stability from its barrel will turn sideways mid-flight. A tumbling bullet fails to keep its ballistically efficient nose facing downrange, so it loses velocity at an accelerated rate. It will very likely hit its target sideways, thus severely limiting potential penetration depth as well.
That’s the condensed introduction to twist rate. Now we come to the real meat and potatoes part of this discussion:
What Is the Right Twist Rate for a 308 Rifle?
The ideal rate of twist for a 308 rifle would give the bullet a gyroscopic stability factor of 1.3 at minimum, although 1.5 is preferable if you are firing over longer ranges. If a bullet’s stability factor falls beneath the 1.3 threshold, its ballistic coefficient (the measure of its ability to overcome air resistance in flight) decays proportionately. It will exhibit a steeper trajectory and its overall accuracy will suffer as the result.
A bullet which rotates too little has an inferior stability factor. But what if a bullet rotates too much? Does that similarly harm its accuracy? The answer is: perhaps.
An overly aggressive rate of twist may cause the bullet to exhibit excessive yaw and spin drift. It will accordingly perform less accurately over extremely long ranges. Delicate and lightweight bullets are also at risk of tearing themselves apart if they rotate too quickly. To keep things safe you should strive for a stability factor between 1.3 and 2, although exceeding 2 will likely produce no discernible detriment in performance.
.308 Win Twist Rate Chart
Bullet Weight (gr)
Bullet Length (in)
Bullet Type
1:14
1:12
1:11
1:10
1:8
Bullet Weight (gr)
Bullet Length (in)
Bullet Type
1:14
1:12
1:11
1:10
1:8
110
0.668
FMJBT
4.419
6.015
7.158
8.661
13.533
130
1.074
SP
1.408
1.916
2.281
2.76
4.312
150
1.11
FMJBT
1.479
2.013
2.395
2.898
4.529
155
1.256
HPBT
1.071
1.458
1.736
2.1
3.281
165
1.175
SP
1.382
1.881
2.239
2.709
4.232
168
1.232
HPBT
1.228
1.671
1.989
2.407
3.76
170
1.247
FMJBT
1.2
1.633
1.944
2.352
3.674
175
1.288
HPBT
1.125
1.531
1.822
2.205
3.445
180
1.26
SP
1.233
1.678
1.997
2.417
3.776
185
1.308
FMJBT
1.137
1.548
1.842
2.229
3.483
210
1.459
HPBT
0.94
1.279
1.523
1.842
2.879
225
1.558
HPBT
0.831
1.132
1.347
1.63
2.546
230
1.602
OTM
0.783
1.066
1.269
1.535
2.399
To summarize: You want your 308 rifle’s barrel to give the bullet a stability factor between 1.3 and 2 at minimum. That said, a higher stability factor is not likely to harm accuracy.
Even JBM Ballistics’ straightforward stability calculator requires more information than many shooters know about their 308 ammo and bullets. You probably don’t want to yank the bullet out of a loaded cartridge just so you can measure its overall length. That’s why we prepared a handy 308 barrel twist chart for your reference.
It’s plain to see how much a bullet’s weight influences its ideal rate of twist. A heavier bullet requires more rotations before it can achieve optimal rotational stability.
That said, while consulting our chart it is important to keep in mind that ballistics are heavily impacted by atmospheric conditions and subtle differences between cartridges. This is true even when manufacturers deliver ammo from the same factory lot.
Furthermore – and more importantly – the bullet’s muzzle velocity and the rifle’s barrel length both greatly influence the stability factor the bullet will achieve. Muzzle velocity varies considerably cartridge to cartridge. That’s why our chart, which assumes a 2,800 fps muzzle velocity across the board, is not a definitive guide to 308 barrel twists. But it does provide a solid idea of what you should be shooting for!
USA – -(Ammoland.com)- Understanding the principles of making subsonic ammunition takes time and a bit of creativity. I got into the game of subsonic shooting a few years back when I was debating taking a dive into suppressor ownership. Despite the fact that I never actually got a can, I learned a great deal about what it takes to not only make subsonic ammunition work in a rifle but some tips and tricks for maximizing your gear and reloading economy.
There are two things that we’re looking for when we get into the subsonic game. First, it is obviously a working velocity below the speed of sound. This may seem like a no-brainer, but it is my belief that truly functional subsonic ammunition needs to always be under the speed of sound, not flirting with it.
As a result, I have found that a velocity of 1050fps at the muzzle is a nearly optimum speed for any condition range. Granted, you may pick up or lose some speed given external variables, but fear not as there isn’t that big of a difference in performance at the effective range of most subsonic cartridges.
The second thing to concern yourself is one that often escapes people: bullet stability. The projectile must be able to stabilize in subsonic flight in order to be accurate. Again, seems like a no-brainer but I’ve seen many guys load subsonic that keyhole at 100 yards or less. You don’t want that to happen with an expensive suppressor attached.
A Bolt Action Rifle was used for shooting Subsonic .308 Win Handloads
For this article I’ll be using .308 Win ammunition in a bolt action as my example as it is easily made subsonic and is a good cartridge to begin working with.
Why not a semiauto .300 Blackout? I’m using the .308 in a bolt gun because it allows more linear testing without the variable of cycling pressure and gas bleed-off. In short, I’m using something that simply launches bullets in order to remove obstructions that could cause error.
The rifle I have has a 13.5” barrel with a 1:10 twist. This twist rate is common to many .308/7.62 rifles and is in my opinion the most versatile twist rate available for any .30 caliber bore.
Why not a 1:12? Easy. I’ve found that the 1:12 twist rate isn’t fast enough to stabilize most projectiles moving at subsonic speeds. You are almost guaranteed a keyhole from a 1:12 bore.
The tighter twist rate enables the slow-moving bullets to gain a bit more gyroscopic stability in flight and this is a huge thing when we’re dealing with low pressures and short ranges.
IMR Trail Boss is 100% Smokeless Powder
In this test I’ll be loading several bullet options from Hornady and I’ll be using the premier subsonic powder on the market: IMR Trail Boss Powder. Trail Boss (TB) was originally designed to work in cowboy action cartridges like .38 Special and .45 Colt. I load lots of .38 with Trail Boss and love how it works. The kernels of powder look like little Cheerios at first glance. This powder is suited to .308 because it is made to take up lots of internal space inside the case. Fifteen grains of TB is enough to nearly fill a .308 case. What this provides is an even and consistent cartridge ignition.
Other pistol powders will not fill the case and this can result in erratic velocities or dangerous pressure curves.
There are several schools of thought when it comes to picking the right bullets for subsonic use. Most are familiar with the use of heavy match bullets in the .300 Blackout and rightfully so. The 1:7 or 1:8 twist rates of the .300 Blackout offer themselves to reliable and accurate performance with a truly massive range of bullet weights.
The bullets I’ll be using are the new Hornady ELD Match 225gr and the more traditional 180gr RN Interlock. These bullets each represent an extreme on the scale of shape and performance. The 180gr RN is a fairly archaic design and would be right at home in vintage .30-03 loadings dating back over one hundred years while the 225gr ELD bullet represents the very cutting edge of projectile technology in our current age. So which one will fare better at the same speed?
.308 WIN Lapua Rifle Brass
Since our target velocity is 1050fps, I began load development starting high and working my way down. Yes, you read that right. Starting high ensures that you know the ceiling of your loads given that there is a danger of getting a bullet stuck in the barrel if you start too low.
It is far better to reduce a load from 1200fps to 1050 than to start out at 600fps and accidently blow your gun up.
The information below is only for your reference. This information is solely for my rifle and my reloading setup. You will doubtlessly experience problems if you use my data in a rifle with a longer or shorter barrel. I loaded all rounds to feed from an Alpha Mags AICS pattern magazine.
I began with some preliminary research into some reloading manuals and internet forums. I’m always careful to believe what is in either for different reasons. With a rough idea in mind, I started the process with neck-sized Lapua Rifle Brass. I decided it best to test my hand loads with both standard and magnum primers to see if there were any differences in velocity or consistency. Many people drill out their primer flash holes, but I’ve found this to be unnecessary and a hassle to inexperienced reloaders. Primers used in the test were CCI #200 Large rifle and Winchester 9 ½ Magnum.
Subsonic Handloads in .308 Win – Testing Results
I started the 180gr loads seated to the cannelure with 12, 11, and 10 grains of TB. I made three each with standard and magnum primers. I could’ve started a bit hotter with 13 or even 14 grains for this bullet, but I decided to keep it standard when compared to the 225gr bullets.
Because of the length of the 225gr bullet, I became concerned with the available space inside my Lapua brass. I originally wanted to start with 13gr of TB, but I heard crunching when I seated the bullets to mag length. This is a huge problem if you’re using TB, as it should not be compressed at all. As such, I decided it best to use the same charge weights as the 180gr load. Just like I mentioned earlier, three of each charge weight were loaded with both magnum and standard primers.
Loads were tested using an Oehler 35P chronograph at a distance of five feet from the muzzle. Weather conditions were pleasant at 50 degrees Fahrenheit. The loads were tested for both accuracy, stability, and velocity at a proving range of 25 yards and for accuracy only at 100 yards.
My data gave me a bit of a surprise because my starting loads of 12gr were pretty darn close to what I was looking for. It isn’t often that I get my way right off the bat, so I was pretty happy with the results. The 180gr load with 12gr of TB gave me an average of about 1090fps. This was close enough to my intended goal of 1050 that I decided to call it good. Not to waste a good day at the range, I fired the rest for data and received interesting results.
I found that there was no discernible correlation between velocity and standard vs. magnum primers. What I did discover about the primers was that there was a difference in regard to accuracy. I suspect that the magnum primers allow for a more consistent powder burn due to the increased flash duration. The magnum primer load in the 180gr/12gr load was substantially more accurate at 100yds than the standard LR primer variation. I managed to group impressively at 100 yards using a Trijicon Reflex sight. This isn’t an ideal optic for shooting groups from a precision rifle, but I expect that I wouldn’t have done all that much better using a magnified scope.
The 180gr/12gr loads shot about 1 MOA at 100 yards and showed no signs of keyholes or tumbling. Good enough for me.
I noticed instability in the 225gr loads in the appearance of deformed entry holes at both 25 and 100 yards. The twist rate was fast enough to be accurate by most standards, but the velocity just wasn’t there while using TB and a 13.5” barrel. The fastest I got the 225gr bullet going was a load average of 936fps while at max case capacity. I suspect that I could indeed get a faster and better load out of the 225 ELD if I loaded the bullet longer and added more powder in the newly freed space in the case, but that would defeat the purpose of having a magazine-fed rifle.
Getting subsonic loads to function in your rifle can be both fun and frustrating. As I learned from my testing, getting a functional load isn’t hard to do, but care must be taken to ensure proper safety, accuracy, and reliability. The last suggestion for subsonic loads: don’t just start the loads high, make sure you take aim high.
About Josh Wayner:
Josh Wayner has been writing in the gun industry for five years. He is an active competition shooter with 14 medals from Camp Perry. In addition to firearms-related work, Josh enjoys working with animals and researching conservation projects in his home state of Michigan.
5 Best Long-Range Hunting Bullets Available Right Now
Want to reach way out with your hunting rifle? Using one of these bullets will help with long-range hunting success.
April 01, 2022By Joseph von Benedikt
America has always been a nation of riflemen. From the longrifle-toting minutemen of the Revolutionary War to Billy Dixon’s long shot at the Battle of Adobe Wells from Sergeant York’s exploits in World War I up to the crack shots of modern PRS competitions, we live and breathe accurate shooting at far-away targets.
Hunters, particularly Western hunters who prowl wide-open country, have always strived to extend their ethical lethal capabilities. And while many pieces equal the complete puzzle, no single element of modern equipment has contributed more to accomplishing long-range capability than purpose-built long-range hunting projectiles.
Here’s a look at the best of the best, starting with the bullet that launched—and still typifies—the type and trend.
1.Berger VLD Hunting
Without doubt, this is the most universally accurate bullet on this list. With a bit of handload tuning, just about any rifle with a good, well-chambered barrel and properly bedded action will shoot half-MOA groups with a Berger VLD bullet. Plus, it’s a simple bullet. No tip. No bonding. No taper to the jacket. Simplicity, in this case, contributes to consistency. Excellent ballistic coefficients enable the VLD Hunting bullet to maintain velocity, which helps it buck wind and maintain energy way out there.
Its Achilles’ Heel is a somewhat unpredictable terminal performance. Most of the time, it penetrates 3 to 5 inches, then grenades into fragments, pulverizing the vitals and killing quickly. Occasionally, however, it fails to expand and penetrates through like a knitting needle. To minimize this tendency, avoid impact speeds of less than 1,800 fps. Conversely, the Berger VLD occasionally will grenade on the surface, leaving a grapefruit-size impact crater but failing to penetrate through the vitals. To minimize that tendency, avoid impact speeds of more than 2,800 fps.
Minimum recommended velocity: 1,800 fps.
2. Barnes LRX
This bullet features all-copper construction., and as a result, it’s impossible to break it up entirely into fragments on impact. Reliable, deep penetration is the hallmark characteristic of the LRX (Long Range X). Combined with moderate but predictable expansion, that penetration gives this bullet outstanding terminal performance marks.
Because copper inherently has less mass than lead, the LRX does not have a super-high ballistic coefficient (BC). Aerodynamics are good, but not great. On the plus side, the LRX is arguably the second most accurate bullet on this list, commonly shooting sub-half-MOA with a good handload.
An LRX will kill cleanly from any reasonable shot angle. It will usually exit, providing a good blood trail. Because it does not fragment at the nose, there will be a lack of secondary projectiles and fragments spiraling off from the bullet. This is good and bad: Good because meat is untainted by microscopic lead fragments; bad because the LRX sometimes doesn’t kill quite as quickly as a lead-core bullet usually does.
When stepping up in game size appropriate for a given cartridge—for instance, when hunting elk with the 6.5 Creedmoor—the LRX is absolutely the best choice for hunters because it penetrates out of proportion to its average, in essence enabling it to punch way above its weight class.
Minimum recommended velocity: 1,600 to 1,800 fps depending on caliber and weight.
3.Federal Terminal Ascent
Featuring a solid copper back half and a lead core bonded into the front half, this bullet is arguably the best all-purpose hunting bullet ever designed. It expands like a soft, rapid-expansion deer bullet; maintains its weight like a premium bonded dangerous-game bullet; and penetrates nearly like a monometal bullet. Reliably. Every time.
Aerodynamics are excellent, too, nipping at the heels of the best Berger and Hornady high-BC bullets on the market. A boattail and a space-age composite tip further enhance flight characteristics. Accuracy is excellent but can be elusive, requiring a bit more handload tuning than the more forgiving bullets on this list. Federal’s factory ammo featuring this bullet tends to shoot very well, grouping into one MOA or less from good rifles.
A nickel-plated jacket prevents any corrosion and provides a naturally lubricious surface. This minimizes bore fouling and benefits smooth feeding up the feedramp and into the chamber.
This bullet’s stand-out characteristic is consistent terminal performance. Thanks to its unique construction, the Terminal Ascent behaves nearly the same (that is, perfectly) whether impacting at 15 yards or 1,000 yards. Excellent mushrooming, high weight retention, and deep-driving, fast-killing capability is the norm.
Minimum recommended velocity: 1,400 fps.
4. Hornady ELD-X
One of the most universally capable and popular long-range hunting bullets on the market, the ELD-X is an accurate, fast-killing projectile and usually features best-in-class aerodynamics. A super-high BC enables it to buck the wind extremely well and hit with plenty of oomph way out there.
Hornady broke the mold and reset the way high-BC bullets are tested and classified by using Doppler radar to test and establish aerodynamic data. A Heat Shield composite tip resists in-flight erosion, resulting in consistent, non-changing downrange BCs. Match-quality construction enables forgiving, consistent accuracy.
Because it’s made with a soft lead core inside a relatively thin jacket—and the two are not bonded together—the ELD-X typically expands dramatically on impact and sheds a lot of weight in the form of fragments that spiral off from the primary wound cavity and create channels of their own. As a result, the ELD-X commonly provides spectacular, fast kills. Its one downside occasionally occurs at very close range, where high impact velocity stresses the bullet, and complete fragmentation can occur. As a result, it’s best to limit close-range shots to broadside presentations when using fast magnum cartridges.
Minimum recommended velocity: 1,600 fps.
5. Nosler AccuBond Long Range
Featuring the same core-to-jacket bonding that made Nosler’s standard AccuBond bullet a household name among elk hunters, the AccuBond Long Range (ABLR) boasts a stretched-out, streamlined profile maximized for aerodynamics. It has a very high BC and shrugs off wind, and so as a result it retains speed and energy well.
In rifles that like the ABLR, it’s a top choice for across-the-spectrum use on big game. It has one downside. For whatever reason, it tends to be somewhat finicky about accuracy. In most cases, careful handload tuning will result in good precision, so you may have to work for it.
Terminal performance on impact is dramatic. Huge mushrooming occurs thanks to the very soft lead core and thin copper jacket, yet courtesy of the bullet’s bonding, weight retention is usually still good. Massive wound cavities combined with reasonably good penetration are common and provide fast, clean kills.
Minimum recommended velocity: 1,300 fps.
Top 5 Most Accurate Factory-Loaded Rifle Cartridges
In the world of accurate shooting, some cartridges achieve renown for predictable accuracy; here’s a breakdown of five of the best factory-loaded rifle cartridges.
April 15, 2022By Joseph von Benedikt
Why certain cartridges excel over others is usually partly intentional, partly serendipitous. Inherently accurate cartridges are a combination of ideal technical design, which enterprising engineers can model, and an otherworldly natural precision, which every design team hopes for, but few achieve.
Over the decades, a few cartridges have emerged as the best of the best. Some are relatively obscure to the average shooter; they’re handload-only propositions used primarily by passionate competition shooters. Examples include the .22 PPC, 6mm BR, 6mm Dasher, 6mm GT, and 6.5×47 Lapua. However, as remarkable as these cartridges are, they aren’t practical for hunters and everyday shooters, and they certainly aren’t available in a broad spectrum of factory loads. So we’re not going to concern ourselves with them.
For the purposes of this article, let’s use three criteria. Each cartridge included must be renowned for accuracy, each must be factory loaded, and each must be readily available in a variety of different loads.
You might argue that by eliminating handloads, we also eliminate the potential for best-possible accuracy in a plethora of deserving cartridges. And you would be correct. However, only the most inherently accurate cartridges regularly produce top-shelf accuracy in factory loads. Eliminating handloads is a stringent but useful criterion. Plus, many shooters do not handload, and spotlighting cartridges that shoot superbly well in factory-load form is particularly valuable to them.
Without further ado, let’s dive in. We’ll start with the star of the whole show.
Candidly, it’s startling how many off-the-shelf, production-grade rifles in 6.5 Creedmoor will shoot half-inch, 100-yard groups from a benchrest.
Hunters adopted the 6.5 Creedmoor wholeheartedly. Inside 400 yards, it’s a superb deer cartridge. Past that it’s still accurate but lacks power. Hunters using the 6.5 Creedmoor in pursuit of elk are best served with tough, deep-penetrating bullet designs.
Introduced in 1952, this cartridge is the civilian twin of the 7.62 NATO round, which was the result of a perceived necessity. Military history aside, the incredible natural accuracy of the .308 Win. was sorta happenstance because reliable function through semiautomatic and fully automatic firearms was of much greater importance at the time.
Accidental or not, the .308 Win.’s inherent accuracy quickly became legend. The cartridge is naturally consistent. Its velocity may be unimpressive, but its extreme spreads and standard deviations are inspiring. Five-shot groups cluster like amorous flies. Barrel life is long, and maintenance is low.
The .308 Win. is a standard-issue military round, so its adoption by sniper programs was a practical—and effective—progression in the world of precision fighting. Hunters, too, learned the .308 Win.’s impressive effectiveness on big game at reasonable distances.
In modern times, the cartridge has been overshadowed by the 6.5 Creedmoor and its ilk for long-range precision work and by the fast 7mm cartridges for hunting. However, the .308 Winchester is still a very accurate cartridge particularly adept on game to 300 yards or so.
3. .223 Remington
Like the .308 Winchester, the .223 Remington predates its military counterpart, the 5.56 NATO. This cartridge was the result of a combined effort from a lot of smart people in the late 1950s. It was adopted in 1962, one year before the 5.56.Although accuracy wasn’t an early hallmark of the .223 Rem., shootability was. Eventually, obsessive handloaders using premium components in varmint-type bolt-action rifles with precision chambers proved the cartridge was extraordinary. The military and the competitive world both took note, and match-grade .223 Rem. and 5.56 NATO ammunition was born.Sierra’s 69-grain MatchKing bullet proved superbly accurate and is factory loaded by several brands. Black Hills Ammunition loads the long, heavy, aerodynamic 77-grain Tipped MatchKing in 5.56-labeled ammo, and in the right firearm it’s amazingly accurate and 1,000-yard capable.Although it’s 60 years old this year, the .223 Remington is still one of the best cartridges available for varmints and predators (four-legged and two-legged), and it still wins long-range service-rifle matches.
4. 6.5 PRC
Springboarding off the burgeoning popularity of the 6.5 Creedmoor, the 6.5 Precision Rifle Cartridge (PRC) is simply more of a good thing. Introduced in 2018, it’s a proper short magnum, featuring a short, fat case that holds plenty of gunpowder. Propellant burn benefits from the short, fat column shape, resulting in excellent consistency.Generating about 300 fps more velocity than the 6.5 Creedmoor, the PRC has about the same performance jump as the .300 Winchester Magnum has over the .30-06. In a word, significant.Also significant is that the same engineers who designed the critical throat and chamber dimensions of the 6.5 Creedmoor created the 6.5 PRC. Skill and perfection pay dividends, and the 6.5 PRC has proven to be extraordinarily accurate.
By nearly every metric on the market, the 6.5 PRC is now the trendiest, best-selling precision hunting cartridge available—and for very good reason. It’s pure poison on deer-size game out to 600 yards. As with the 6.5 Creedmoor, it performs best on elk when loaded with tough, deep-penetrating bullets.
5. 6.8 Western
This cartridge is still embryonic. It was introduced early in 2021. However, I’ve been using it for two years, in preproduction and production rifles and ammunition. Every single rifle I’ve tested (and there have been many) has produced extremely tiny groups. Sub-MOA accuracy is the norm, and most 6.8 Western rifles—even lightweight mountain rifles—will do significantly better than that.I shot a mature caribou bull at 608 yards with a 6.8 Western (serendipitous numbers, are they not?). I shot a coyote in Nebraska at 20 yards, a whitetail at 40 yards, a Kodiak Island fox at 250 yards, and a Sitka Blacktail at 280 yards. My brother shot a monster 406-inch (official, gross score) public-land bull elk on a DIY hunt with the 6.8 Western, from 679 yards.What exactly is the 6.8 Western? It’s the classic .270, brought to space-age performance by fast-twist rifling that enables it to use long, high-ballistic-coefficient bullets. Like the 6.5 PRC, it uses a short, fat column of powder and has plenty of “head height” for super-streamlined bullets protruding way out of the case. And clearly, the chamber was designed properly because even though it is an infant in terms of years, the 6.8 Western provides veteran levels of long-range capability and extraordinary accuracy.
An important concept called “headspace” is often overlooked and unknown to many shooters who don’t realize how much they don’t know. I never realized how few shooters have even heard of, or been concerned about, headspace. That fact was pressed home when I was at the range one day and another shooter was having all sorts of issues with a new AR-type rifle.
The rifle would not fire more than one round. When it did fire, it would not cycle and would not go into battery. Knowing I am an instructor, he asked me my opinion. I said, he should return it to the manufacturer. He then said something that should not have surprised me. “I made it,” he declared.
A .45 ACP rimless cartridge seated in a chamber. The case mouth is larger than the bullet diameter and rests against the front of the chamber, thereby correctly seating the cartridge.
I asked, “What do you mean, I made it? Did you manufacture the parts?” He clarified that he bought the parts and assembled them. In my naïveté, I asked who’s upper he used. He again proudly stated, “I put that together from parts also.” The first thing that leaped into my mind was, of course, the headspace.
I asked if the headspace was set correctly. That’s when the conversation took an interesting turn. He had the look of a deer in the headlights, a kid caught with his hand in the cookie jar, or your best friend caught in bed with your wife… HUH? “What is headspace?” he uttered feebly. At that moment, I told him to clear the weapon, put it in the case, and leave the range. He was not to return until the headspace was set properly.
How could someone be so ignorant as to think they could assemble a firearm and not even have heard of the term, headspace? Now that’s off my chest. I got some splanin to do, Lucy!
What Is Headspace?
Simply put, headspace is defined as the distance between the face of the bolt and a point in the chamber that prevents further forward movement of a cartridge. As an example, in the accompanying illustrations, we have cutaway views of a .22 rimfire, bottlenecked rifle cartridge, .45 ACP, and a belted magnum cartridge shown how they should appear in a chamber. On the .45, notice that the cartridge case is a bit larger than the bullet by the thickness of the brass case, and the chamber is shaped so that it fits the case correctly. Of course, depending on the shape of the cartridge, the headspace could be different for different firearms as seen in the illustrations.
This is the rim of a centerfire, rimmed rifle cartridge.
Most of the earliest metallic cartridges were rimmed. This meant, they had a rim at the base of the cartridge that was larger (refer to the illustration of the .22 LR) than the diameter of the cartridge case. When this type of cartridge is pushed into a firearm’s chamber, the rim positions the cartridge correctly and prevents it from going too far into the chamber.
Because of that design feature, a rimmed cartridge’s headspace is determined by the thickness of the rim. The most popular cartridge today, the .22 Long Rifle rimfire cartridge is an example of a rimmed cartridge. It should be noted that it is common today to find that calibers intended for use in revolvers have rims that establish their headspace.
That means that most modern cartridge designs are of the rimless type. i.e., the diameter of the rim is the same or smaller (rebated) than the diameter of the case body. Modern cartridges also have other ways to ensure proper seating of the bullet in the chamber. One example would be pistol cartridges where the case diameter is slightly larger than the bullet and the chamber has a shoulder that the case mouth rests against as in the illustration of the .45 ACP.
On the base of a rimless cartridge, you’ll notice that the rim does not extend beyond the width of the case.
However, it must be mentioned that there are other rimless cartridge designs, such as bottlenecked cartridges (which are mostly used in rifles), the shape of the firearm’s chamber is correspondingly tapered to achieve proper headspace. That is because the headspace on a bottlenecked rimless cartridge is the distance from the bolt face to the tapered section or shoulder.
In the case of belted cartridges, a design introduced by the British firm of Holland & Holland on its proprietary calibers (such as the .300 Holland & Holland Magnum), where the chamber is shaped to seat the forward face of the belt.
Different cartridges result in headspace measurements at different points on the cartridge/chamber.
When the .300 H&H Magnum was first being developed, it was not possible to provide proper headspace for a cartridge with a shallow shoulder design. Holland’s solution was to add a belt around the cartridge body. This is similar in function to the rim of a rimmed cartridge, but gave a long enough surface to allow the cartridges to fit side-by-side in a magazine without interfering with the feeding of those cartridges. This design feature was later used on other magnum rifle cartridges designed by others as well.
As previously mentioned, headspace is the distance between the bolt face and a point in the chamber that prevents further forward movement of a cartridge. Depending on the firearm and the shape of the cartridge, this distance can be different for different cartridge types, as the images show.
Improper Headspacing
Now, let’s look at what happens when the headspace is not correctly set, as in the anecdote mentioned earlier. There are two possible scenarios we must look at. The first is excessive headspace. Excessive headspace is best described as the condition where there is extra space between the bolt face and the cartridge in the chamber.
When that condition exists, the firing pin hits the cartridge and it will move forward into the chamber before detonating. When the propellant does ignite, the walls of the cartridge expand due to pressure and firmly stick to the walls of the chamber, preventing rearward motion of the cartridge. When that happens the thicker base of the cartridge will move backward.
<
This happens because there is a gap between the cartridge and the bolt face, and this will cause the walls of the cartridge to stretch. If the stretching is too much, the walls of the cartridge could rupture, release hot gases into the action, and potentially spray brass fragments out from the action of the firearm. In turn, this could be hazardous to the shooter or anyone standing next to him.
The second situation is created when there is insufficient headspace in the chamber, or too little space exists between the bolt and the cartridge. In this condition, the back of the cartridge will stick out and the bolt will not be able to close fully on the loaded cartridge. The user will not be able to properly operate the firearm when this happens.
On the belt of a belted magnum cartridge, you’ll notice that the rim is wider than the case but not wider than the belt.
If the user were to force the bolt to close on the cartridge, the bullet will be pushed tightly into the case neck. If the firearm is fired, this will cause excessive pressure to build up inside the cartridge case, leading to hot gases coming out of the cartridge’s primer pocket — with similar results to excessive spacing. In a worst-case scenario, the excessive pressure could cause the action to rupture and cause damage to the gun and its user.
So, the next question to ask is how to determine whether a firearm has proper headspace? We can do that by using a set of headspace gauges. These are measuring instruments that are precisely machined to the SAAMI, CIP, or military standards for a specific cartridge or caliber. Typically, headspace instruments are made of heat-treated steel and are machined to tolerances below 0.001 inches or so. They are made in various calibers and sold at reasonable prices. Typically, there is a “Go” gauge, a “No-go” gauge, and for military specification rifles, a “Field” gauge.
Go Gauge
The bolt on a firearm must be able to close with no resistance when a Go gauge is inserted into the chamber. This signifies that the firearm is able to meet the minimum length specification for that particular cartridge. If the bolt does not close with the Go gauge inserted, the firearm has insufficient headspace. Another possible cause could be a dirty chamber or bolt face. The accumulated dirt may be thick enough to prevent the bolt from closing on the gauge. However, if the firearm is clean and the bolt still does not close on the Go gauge, it must be taken to a competent gunsmith for adjustments.
If a firearm successfully closes on the Go gauge, at a minimum, the firearm has sufficient headspace. However, it may still have excessive headspace. That can be determined with No-go gauge.
Headspace gauges – The top one is a No-go gauge, and the bottom is a Go gauge.
No-Go Gauge
A new (or overhauled) firearm must not be able to close on a No-go gauge. If the bolt closes successfully on a No-go gauge, this means the firearm has excessive headspace and there is a risk of cartridge cases rupturing inside the chamber. If the firearm is new or recently repaired, it should be returned to the manufacturer immediately.
A used firearm may be able to close on a No-go gauge, due to wear of the bolt and chamber surfaces. This means it should probably go to a gunsmith for repair soon — it may be possible to fire new factory ammunition in it until then, but reloaded ammunition is probably a bad idea. The firearm may malfunction on slightly out-of-spec cartridges. Here’s where the test with the third gauge comes in (especially for firearms built to military specifications).
Field Gauge
The bolt of any firearm, whether old or new, should not be able to close on a Field gauge. A bolt that closes on No-go, but not on a Field gauge, may be considered close to being unsafe, but may work on new cartridges. Likely, it should be sent to a gunsmith to have the headspace reset. However, if the bolt closes on a Field gauge as well, then it is not safe to fire and should be sent for repairs immediately.
Semi-rimmed cartridge — The rim is slightly wider than the diameter of the case.
Some calibers have a fourth gauge, known as a Field II gauge, for which the bolt should never lock on. This type of gauge is only used by certain rifles. For example, Colt uses it to reject M-16 rifles. It must be noted that gauges are usually manufactured to either SAAMI, CIP, or military standards, and therefore may have different dimensions, even for the same caliber cartridge. Therefore, it may be possible that a rifle manufactured to NATO specifications, may lock on a No-go gauge built to SAAMI specifications, but correctly not lock on a No-go gauge built to NATO specifications.
This is because military weapons are generally designed to operate with wider tolerances and military ammunition cases are generally thicker than commercial ammunition. That means they can tolerate more stretching without rupturing. Therefore, a military firearm may fail the test using SAAMI gauges, but still be deemed safe to fire per the military specification gauges. However, if it passes using SAAMI gauges, it is very likely to work correctly.
These gauges are relatively inexpensive. If you fancy yourself a firearms enthusiast and gun crank, do yourself a favor and get a set of gauges and learn how to use them for peace of mind.
8 Best Charge-Stopping Bear Cartridges
by Eric Conn—-posted on June 3, 2019
When it comes to recognizing and responding to a bear attack, few people have as much experience as Alaska’s Steve Nelson, a former research geologist for the U.S. Geological Survey who’s spent the last 41 years teaching bear defense courses in the Last Frontier. As a geologist, Nelson has killed four bears in defense of life and property (DLP), including two black bears and two grizzlies. Nelson continues to teach a bear defense course in Alaska, instructing geologists and representatives from other government agencies how to operate a wide variety of firearms platforms in a bear defense situation.
In terms of firearm selection, Nelson said it’s really about delivering a few well-placed shots on target in a short timeframe. The more energy and penetration the better, provided you don’t select a firearm that’s too powerful for you to adequately manage. As the bear charge drill in his course demonstrates, the average bear attack will happen at 50 yards or less with an 800-pound animal moving at 30 mph. At that distance, a shooter has roughly four seconds to make a charge-stopping shot, which requires a steady hand under intense pressure.
Among firearms platforms, a rifle delivers more energy and is effective to greater distances, making it the first choice. A 12-gauge shotgun and slug will deliver impressive energy and is effective to moderate ranges. A handgun is worn on your person, however, and is invaluable because it stays with you, whether you’re answering nature’s call or stopping to field dress a game animal. Like the Spartan’s xiphos blade, the handgun is a much shorter secondary weapon intended for up-close-and-personal encounters.
Over the decades, several cartridges have proved themselves as worthy against the nastiest bears North America has to offer. Here’s a look at the eight best charge-stopping bear cartridges ever made.
1. .45-70 Government First adopted by the U.S. military in 1873, the .45-70 Government has been one of the longest-standing big-game cartridges of all time. It’s also been incredibly popular among Alaskan hunters and guides, especially in lever-actions like Marlin’s 1895 Guide Gun, which is compact, fairly lightweight and highly maneuverable in close quarters. It’s also capable of sending a massive projectile, like Buffalo Bore’s 430-grain hard-cast bullet, at roughly 2000 fps and 3,600 ft.-lbs. from the muzzle. Talk about stopping power.
2. .454 Casull Developed by Dick Casull and Jack Fulmer in 1957, the .454 Casull is a dangerous game hunter’s dream come true. One of the more powerful handguns available today, the .454 is capable of pushing a 300-grain Buffalo Bore bullet at 1650 fps with 1,813 ft.-lbs. of energy at the muzzle. Nelson killed one of his charging grizzlies with a .454 Casull, which he says is one of his favorite choices for bear defense. Ruger chambers the .454 Casull in both the Super Redhawk with a 4-inch barrel and the Alaskan in a 3-inch variant, both of which are compact and easy to draw when things get up close and personal. Is it fun to shoot? Not at all. Nelson says after about 20 shots, his wrist starts to swell and he can no longer shoot. The beauty of the .454, however, is that you can practice with .45 Colt rounds and save yourself a bit of recoil trauma.
3. .44 Remington Magnum Considered by many to be the minimum for big bear defense rounds, the .44 Remington Magnum was first introduced in 1955 for revolvers and gained widespread popularity in the 1970s thanks to Dirty Harry. While some may consider it the minimum, it’s plenty powerful enough to stop an onerous bear. A 240-grain +P Buffalo Bore projectile carries roughly 1,600 ft.-lbs. of energy at 1550 fps, which is more than double that of the 10mm and four times more energy than the 9mm. Available in shorter versions like the Smith & Wesson 629 with 4-inch barrel, the .44 Mag. has a well-deserved reputation as a charge-stopper.
4. .375 H&H Magnum One of the original belted, rimless magnum rifle cartridges, Holland & Holland’s .375 is not only considered one of the best cartridges for hunting Africa, it also has a proven track record for lethality on large-bodied game in Canada and Alaska, including moose and bear. Popular among Alaskan guides and hunters, the .375 is capable of launching a 270-grain bullet at 4,300 ft.-lbs. and 2700 fps, thus delivering massive energy on target. As Nelson points out, the first shot may end the charge but doesn’t always kill the bear, which means it’s handy to have a rifle that can make the longer follow-up shot.
5. .50 Alaskan Taking a .348 Winchester case and necking it out to accept a .510-inch, Alaskan Harold Johnson was able to successfully convert a Winchester Model 1886 rifle into a .50-caliber, bear-killing machine. The result, of course, was the .50 Alaskan. Buffalo Bore produces several loads for the .50 Alaskan, including a 450-grain bullet that delivers a whopping 4,400 ft.-lbs. of energy from the muzzle. As a wildcat cartridge, it hasn’t seen the widespread use of other rounds on this list, but that hasn’t stopped many guides and hunters, Nelson included, from converting Marlin lever guns for its very effective use.
6. 12-Gauge Slug According to Nelson, the 12-gauge slug gun is by far one of the most popular choices for bear protection in the Alaskan bush. While it is extremely effective, the main reason it’s been so widely-used is because shotguns like the Remington 870 and Mossberg 500 are a fraction of the price of bolt-guns and, in turn, that’s what the government has provided to its employees. Based on ballistic testing and field use, Nelson recommends Brenneke’s Black Magic Magnum or DDupleks’ Monolit 32 solid steel slug. The Black Magic Magnum is a 602-grain slug that carries 3,000 ft.-lbs. of energy at 1500 fps, while the 495-grain DDupleks leaves the muzzle at 1410 fps with 2,180 ft.-lbs. of energy.
7. .338 Winchester Magnum The favorite among Alaskan guides as a backup gun, the .338 Winchester Magnum was released in 1958 as belted, rimless cartridge. Based on the .375 H&H, the .338 will send a 300-grain Barnes bullet out the barrel at 2500 fps with a devastating 4,100 ft.-lbs. of energy. Considered by many to be the most versatile North American big-game cartridge, the .338 Win. Mag. has killed its fair share of charging bears. It’s chambered in nearly every major manufacturer’s rifle and has a plethora of ammunition choices as well.
8. .357 S&W Magnum While some folks claim the .44 Magnum is the minimum for charging bears, many others have opted for a Glock 20 in 10mm Auto and, interestingly enough, passed right by the .357 S&W Magnum. Several folks have even successfully killed bears with a 9mm. While a well-placed shot from a 10mm can no doubt do the trick, the .357 Mag. has 780 ft.-lbs. of energy, while the 10mm has about 728 ft.-lbs., both with a 180-grain Buffalo Bore bullet. As Nelson has seen in bear defense training, many shooters have cycling issues with the 10mm due to the “limp-wrist syndrome,” something that isn’t an issue with a revolver and is the last thing you want to happen during a bear charge. The .357 is also available in smaller-framed revolvers that fit smaller hands, making it ideal for women and less experienced shooters. Any way you slice it, the .357 has proven itself as a worthy close-range bear stopper.
5.56 Twist Rate Chart
Jun 29, 2022
Need a 5.56×45 twist rate chart for an AR-15 or other 5.56 firearm? Let’s kick this 5.56 barrel twist guide off right by getting straight to the point! (When viewing this chart on “Mobile”…. Please scroll the chart)
Bullet
40 Grain
45 Grain
50 Grain
55 Grain
60 Grain
62 Grain
65 Grain
69 Grain
70 Grain
75 Grain
77 Grain
80 Grain
85 Grain
90 Grain
1:16″
Good
Good
Ok
Ok
Poor
Poor
Poor
Poor
Poor
Poor
Poor
Poor
Poor
Poor
1:14″
Good
Good
Good
Ok
Ok
Ok
Poor
Poor
Poor
Poor
Poor
Poor
Poor
Poor
1:12″
Ok
Ok
Good
Good
Good
Ok
Ok
Ok
Ok
Poor
Poor
Poor
Poor
Poor
1:10″
Poor
Ok
Ok
Good
Good
Good
Good
Good
Ok
Ok
Ok
Poor
Poor
Poor
1:9″
Poor
Ok
Ok
Ok
Good
Good
Good
Good
Good
Ok
Ok
Ok
Ok
Poor
1:8″
(Saint)
Poor
Poor
Ok
Ok
Ok
Good
Good
Good
Good
Good
Good
Good
Ok
Ok
1:7″
Poor
Poor
Poor
Ok
Ok
Ok
Good
Good
Good
Good
Good
Good
Good
Ok
1:6″
Poor
Poor
Poor
Poor
Ok
Ok
Ok
Ok
Ok
Good
Good
Good
Good
Good
Need to know why the information on that table is important to an AR-15 owner? Then keep reading!
What Is Rifling?
Inside the barrel of a rifle, photo courtesy of Shooting Times.
If you look inside a modern rifle or handgun’s barrel, you will see rifling. (Make certain the firearm is not loaded before attempting this.) Rifling is the helical grooves and lands machined into the internal surface (aka the bore) of a barrel.
Don’t have a gun barrel to look down? No worries – you have already seen rifling if you have watched a James Bond movie. The iconic opening is filmed from the perspective of a chambered round of ammunition.
Rifling has an important job to do. Its grooves and lands actively engage with a bullet as it passes through the barrel. This forces the bullet to rotate – and thanks the fundamental law of angular momentum, the bullet will continue to rotate after exiting the barrel.
A bullet which rotates in flight along its longitudinal axis possesses something called “aerodynamic stability.” Just like an expertly thrown football, a stabilized bullet keeps its tip pointed forward to achieve better accuracy over longer distances. This is why rifled barrels are significantly more accurate than smoothbores.
What Is Twist Rate?
A gun barrel’s twist rate (aka rate of twist or barrel twist) indicates how many inches it takes its rifling to make one complete rotation. Twist rate is expressed as a ratio of 1:X” (i.e. 1 turn per X inches).
It’s easier to understand twist rate with an example. Suppose a 20” barrel has a twist rate of 1:10”. That means the barrel’s rifling makes exactly two complete rotations from start to finish. A bullet which passes through such a barrel would accordingly rotate exactly twice before clearing the muzzle.
Twist rates are often compared to one another as “faster” or “slower.” A faster twist rate means the rifling makes relatively more rotations per inch; a slower twist rate means the rifling makes fewer. For example, 1:6” is a faster twist rate than 1:8”.
What Is the Best Twist Rate for an AR-15?
The best twist rate for a 5.56 firearm (including most AR-15s) depends on the ammunition it is firing. More specifically, it depends on the weight of that ammunition’s bullets. This is because heavy bullets have more inertia, and therefore require more complete rotations to fully stabilize before exiting the muzzle. Conversely, lighter bullets require fewer rotations before they become adequately stabilized.
If you once again refer to our 5.56 twist rate chart, you will see just how bullet weight determines the best rate of twist for an AR-15: green is optimal, yellow is acceptable, and red is inadvisable. Note how heavy bullets perform better in conjunction with faster twist rates, and slower twist rates are better suited for lighter bullets.
The two most popular bullet weights for 5.56 are 55 and 62 grains. From our chart you will see that the best twist rate for 55 grain ammunition (e.g. PMC M193) is 1:12” or 1:10”. The best twist rate for 62 grain ammunition (e.g. M855) is 1:8”, 1:9” or 1:10”. (We would advise sticking to the faster of the three best twist rates for 62 grain bullets.)
What Happens When Twist Rate Is too Slow or too Fast?
When a 5.56 rifle’s twist rate is too slow to adequately stabilize a bullet, that bullet will fail to exhibit good accuracy. The negative effects of insufficient twist may not become apparent until the bullet has flown several hundred yards downrange, but they will inevitably reduce a rifle’s effective range all the same.
Many shooters worry whether an excessive rate of twist will “overstabilize” a lightweight bullet, in turn causing the bullet to rotate so quickly that centrifugal force tears it to pieces. Fortunately, the vast majority of bullets are just too tough to undergo core/jacket separation in response to overstabilization. Unless a bullet is of unusually low quality, it will not exhibit significantly worse accuracy after passing through a barrel with too fast a rate of twist for its weight.
What About 5.56 Twist Rate for Frangible Rounds?
There is an important exception to this rule. Frangible bullets, which are brittle by design to promote safer target shooting, are also at heightened risk of in-flight self-destruction if they are overzealously stabilized by too fast a rate of twist.
Before you study our twist rate chart too closely, take heed that it doesn’t supply all the information you need to achieve the best accuracy out of your rifle. The quality of your ammunition, the quality of your rifle and its barrel, and naturally the quality of your marksmanship all have significant impacts on performance. Atmospheric conditions all play their own roles in influencing ballistic performance as well.
But if you have just gotten your first AR-15 and need to know the best ammo for its barrel, our twist rate chart should prove a great point of reference!
Firearm and Ammo Storage Practices for Warm Weather
On the ammo storage side of things, the important aspects of weather are the swings in extreme temperatures and how heat accelerates oxidization. Extreme temperature changes, especially when those changes occur over a short period of time, will affect the expansion of the various components. Let’s take a look at some best practices for storing firearms and ammo in warm-weather months.
Some General Rules
Brass has a different expansion rate than copper, lead, or steel. This difference can affect the seal between the brass and the projectile, or the brass and the primer. Loosening these seals may allow fresh oxygen and moisture into the cartridge. The fresh oxygen accelerates the oxidization process (read as slow burning). In effect, this will decrease the energy delivered when the round is fired.
Guns stored in a vehicle are more likely to experience issues due to weather changes.
The addition of moisture can be a bit more problematic. This can greatly reduce the percentage of burnable powder (wet powder doesn’t burn well) or cause the granules to clump. Clumping will change the shape and burn rate of the powder as well. It may even (rarely) cause detonation.
Please realize, this is not a process that happens (assuming quality ammo) when you leave your carry gun in the console once on a hot workday. Although the interior of the car may well hit 140-150 degrees, this is a process that takes numerous large temperature swings over a significant period of time. Having said that, if you routinely do this with your carry gun, it may well be time to replace what’s in the mag with some fresh ammo and use the old stuff for practice.
The Warm Weather Effect
I never have carry ammo in the gun for longer than six months. Just like replacing optic batteries, it is cheap insurance. This is much less of a concern for your bulk ammunition that is stored inside the house. Most of us keep the house between 68-78 degrees all year long. That is not even close to an extreme change. With that mild of a swing, you may see effects in 40–100 years. Those of us who keep cases of ammo out in the non-climate-controlled garage are a bit more likely to see these effects over a course of five to 10 years.
We recently had a day in Tennessee where the low was 29 degrees and the high was 87 degrees. My garage probably only dropped to 35, but in the heat of the day, it got well over 100 degrees. That is a pretty big swing over an 8–10-hour period. Having this happen dozens of times during the year, plus having 30–90 days where the garage temperature exceeds 100 degrees, is not good for your ammo. Remember, the high heat accelerates oxidation, even without adding more oxygen.
Ammo cans are a classic way to store your supplies. Just make sure the rubber o-ring is intact and toss in some desiccants.
Addressing Issues
Here are some ways to mitigate ammo storage issues:
Don’t store your long-term storage ammo in a place that is not climate-controlled.
Rotate your practice ammo so it never sits for more than three to five years.
Rotate carry ammo over to practice ammo status at a minimum of every 12 months. Six months, if you are often heat-abusive to the ammo.
People are going to hit me in the comments regarding spam cans, self-sealed ammo cans with oxygen absorbers, or vacuum-sealed ammo bags. All of those things will help to keep out moisture and the corrosion associated with it. It does not affect how heat oxidizes propellants or how those same cycles can loosen uncrimped ammo and primers.
I will also get comments regarding the surplus Russian 7.62×54 ammo that is ’45 vintage and got dug up from a field outside of Kursk back in the late ’80s, that shoots great. That ammo was in spam cans that were buried. Do not underestimate the insulation value of a couple of feet of soil. Second, you are not seeing the percentage of spam cans that were too ruined to sell. Thirdly, I own several Mosin’s and only one will shoot groups better than four inches at 100 yards, some shoot eight inches. How are you going to notice deterioration with that lack of precision?
Plastic ammo storage boxes work great for storing handholds.
Some Final Advice
In a perfect world, your ammo storage can would have a fresh silicone gasket, a couple of oxygen absorbers and be stacked in a closet inside the HVAC-controlled portion of the house. If that isn’t possible, use the other ideas to lessen the effects of heat and temperature swings.
With guns, I hope they are all kept in the HVAC portion of the house, except for your carry and truck/trunk guns. I will focus on that area, as the rest should not see much effect during summer.
Your carry gun has several things that affect it in the higher-heat environment. The higher the heat, the higher the total humidity. This higher humidity is combined with a much higher likelihood of sweat. Combining the two keeps moist salt in contact with your gun for extended periods. Coupling that with the higher-effective VOC of most gun oils in higher temperatures, makes for less protection in a higher-corrosion environment.
I hope you can see this leading to issues over time. Your truck/trunk gun has very high heat and likely has condensation to deal with in large doses. Rotate the ammo storage and clean the firearm a couple of times between April and October, or you might just find a dusty, rusty, bone-dry gun when you need it.
It’s important to clean your carry gun regularly to prevent rust and keep it functioning properly.
Conclusion
The takeaway is to clean your carry guns more often and perhaps invest in gun oil with better protection qualities (lower VOC and higher cling). The various all-in-one “CLP” (clean-lube-protect) products are great for light cleaning and light protection. They are not great for removing high carbon build-up or resisting high-corrosion environments. Dedicated cleaning solvents and lubricants are preferred.
If you’re a new gun owner, you probably don’t really know what bullet grain means. You may look at a box of ammo, see “115-grain” written on the side, shrug, and flip it over to look at what you really care about: the price tag. Before you do that, take some advice from a few seasoned firearm aficionados and consider the grain for the ammunition you’re purchasing.
Why think about bullet grain, you may ask? Well, actually, the size, shape, and material your ammo is made out of affects factors such as accuracy, recoil, and terminal ballistics. Let’s check out what bullet grain really means and how it can make you a better overall marksman.
Editor’s note: this is an article for a new gun owner to explain the basic concepts of bullet grain and how weight may or may not impact the shooting experience. It does not imply there is a direct relationship between bullet grain and a shooter’s ability.
What Does ‘Bullet Grain’ Mean?
A grain (“gr” for short) is a basic unit of weight measurement. One grain is equal to 1/7,000 of a pound or 1/437.5 of an ounce. If you’re like me and have a hard time imagining realistically how much things weigh, here are some common household items I use as a guide to put things in perspective:
A new dime weighs about 34.5 grains
A dollar bill weighs about 15.4 grains
A sheet of printer paper weighs about 77 grains
A “AA” battery weighs roughly 385 grains
All bullets are classified based on their weight in grains. For example, the most common 9mm Luger cartridges have bullet weights of 115 grains, 124 grains, or 147 grains.
The range of bullet weights is actually much wider than what you might think, with the lightest being 17 grains such as in a .17 HMR round and the heaviest being upward of 700 grains such as the .50 BMG cartridges. Most rounds have a shorter standard range than that, though. One example is the classic AR-15 .223 cartridge, which ranges from 40–77+ grains with the standard being 55 grains. If you’re more of a 9mm Luger type, those usually come in options ranging between 60–160 grains.
A common misconception when it comes to the term “grain” is that the number on the ammo box is a reference to the amount of gunpowder in the cartridge (which, to be fair, gunpowder is also measured in grains if you’re into handloading). The label, however, is strictly speaking about the weight of the bullet (projectile that exits the barrel). Now that we’ve covered the basics of what “grain” refers to, let’s take a look at how you can use that knowledge to improve your shooting.
Advantages of a Lighter Bullet
There are so many great options out there for ammunition. When choosing which type of cartridge to use, you’ll want to consider several factors such as the type of shooting you’ll be doing (hunting, plinking, self-defense, etc.) and which rounds feed better through your firearm. We’ll take those factors into account when comparing lighter-weight bullets to heavier weights, and also discuss how the grain of the bullet affects accuracy, recoil, and terminal ballistics.
Accuracy
With a lighter bullet, you generate more overall speed, which means a flatter trajectory. This makes lighter rounds excellent for longer-distance shooting. The lower-grain cartridges are also great for hunting if you plan on making longer shots at smaller game animals such as coyotes or prairie dogs.
One thing to watch out for, though, is wind. Because of the lighter weight, these bullets can be blown off course more easily.
Recoil
You may equate lighter bullets to lighter recoil, which may or may not be true based on the type of recoil management your gun has. Theoretically, though, a lighter bullet should have more recoil because of Newton’s “equal, but opposite reaction” theory. We already talked about lighter rounds having more energy and that energy must go somewhere…
So, instead of arguing the differences in recoil between light and heavy bullets, let’s leave it at this: firing lighter bullets usually feels “snappier,” while firing heavy bullets feels more like a “roll” or “pull.”
Terminal Ballistics
Though you’ll get more speed with a lighter bullet, you do give up a certain amount of energy when talking terminal ballistics (aka how the bullet strikes the target). Less mass means your shot generally won’t carry as far into the target as a heavier round would, so you’ll want to be shooting at non-living targets or smaller game animals in order to keep things more humane.
To recap, lighter grain bullets will give you the advantage of speed and distance, making them perfect for competition or long-range shooting, but have snappier recoil and less penetrating energy when they hit the target.
Advantages of a Heavier Bullet
When you get into the higher-grain cartridges, you gain a lot in terms of effectiveness. Here’s how our heavier contenders stack up in terms of accuracy, recoil, and terminal ballistics.
Accuracy
A heavier bullet is not going to go as far. So, if you take a 400-grain Buffalo Bore Dangerous Game round and try to hit a pig that’s 300 yards away, you’re probably going to miss what you were aiming at. But, on the flip side, the extra weight gives the bullet more stabilization against wind gusts. So, if you get within 100 yards of the pig, you’ll probably have a nice trophy to mount.
Realistically, if you’re just taking your firearm out to the range for some fun plinking, bullet weight won’t matter much. It will really just depend on what you can afford, and what your weapon likes best.
Recoil
Since recoil is calculated based on several factors including bullet weight, velocity, type of propellant, and design of the weapon, the bullet grain you choose will affect how much your shots will kick. How the shooter feels the recoil, though, is totally subjective, so even though a heavier round may technically generate recoil, it’s still a matter of how you personally perceive the blast.
One thing about heavier rounds that definitely reduces heavier recoil, is using subsonic rounds with a good suppressor. Subsonics are basically all heavier in weight and, with the aid of a suppressor, generate a small enough amount of energy to be absorbed very effectively.
Terminal Ballistics
Here’s where the heavier rounds really shine. If you want effectiveness for defensive situations, larger game, or combat, then higher-grain cartridges will get the job done. The heavier the bullet, the better expansion and penetration you’ll get on impact. This means quicker and more humane kills.
Conclusion: Bullet Grain
Many law-enforcement agencies are starting to choose rounds on the heavier side. The FBI, who landed on the Hornady Critical Duty 175-grain .40 S&W as its go-to. So, as you begin to think about how your choice in bullet weight will affect your shooting, keep these things in mind:
Lighter weightgenerally means more speed and distance, but also more recoil and less power at the target. Lighter bullets are good for competition and long-range shooting.
Heavier weightgenerally means more effectiveness, making them excellent for defense, large game, and combat.
No matter what ammo you choose, remember to experiment a bit to see what weights work best in your gun and don’t forget to have fun as you get to shooting.
Make Your Mags Last: A Guide to Buying, Storing, and Maintaining Magazines
Primary Arms Staff
Magazines are some of the most underappreciated and overlooked firearms accessories. They don’t improve precision or speed like optics and triggers do, nor do they garner clout like fancy rail covers or rifle furniture.
But without them, your gun is not much more than a wall decoration. Rifle and handgun magazines are consumable products—they don’t last forever. They have a certain service life, often quite long, but never indefinite, after which they need to be rebuilt or replaced. Most of us have the good fortune to live in a world where that process is as simple as going online and ordering a few new ones straight to your door.
Sadly, in this era of politics and polarization, not everyone has this option for standard capacity magazines. Many of us may be running out of time to buy mags, staring down the possibility of indefinite bans.
For others, time has already run out, but as we saw in California a few years ago, new opportunities do present themselves every now and again.
Whether you’re finding yourself in one of these scenarios or you just want to be prepared for whatever may come down the road, keeping a stockpile of spare magazines is never a bad idea. To help with that, we’ve put together a brief guide on how to shop for, store, and maintain your trusty rifle and pistol magazines.
Buying Magazines
If you’re looking to be prepared over the long haul, it’s important to start by buying the best magazines you can afford. When getting a new magazine is as easy as popping down to your local sporting goods store, it’s easy to justify buying cheap, especially for training or plinking mags.But should there ever come a time when new mags are harder to find, you may wish you bought the best. When bans are a real possibility, service life is everything, and you shouldn’t hesitate to drop an extra couple bucks if it means the mag lasts four times longer.For these reasons, we recommend buying the best magazines you can afford. For handguns, this usually means buying magazines made by the original manufacturer of your firearm, but there are cases where aftermarket mags surpass OEM ones. A quick Google search can usually tell you which is the case for your specific firearm.
For common rifle magazines, such as those for an AR-15 or AK-pattern rifle, “best” is harder to define. There is a plethora of top-quality magazines available for both platforms, often at a variety of price points. For these firearms, it’s not so much about buying the best as it is about buying the best for you.
Most high-quality rifle magazines will feed reliably and last for years. Unless you’re looking for specific features like windowed sides, the primary difference between magazines comes down to the material.
Polymer mags are the most popular option for most users. They’re lightweight, extremely durable, and very resistant to environmental factors. However, if you break a polymer magazine, it’s usually irreparable.
Aluminum magazines are more flexible. The weight difference between aluminum and polymer is negligible, and aluminum mags are plenty resistant to corrosion and heat. However, aluminum magazines are substantially more likely to suffer from feed lip bending if dropped on the ground repeatedly and can develop reliability issues if allowed to suffer dings and dents to the body. Should these things happen, though, you can usually bend the aluminum mag back into shape.
If you’re looking for something heavier still, steel magazines are the very definition of ‘rugged’. Steel magazines are extremely tough, and in the rare event that they are damaged, you can usually repair them. This durability comes with trade-offs though.
Steel magazines are more susceptible to rust, which makes them a riskier investment in wet climates. Steel mags are also considerably heavier than either polymer or aluminum, and at a time where everyone is streamlining their kit, steel magazines are falling out of favor. That said, you’ll have no problem finding steel surplus magazines for AK platforms or rifles like the FAL or HK G3. For AR15s, we recommend checking out E-Lander or DURAMAG for newly manufactured steel mags.
At the end of the day, which magazines are best for you will come down to your individual needs; users in Arizona may be fine with steel mags in the dry heat, but those same magazines might fare poorly in the Pacific Northwest unless carefully preserved.
Storage
This brings us to storage. If you’re planning to pack a few magazines away for a rainy day, it’s important to make sure they’ll still be functional when you unpack them.
The biggest enemy of magazines is rust. For steel surplus magazines, this is obvious, but even polymer and aluminum mags are vulnerable to rust with their stainless-steel springs. Stainless steel does a pretty good job of fighting corrosion on its own, but if left in an inhospitable environment, rust is very real possibility.
For this reason, you’ll want to do some prep on your magazines before putting them away for more than a year. First and foremost, find a proper storage container. We recommend MIL SPEC ammo cans, but anything that seals out environmental moisture will do.
It doesn’t need to be waterproof—anything capable of keeping the moisture in the air away from your mags is fine. In a pinch, even a plastic bag will work for short-term storage, but that shouldn’t be more than a stopgap.
Next, you’ll want some desiccant. Silica gel is the most common form; you’ve probably seen little packets of it in bags of beef jerky.
Desiccant is important because when you seal your magazines inside an ammo can or plastic bag, the moisture in the air is sealed in with them. The desiccant absorbs that moisture, drying out the air and reducing your chances of corrosion.
Lastly, if you’re going to be packing your mags away for a long, long time, we recommend a coating of grease on the springs, or on the entire magazine for steel mags. Oil can be used but tends to drip off or dry out over time. Grease stays in place and provides an extra layer of defense against rust.
If you do grease up your magazine springs prior to storage, remember you’ll need to degrease them before use. Grease does a great job at preventing corrosion, but it also acts as a magnet for dirt, sand, and gunshot residue during use.
Maintenance
For magazines in storage, the only maintenance you’ll really need to do is to check on them every year or two to make sure rust hasn’t set in, and maybe change out the desiccant. Magazines you’re actively using are a different story.
Proper maintenance can go a long way towards maximizing the service life of your magazines. The biggest contributor to premature magazine wear is the practice of “rotating” magazines; that is, unloading your mags and reloading the ammo into a different set of magazines periodically.
The rationale behind this practice is to take the strain off the springs and allow them to rest. Theoretically, alternating between two sets of magazines in this manner should extend the life of all the mags. In practice, though, it does the opposite.
Leaving magazines loaded does not place any additional wear on the springs, but constantly unloading and reloading the springs does. Each time the spring is compressed, a small amount of wear is incurred by the metal, but leaving it loaded does not create additional wear in high-quality modern springs.
Similarly, some users raise concerns about feed lip damage in polymer magazines left loaded for too long. Evidence for this is limited, at best, in older generations of magazines, and completely non-existent for modern, quality magazines.
The short and long of it is this: whether you prefer to store them loaded or empty, your mags will be fine, as long as you leave them be. Repeatedly loading and unloading them without purpose does nothing but wear them out.
Still, even if the only time you load your mags is to shoot at the range, magazines are a consumable good. They will wear out eventually. For most magazines, components such as the body and floor plate will outlive the firearm they feed.
Springs and followers, on the other hand, can wear out over time. Luckily, even in jurisdictions with more restrictive laws, replacement parts such as these can usually be ordered online and shipped to your house without hassle.
Nonetheless, if you have a set of magazines you use particularly frequently, a couple spare springs and followers certainly aren’t going to hurt.
Summary
Following these tips will help you make the most of your magazines and keep you shooting for a long, long time. We live in uncertain times, and the freedom to buy a new magazine whenever you happen to need one might not always be available for all gun enthusiasts.
If you’re thinking of stocking up, whether to prepare for upcoming legislation or just to take advantage of good prices, add some proper storage and maintenance materials to your cart to protect your investment. When you open your boxes years down the road to find your mags looking shiny and new, you’ll be glad you spent the few extra dollars.
If you decide to own a firearm, it’s necessary to learn how to safely use it and store it in your home. Gun safety rules are important to learn in order to ensure that you and all of the people around you are never in a position where you could be injured or killed by mistake. This can easily be avoided by knowing and abiding by firearm safety rules.
The Six Basic Gun Safety Rules
It’s important for gun owners to understand and practice gun safety whether they are alone or with friends and family. There is no such thing as too careful when it comes to responsible gun ownership. For anybody considering buying and storing a gun, there are some basic (gun safety) rules you should be aware of and practice at all times:
ALWAYS treat every gun as if it is loaded. Even if you’re sure it’s unloaded, treat it as if it could go off any time you handle a gun. Assume the gun is loaded even if someone tells you it’s not.
ALWAYS point a gun in the safest possible direction and be aware of where it is pointing. A safe direction means that it is pointed away from anybody or anything that could be injured or damaged if the gun was accidentally discharged. It’s important that you never point a gun toward yourself or another person, only at your target.
ALWAYS keep your finger off the trigger (called “indexed”) unless you’re ready to shoot. Your finger should be off the trigger and outside of the trigger guard, even if it feels more comfortable to rest your finger on the trigger. There’s always the potential that you could stumble or accidentally pull the trigger. Sudden noises and movements can also result in an accidental discharge, as humans have a tendency to tighten their muscles when they’re startled. Remember that the trigger is for firing and the handle is for handling.
ALWAYS know your target and the general area surrounding it. Always be sure that the areas in front of, behind, and around your target are safe before shooting so that you will not hit anyone if your bullet misses or completely passes through the target. If you aren’t sure about your surroundings, don’t shoot, and never fire at a target that is only a movement, color, sound, or shape you can’t identify. Always be aware of the people around you before you shoot.
ALWAYS know how to operate your gun before you try to shoot it. Not all guns are the same, so you should make a point to become thoroughly familiar with your gun and its mechanical characteristics, such as how to properly load and unload the gun and how to clear a malfunction. If you are unsure about anything, ask your firearms dealer or the gun’s manufacturer.
ALWAYS store firearms safely prevent unauthorized use. Your guns and ammunition should always be stored in separate places and secured using a lock box, safe, or other secure storage option so that it cannot be used unless you or somebody you authorize personally takes it out for use.
Tips for Using or Storing a Firearm Safely
Ensure the gun is safe to operate. Just like other tools, guns need regular maintenance to remain operable. Regular cleaning and proper storage are a part of the gun’s general upkeep. If there is any question concerning a gun’s ability to function, a knowledgeable gunsmith should look at it.
Use only the correct ammunition for your gun. Only BBs, pellets, cartridges or shells designed for a particular gun can be fired safely in that gun. Most guns have the ammunition type stamped on the barrel. Ammunition can be identified by information printed on the box and headstamp of the cartridge. Do not shoot the gun unless you know you have the proper ammunition.
Wear eye and ear protection as appropriate. Guns are loud and then noise can cause hearing damage. They can also emit debris and hot gas that could cause eye injury. For these reasons, shooting glasses and hearing protectors should be worn by shooters and spectators.
Never use alcohol or over-the-counter, prescription or other drugs before or while shooting Alcohol, as well as any other substance likely to impair normal mental or physical bodily functions, must not be used before or while handling or shooting guns.
Store guns so they are not accessible to unauthorized persons. Many factors must be considered when deciding where and how to store guns. A person’s particular situation will be a major part of the consideration. Dozens of gun storage devices, as well as locking devices that attach directly to the gun, are available. However, mechanical locking devices, like the mechanical safeties built into guns, can fail and should not be used as a substitute for safe gun handling and the observance of all gun safety rules. If you own a gun be sure to store it in a gun safe, even if that’s a bedside safe, or budget gun safe. If you have a significant amount of ammunition around try storing it in safe made for storing ammo.
Be aware that certain types of guns and many shooting activities require additional safety precautions.
Cleaning Regular cleaning is important in order for your gun to operate correctly and safely. Taking proper care of it will also maintain its value and extend its life. Your gun should be cleaned every time that it is used. A gun brought out of prolonged storage should also be cleaned before shooting. Accumulated moisture and dirt, or solidified grease and oil, can prevent the gun from operating properly.
Children and Firearm Safety
Because of the popularity of firearms, children are likely to encounter guns in their lives. Many do so without parental supervision. Even if you do not own a gun, a child could come in contact with a gun at a neighbour’s house or when playing with friends. Children need to know what to do when exposed to firearms. Unfortunately, they develop the wrong ideas and impressions about firearms from what they view on television. Much of gun use on TV is inaccurate and untrue.
On television, firearms are handled with little safety in mind. Children often see movie stars who seem invulnerable to bullets. The viewing public never sees the tremendous damage a bullet can inflict. One shot can kill. Children need to understand the difference between pretend and real life.
Firearms come in all sizes and shapes. The words “gun”, “rifle”, “machine gun”, “shotgun” and “pistol” create various images among children. Children are curious about firearms and will seek them out naturally. They need to understand that a little gun is just as dangerous as a big gun. They also need to understand the difference between a toy gun such as a cap gun or squirt gun, and a real gun such as a pistol or shotgun.
Children should never handle firearms unless parents say it is all right and then do so only in the presence of a responsible adult. They should never “show and tell” firearms to friends. Children should be taught that if they find a gun or ammunition, they should immediately tell an adult or call the police. If they see someone handling a gun who is drunk or under the influence of drugs, they should leave and immediately call 9-1-1. According to the National Rifle Association’sEddie Eagle GunSafe® Program, if a child finds a gun in an unsupervised situation, they should:
1. STOP – DON’T TOUCH 2. LEAVE THE AREA 3. TELL AN ADULT
Children should be taught to never point any weapon, real or otherwise, at others. This includes BB guns, toy guns, water pistols, darts, toy bow and arrow sets, etc. They should not point a weapon at the TV set, pets, birds or other animals. They should never let someone point a gun at them and should leave if it happens.
Gunshots are not necessarily loud. If a child hears a “popping” sound, the sound of a firecracker, or what appears to be gunfire, they should not go outside to investigate. Do not assume everything is okay. Seek protection and notify the police. Adults who own firearms tend to hide them from their children. It becomes shrouded in secrecy. When children discover guns, they like to mimic what they see on television. They point and shoot. In some cases, a child too young to pull the trigger turns it around, points it at his face, and squeezes the trigger with his thumbs. Many guns are not equipped with a safety lock mechanism, increasing their danger.
Teach your child to shoot
Most kids are interested in guns. Parents should explain firearm use to their children, much like they would with matches – to remove the mystery surrounding it.
Why? Letting a child shoot a gun under adult supervision will teach him or her the immense power and danger of its use. A child will learn to respect firearms, not be misguided by what is seen on television. Children can be taught the basic rules of gun use, even with a pellet gun or a .22 caliber firearm, in a controlled setting.
Adults and Gun Safety
The essentials to proper firearm handling include knowing the basics of firearm safety, being able to void out distractions and being able to concentrate on sight alignment and trigger control. Gun use for self-protection must be a reflex – one brought about through constant practice. We cannot plan what do to in an emergency but we can train ourselves to react instinctively. Use a firearm you’re familiar and comfortable with, not one you cannot control. If you do not feel comfortable with firearms, avoid them, but if there is one in your home know the rules of safe handling.
According to firearms experts, one should not buy a gun immediately after being victimized in a crime. Citizens need to understand that “getting even” with a criminal is not a good reason for owning a firearm. Trying to get even after a crime means that the gun owner will be angry, frustrated, scared, and will be unsafe handling a firearm.
Adults who own guns need to be reminded of the basic rules of firearms and the safe storage of guns and ammunition. Guns are not intelligent; they are a piece of cold steel with the potential to inflict great bodily harm. A qualified gun handler is one who is well versed and trained in the fundamentals of firearms.
A firearm should never be left loaded and unattended. Don’t store it loaded in the dresser drawer. This means that if one wants to keep a loaded gun at their bedside at night, it should be unloaded and put away in the morning in a locked cabinet or safe. If there are children in the house the firearm should be locked up in a safe or locked cabinet.
Adults should treat all firearms as if they are loaded all the time, even if the action is open or the clip is empty.
Don’t squeeze the trigger to see if it is loaded. This is the most common cause of unintentional gunshot wounds.
One should never point the muzzle of a firearm at someone unless they intend to kill or destroy.
Don’t let the muzzle inadvertently drop or point at others.
Don’t handle firearms when under the influence of drugs or alcohol. This includes over-the-counter cough preparations and allergy medications.
Don’t practice with a firearm if you feel ill, have a cold, or have an earache.
Guns and ammunition should always be stored separately.
Ammunition should be stored in a metal container, such as an ammo box. It should be kept in a cool, dry area with little temperature change. The garage is not a good location because of wide temperature fluctuations.
Which sniper rifle has the longest effective range?
by: Nate Vance
I’d have to say the Barret M-99.
The reason is not because of the rifle itself but rather the caliber it fires.
The first real development of an ultra long range sniper cartridge was the .408 Cheytac.
Cheytac M-200 Rifle chambered in .408 cheytac (above)
Barret M-99 rifle chambered in .416 Barrett (above)
Because the .408 was first to really dive head first into the ultra long range category it has developed a kind of mythical status, shows like future weapons and and the movie shooter added to this reputation. The .408 and the rifle that fired it are an outstanding combination. However, in the years since the .408’s development some competitors have overtaken it. Even if only by a slight margin.
The most notable is from Cheytac themselves. They further necked down the cartridge case to .375 caliber to produce the .375 Cheytac. It is unequivocally ballistically superior to its bigger older brother.
We can thank California for the .416 Barret. Cali outlawed the .50 bmg cartridge so Barret necked down the .50 bmg case and loaded a .41 caliber projectile in it in order to comply with California laws. It only took 3 years to develop a gunpowder compound capable of taking advantage of the combination. Despite having significantly less powder and recoil than the big 50 the more aerodynamic 41 caliber bullets were capable of staying supersonic to incredible ranges (Around 2200 yards). The .416 has been shown to make first round hits out to 2500 yards or so. Compare this to the .50 that goes subsonic around 1500.
An indicator of the effectiveness of the .416 is to look at the what the pros use. There is a marksmanship competition called “The King of Two Mile.” That’s correct, 2 miles. Below is a list of what the top 10 competitors used.
Two out of the top three were the .416 Barret. The number 2 slot is a modified .375 Cheytac case. The .408 is not on the list.
The .375 and .416 are absolute bruisers as you can see from the picture. They are not for the faint of heart and require more than the average marksman is trained to do.
In order to take advantage of their maximum ranges you need very high quality range finders and ballistic computers with the ability to accurately determine the correct environmental conditions. At those ranges a miscalculation in your density altitude can make a big difference in whether or not you hit the target.
They also require the use of projectiles with little to no variability in weight, length and shape.
At any rate, if I had one cartridge to pick for an ultra long range shot and had to do it with a factory rifle it would be an M-99 firing the .416 Barret.
I selected the Barrett M-99 chambered in the .416 Barrett cartridge as the rifle with the most capability for striking targets at the longest possible range. This would not indicate that the M-99 is always or even ever the best option for a sniper to carry. The .416 Barrett cartridge is an absolute beast. It’s performance is incredible but as with all engineering endeavors there is always a give and take.
This is a formula one race car. Arguably one of the highest performing vehicles on the planet. It’s also extremely technical to drive, requires incredible maintenance, a very well trained operator and probably costs more than the average home. It’s a very purpose built machine.
The .416 cartridge is similar in some ways. It’s performance is incredible. In order to take advantage of that performance potential the cartridges it fires must be loaded with very precise measurements of powder with a very specific burn rate. The projectiles must be weighed to very close tolerances and seated in the case to exacting depths. The operator must be flawless and they are very expensive to operate. Some of these problems are common to any cartridge if you are attempting to shoot at extended ranges. The problem of encountering ballistic inconsistencies at the ranges the .416 is capable of shooting are intolerable compared to most other target engagement distances. The difference between 1,000 and 3,000 meters is not three fold in complexity. The increase in difficulty is exponential. Take the .308 for example, with an effective range of around 1,000 yards. Some small variation in chamber pressure may not manifest in a miss. At 3,000 yards even with a .416 a minor variation in chamber pressure may manifest in missing by meters. The fact that anyone can do it, let alone in adverse combat conditions is more than impressive.
So, to explain why I chose the .416 in a little more detail.
In order to hit a target at extreme ranges you have to be able to accurately predict the flight path of the bullet. In any long range shot the rifle is not pointing at what you are aiming at. The barrel has to be aimed above the target. This results in a parabolic flight path to the target. Much like throwing a football.
You must have an accurate ballistic coefficient in order to predict how high above your target you need to point the muzzle.
Ballistic coefficient is defined as “a constant in ballistics that represents the efficiency of a projectile in overcoming air resistance.” The instant a bullet leaves the muzzle it is acted upon by gravity. If you fired one bullet on a perfectly level trajectory at ten feet above the ground, and simultaneously dropped a bullet from a height of ten feet they would both hit the ground at the same time. The bullet fired would have just travelled some distance. Gravity is constant. If rifle bullets were capable of maintaining a constant velocity the math would be fairly simple. Bullets however immediately begin to decelerate due to atmospheric friction. The energy required to move air molecules out of the way slowly robs the bullet of energy. The .416 leaves the muzzle at roughly 3,300 feet per second/ 1,006 meters per second, or Mach 3. At these speeds air almost acts like a fluid. A bullet with poor aerodynamic qualities would decelerate extremely fast at those speeds.
Ballistic coefficients are determined by measuring their aerodynamic efficiency against a standard model. For modern rifle shaped bullets the most accurate drag model is referred to as the G-7. This model is produced and extensively tested. Then when a manufacturer makes a new bullet it’s ballistic coefficient can be calculated mathematically by comparing its shape to the model.
Standard G-7 ballistic model.
This calculation is only a starting point. Every rifle is slightly different. Even two rifles produced by the same manufacturer may produce slightly different velocities or characteristics due to almost imperceptible variations. While a calculated ballistic coefficient will get you very close, you must fire your desired rifle/ammunition combination and observe it’s real world performance in order to develop a truly accurate ballistic coefficient.
For more details on ballistic coefficients and drag models:
There are many factors acting on a bullet besides drag and gravity but a bullet with a high ballistic coefficient coupled with a high muzzle velocity minimizes the the work the shooter has to do in order to compensate for these factors.
A more aerodynamic bullet retains its velocity better, which means it takes less time to get to the target. This in turn means that gravity has less time to work on it. So the shooter doesn’t have to adjust for as much elevation. Wind also does not have as much time to deflect the bullet resulting in less lateral correction.
Stability is also an important factor. Modern rifle bullets don’t naturally want to fly pointy end forward. The nature of their shape places their center of gravity closer to the tail end of the bullet. This inherent instability is addressed by imparting spin on the bullet by cutting rifling into the barrel. A series of grooves are cut into the inside of the barrel causing the bullet to spin at a prescribed rate
The twist rate is determined by many factors but essentially the longer the projectile and the smaller the diameter, the faster the twist needs to be. The bullet is a gyroscope in flight and the angular momentum from rotation is greater than it’s inherent desire to want to fly heavy side first.
A bullets rotational speed is directly connected to its forward speed. A twist rate of one revolution for every foot travelled would be listed as 1:12 or (one revolution for every 12 inches). This may not sound like that much spin until you convert it to RPM’s. The 416 for example would require a 1:9 twist for a 500 grain bullet that will be stable through transonic speeds. That comes out to 1.25 revolutions for every foot travelled. The 416 leaves the muzzle at about 3,300 feet per second, that’s 247,500 rpm’s. This is more RPM’s than is required to stabilize the projectile but it is needed so that the bullet will remain stable at range when it has significantly slowed down. Imagine a spinning top on a table. When it slows down and it’s angular momentum becomes less than gravity it will start to wobble and then fall over, a bullet will do pretty much the same and when you reach that distance all accuracy is lost
So again, a bullet with a high ballistic coefficient will retain its speed and therefore its stability for a longer distance.
Ballistic coefficient is only one factor in a long list of what makes an accurate long range bullet. It is one of the most important though and has a huge impact on many of the other factors.
I will compare the 416 Barrett cartridge to the .375 Cheytac (which I consider the very close second). The .375 can on the high end fire a 400 grain (25.92 grams) projectile at around 2850 feet per second. The 416 can fire a 500 grain (32.39 grams) projectile at 3,300 fps.
I picked one bullet manufacturer that makes exceptionally aerodynamic bullets for each bore diameter. The company is called Cutting Edge bullets. They have a product line called the lazer. The bullets are the same form factor for each bore diameter.
The 400 grain .375 caliber Cutting Edge lazer bullet lists a G-7 ballistic coefficient of .445
The 500 grain .416 caliber Cutting Edge lazer bullet list a G-7 Ballistic coefficient of .491.
500 grain .416 caliber Cutting Edge Lazer bullet.
While the .375 is an AMAZING cartridge and is capable of remarkable things. The higher ballistic coefficient coupled with significantly higher muzzle velocity of the .416 Barrett makes it the winner in my mind, if ultra long range hit probability was the primary deciding criteria.
Shooting Uphill and Downhill
By Chuck Hawks
The hoary old question of where to aim when shooting up or down hill regularly rears its head. It seems that many hunters understand that shooting at a steep angle changes the point of impact, but can’t remember why or in which direction.
The correct answer is to hold lower than normal when shooting steeply up or down hill at long range. (At gentle angles you can ignore the problem altogether over the maximum point blank ranges of hunting rifle cartridges.)
This seems odd to many, and they insist on making the problem more difficult than it needs to be. But the reason is simple. Trajectory, the bullet’s flight path, depends on the horizontal (level) range to the plane of the target, not the line of sight range up or down hill. Your eye sees the line of sight (slant) range from your position to the target, which is longer than the horizontal range.
Remember that it is gravity working on the bullet during its flight time that causes it to drop. If you were to shoot straight down, say from a tethered balloon, the bullet would have no curved trajectory, it would travel toward the earth in a straight line, just as if you simply dropped it. Likewise, if you shoot straight up, the bullet travels up in a straight line until its momentum is expended. Again, there is no curved trajectory.
You can infer from this that the farther from the level position a rifle is held when a bullet is fired, the less the bullet’s drop will be over any given line of sight distance, whether it is fired up or down. Since your sights are set to compensate for bullet drop, and there is less bullet drop when shooting at an up or down angle, you must hold lower than normal to maintain the desired point of impact. For example, if you are shooting up or down at a 40 degree angle and the line of sight range is 400 yards to the target, the horizontal range is only 335 yards. 335 yards is the distance for which you must hold.
Leupold RX-III TBR display for example above. Illustration courtesy of Leupold & Stevens,Inc.
The Leupold RX-III rangefinder that I reviewed for Guns and Shooting Online includes among its many features a mode that automatically compensates for up and down angle shots. Leupold calls this “true ballistic range” and you can set the RX-III’s main readout to display the horizontal distance to the target, which is the distance you need to worry about in terms of trajectory. In the lower left corner of the display it also tells you the angle at which your are ranging and the line of sight range from your position to the target.
For example, if I range the top of a tall fir tree some distance from my house the line of sight range is 151 yards and the angle is 19 degrees of elevation, while the horizontal range–the true ballistic range–is only 130 yards. It is a neat rangefinder and a little time spent with one drives home the reality that, in terms of bullet trajectory, it is the horizontal, not the line of sight, range that matters.
Gun Skills: Setting Up Stoppage
by Mel Dixon July 28, 2022
There are, of course, many kinds of stoppages you might encounter in shooting semi-automatics, but ultimately they boil down to two basic types: simple and son-of-a-!!!
That is, most stoppages are fairly easy to clear, but some are more complex and thus take more time to resolve (and frequently involve some creative language use).
A non-operational firearm isn’t much help in a self-defense scenario (beyond the sight of a gun being a deterrent in itself), so it’s worth your time to practice clearing stoppages. One of the problems here is fooling your mind—you’re setting up the stoppage, so you know it’s coming, but you must practice as if you don’t. Even if you’re working with a friend, you know you’re working on stoppage drills, so you might expect issues more than usual. The only solution is to focus on your practice as if you had no idea the problem was coming.
Follow all NRA safety rules throughout this and all exercises, of course; particularly, be careful to keep your muzzle pointed in a safe direction and your finger off the trigger any time you’re working the action to clear a stoppage.
Simple Stoppages Setup Simple stoppages include failures to feed, misfires (dud rounds) and failures to eject (stovepipes). Failure to feed means a round didn’t go into the chamber even though the slide closed, often because the magazine wasn’t seated well enough or perhaps because of a tired spring in either the gun or the magazine. A misfire is when the cartridge went into the chamber but didn’t fire for some reason—such as insufficient powder or a dead primer in reloaded ammunition. A failure to eject (stovepipe) is when a piece of brass doesn’t eject from the chamber all the way, thus stopping the action from cycling again.
All three of these can usually be cleared with an immediate tap-and-rack. To set up both a failure to feed (or a stovepipe if you prefer) and a misfire round for the same practice session:
1. Load a magazine as normal except for putting one dummy round somewhere in the mix. Leave the magazine out of the gun for now.
2. Close the slide, and then load the magazine into the gun. (Leave the slide closed without racking it.) If you prefer to set up a stovepipe instead of a simple failure to feed, insert a used piece of brass in the ejection port as you close the slide.
3. Now perform any standard shooting drill. Keep your focus on your fundamentals and on your time to engage, as usual.
4. When you encounter a dead click, as you will at the beginning of, and sometime during, the drill, take your finger off the trigger.
5. Instructors disagree with each other here about whether to take immediate action or assess the stoppage. Assessing takes a moment when you could be clearing, and that moment could be all it takes for a bad actor to get the upper hand. You make the determination about what’s best for you, but I submit that you can do both—assess even as you clear.
6. If the stoppage is not a double-feed, tap and rack: give the magazine a good thump to seat it fully and then rack the slide to cycle the action.
7. Get back on target immediately and fire the next set of shots for the drill.
Complex Stoppages Setup Now for the stoppages that require more time to resolve—usually double-feeds. A simple tap-and-rack can clear a double-feed if you’re very lucky, but in many cases, it can make the situation even worse. This is why some instructors argue for assessing first. “There are symptoms and there are solutions,” NRA Training Counselor Doug Davis likes to say. Either way, at some point, you’ll need to realize your stoppage needs more than just a tap-and-rack.
1. Load a magazine as normal and put it into the gun. Do not close the slide.
2. Insert a round directly into the gun’s chamber.
3. Close the slide. The gun should try to load one round from the magazine into the chamber, but of course a round is already there, so now you have a double-feed.
4. Perform any standard shooting drill, keeping your focus on your fundamentals and on your time to engage, as usual. (Remember, you’re trying to train as if you didn’t know a stoppage was coming.)
5. When you encounter the stoppage, as you will at the beginning of the drill, take your finger off the trigger. Identify the double-feed. Move to cover, if possible.
6. Lock the slide open and remove the magazine.
7. With the magazine out (and your finger off the trigger), quickly rack the slide three times. This should dislodge any obstruction.
8. Insert either a fresh magazine or the one you previously removed. If you retained the magazine you previously used, quickly look to ensure the top round is still seated correctly before re-using it.
9. Rack and roll: Cycle the slide and get back on target immediately to fire the next set of shots for the drill.
The very best scenario for these complex stoppages still has you losing several seconds as you clear and reload. That’s a bad thing in a self-defense scenario, and no amount of creative language will save you. So keep your gear as close to perfect as you can get it and practice, practice, practice clearing stoppages to decrease your response time.
How To Use the Flash Sight Picture Shooting Method
By Ed AKA “The Real Most Interesting Man in The World” LaPorta Published on July 29, 2022
As an instructor, one of the most difficult concepts for me to teach students is the FSP. One of the reasons is because it is difficult to relate to them exactly what they will see in that 1/10 second. Even pictures lack the ability to give a true example. Only an animated video stands a chance of providing a clear example.
When target shooting or casually plinking, you take your time and align the front and rear sights. This allows you to make accurate hits in tight groups. It is easy to analyze whether the student understands the concepts of sight alignment and sight picture during slow, aimed fire.
The correct sight picture as many of you already know, has the front sight centered between the posts of the rear sight with the top of the front and rear sight even across the top.
Proper Sight Picture
The concept of which is accomplished by placing the front sight in the center of the rear sight with equal space on either side. The sights must be aligned across the top. The top of both the front and rear sights must be at the same level. This is what we refer to as proper sight alignment.
Proper sight alignment is essential for precise shooting, especially at longer distances. It is easy to analyze whether a student understands the concept by examining their target. If the groups are small and placed with precision, they get it. If not, they don’t. By analyzing their groups, I can usually tell what they are doing wrong and offer instruction to correct it without much difficulty.
Sight alignment is more important than sight picture when shooting fast at close range. If the sight alignment is correct, even if the sight picture is partly off, the target will be hit. In essence, when the target is big and close, you can get by with fairly unrefined alignment of the gun on the target and still get an acceptable hit. When the target size is smaller or it’s farther away, you need more precise alignment.
For the concealed carry holder, the odds are that any ‘defensive shooting’ situation he or she will be involved in will be close-up. According to FBI statistics, the encounter will normally be at 21 feet or less. At that distance, during a rapid violent attack, there is no time for the perfect sight picture and precise sight alignment.
A quick response and center-mass hits are what is needed. It is not important that all center-of-mass hits are not arranged in a tight group. One could argue that multiple hit locations have the potential of causing greater damage to the attacker from dispersion and expansion, but I’m not so sure.
The modern technique (abbreviation of modern technique of the pistol) is a method for using a handgun for self-defense, originated by firearms expert Jeff Cooper. The modern technique uses a two-handed grip on the pistol and brings the weapon to eye level so that the sights may be used to aim at the target.
Flash Sight Picture
During the creation of what has become known as The Modern Technique of Pistol Shooting, Jeff Cooper invented a sighting concept called the “Flash Sight Picture (FSP).” This part of the modern technique has been refined over the years. The basic idea is to get your sights on the target quickly with multiple effective hits.
Colonel Cooper analyzed the sighting process and realized that you only need about a tenth of a second to recognize where the front sight is. Through repetitive training stressing the proper grip, you train the muscle-memory responses of the shooter to align the sights on the target without the delay of the slow, time-consuming, conscious alignment of sights. For this to work, it is imperative that the shooter’s grip be correct. A good way to practice this is in front of a mirror.
Ensure the firearm is unloaded and no ammunition is in the area. Start with your handgun holstered. Slowly execute your presentation bringing the gun to eye level. It should be pointed directly at its reflection. If the sights are perfectly aligned, without any adjustment needed, your grip is correct. If your sights are not properly aligned, make adjustments to your grip and repeat.
The correct grip demonstrated with a straight line through the sights up your forearm aligned with your pointing index finger.
Continue repeating the exercise and adjusting the grip until it is correct. Do not worry if you are seeing the two images aligned, that is another problem and takes another lesson to correct. Once you can repeat the grip on demand, slowly increase the speed of the presentation in front of the mirror. Remember, they say it takes 500 perfect repetitions to build the muscle memory needed to learn an action.
What you want to do is take advantage of your innate ability to point at things the way you have your entire life. Remember your mother telling you not to point because it was impolite? Well now it’s not, and we want to be impolite. So, point away to your heart’s content.
The technique to obtain the FSP is to first look at your target, focus on center mass, present your firearm — bringing it from the low-ready position to eye level — and move toward the target while maintaining focus on the threat. When you see the front sight in line with the target, transfer your focus to the sight.
Jim Hoag using the FSP around the time of its invention.
When the front sight hits the A-Zone, press the trigger. You should be rewarded with good center mass hits. Of course, this assumes competent trigger control, which is something you have already mastered. Trigger control is, after all, a critical fundamental skill for shooters to concentrate on, regardless of the technique used.
Point Shooting
Something needs to be mentioned now and that is the difference between the FSP and Point Shooting. When Point Shooting, the pistol is drawn from the holster and fired from the level of the hip or forward of the hip. You do not bring the gun to eye level nor are the sights being aligned.
Some research statistics and studies indicate that being in a gunfight and shot or killed, you stand an 80% chance that it will happen at 21 feet or less. So, using a method to aim and shoot that is instinctual, fast, and accurate — such as FSP shooting — makes sense to me, especially for close engagements. If you have been trained in proper sight alignment, then it should be an easy transition to learn to use the FSP method.
Understand however, that it is a technique you must practice, study, and decide when, if, and in which situations it will work best for you. Again, do not use this technique without lots of practice. Remember, to safely practice bringing the gun up and on target quickly — without ammo in the area designated for dry-firing in your home.
When you go to the range and engage in live fire, you will be rewarded by the number of A zone hits and how quickly you are able to get them. With Flash Sight Picture shooting at seven yards, you should be able to get consistent hits in the A zone almost every time — even when the front sight is not in perfect alignment. If you are out of the A zone, slow down a bit, and check/adjust your grip until you are on target.
The Flash Sight Picture is a method that allows the defensive shooter to get quick hits on a threat using the level of accuracy that is needed in close-range gunfighting.
The key to all things shooting is to practice often, beginning slow and then increasing the speed slowly. The speed will come on its own as you master the skill. As the good Colonel used to say, “Ride hard, shoot straight, and speak the truth.”
Although the pictures show perfect sight alignment, that will not always be the case with a Flash Sight Picture. The concept is about getting a quick sight picture that is accurate enough to land a critical hit to the threat — before the threat lands a hit on you.