Select your subject from Menu Below. Highlight and click your subject then scroll down page to view.

Hunting

Hunting Cartridges March 31, 2023 By Dave Emary

All technical disciplines have their own set of nomenclature and definitions. For example, I wouldn’t expect a geologist to have much understanding of a conversation with an aeronautical engineer about a wing’s aspect ratio or lift-to-drag ratio any more than the aeronautical engineer would have much understanding of a discussion of the late Cambrian period.

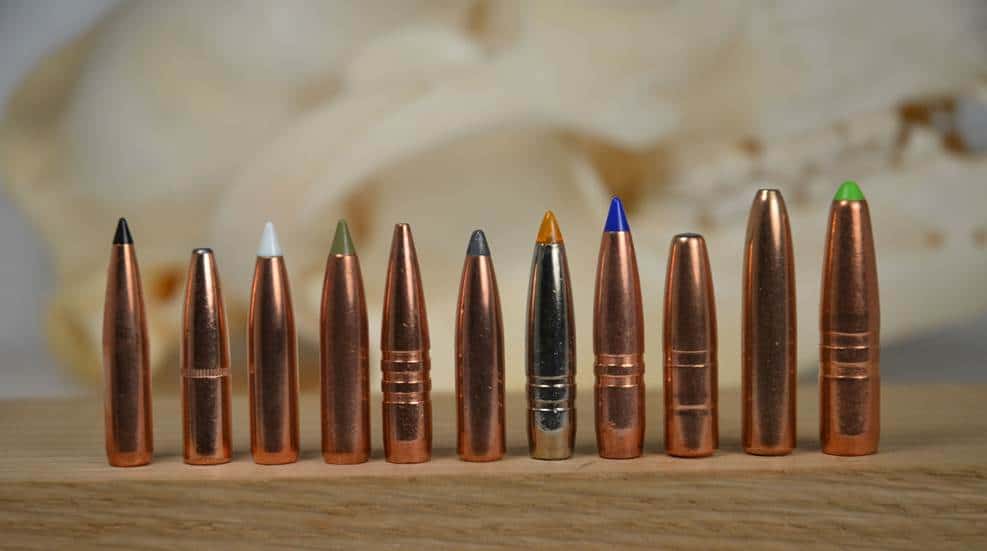
As shooters and hunters, we definitely have our own set of nomenclature that applies to our passion. Try having a discussion with your wife about the merits of a high ballistic coefficient (BC) bullet and the benefits to its trajectory, retained velocity and terminal performance for the big-game hunter. How long did it take for her eyes to glaze over? Along those lines, I thought it might be beneficial to readers to review several ballistics terms, what they mean and how they can be used to help hunters make choices about what bullet to hunt with, how to set up a rifle and scope accordingly, and what to expect for performance in the field. I would like to delve into BC, sectional density (SD), maximum point-­blank range (MPBR) and minimum striking energy (MSE). We’ll look at the definitions of these terms and consider how they can be used to guide our decisions about bullet selection and setting up a rifle and scope.
Ballistic Coefficient (BC)

I won’t go into the mathematical definition of “BC.” I have done this in detail in previous columns, first in May 2018. BC is simply the comparison of a bullets’ rate of velocity loss as it flies through the air compared to a standard bullet. The rate of velocity loss of the standard bullet has been carefully measured, and BC is a measure of how well or poorly this example bullet retains velocity compared to the standard bullet. Don’t get wrapped around the axle on whether to use “G1,” “G7,” or “whatever” BC. That tangent can lead to a lot of minutiae. Suffice it to say, if you are a traditional hunter and hunt at ranges within 400 yards, G1 will work just fine for you. If you are a long-­range hunter and shoot at ranges in excess of 400 yards, you might want to be looking at G7 BC numbers.

In all cases, the higher the BC number, the better the bullet is at retaining velocity. This means the bullet shoots flatter, drifts less in the wind and retains more striking energy by the time it reaches its target. The longer the range, the greater importance BC has. The real-­world bottom line is the differences in trajectories will be meaningless at normal hunting ranges unless you have a huge difference in BC. For long-­range shooting, you’re going after every advantage you can reap for a flatter trajectory and reduced wind drift. As I see it, the real advantage of a higher BC bullet is the higher retained velocity, which results in greater range for effective terminal performance.

.30 cal chart

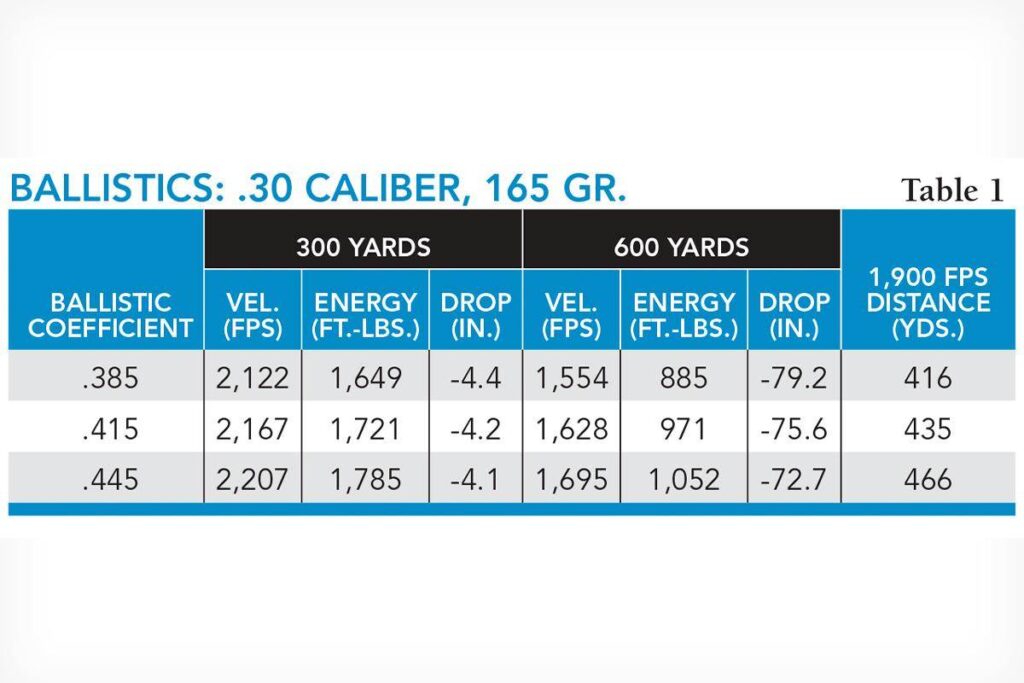
Table 1 shows the 300- and 600-yard retained velocity, energy, drop and the range that it has dropped to 1,900 feet-per-second (fps) retained velocity for a .30-caliber 165-grain bullet with a muzzle velocity of 2,800 fps and 250-yard zero with several different BCs. As you can ascertain from the table, the higher BC bullet has more retained velocity, more energy and less drop. If we say this bullet type has an expansion threshold velocity of 1,900 fps, the higher BC offers an extra 50 yards of effectiveness versus the lower BC bullet.
Sectional Density (SD)

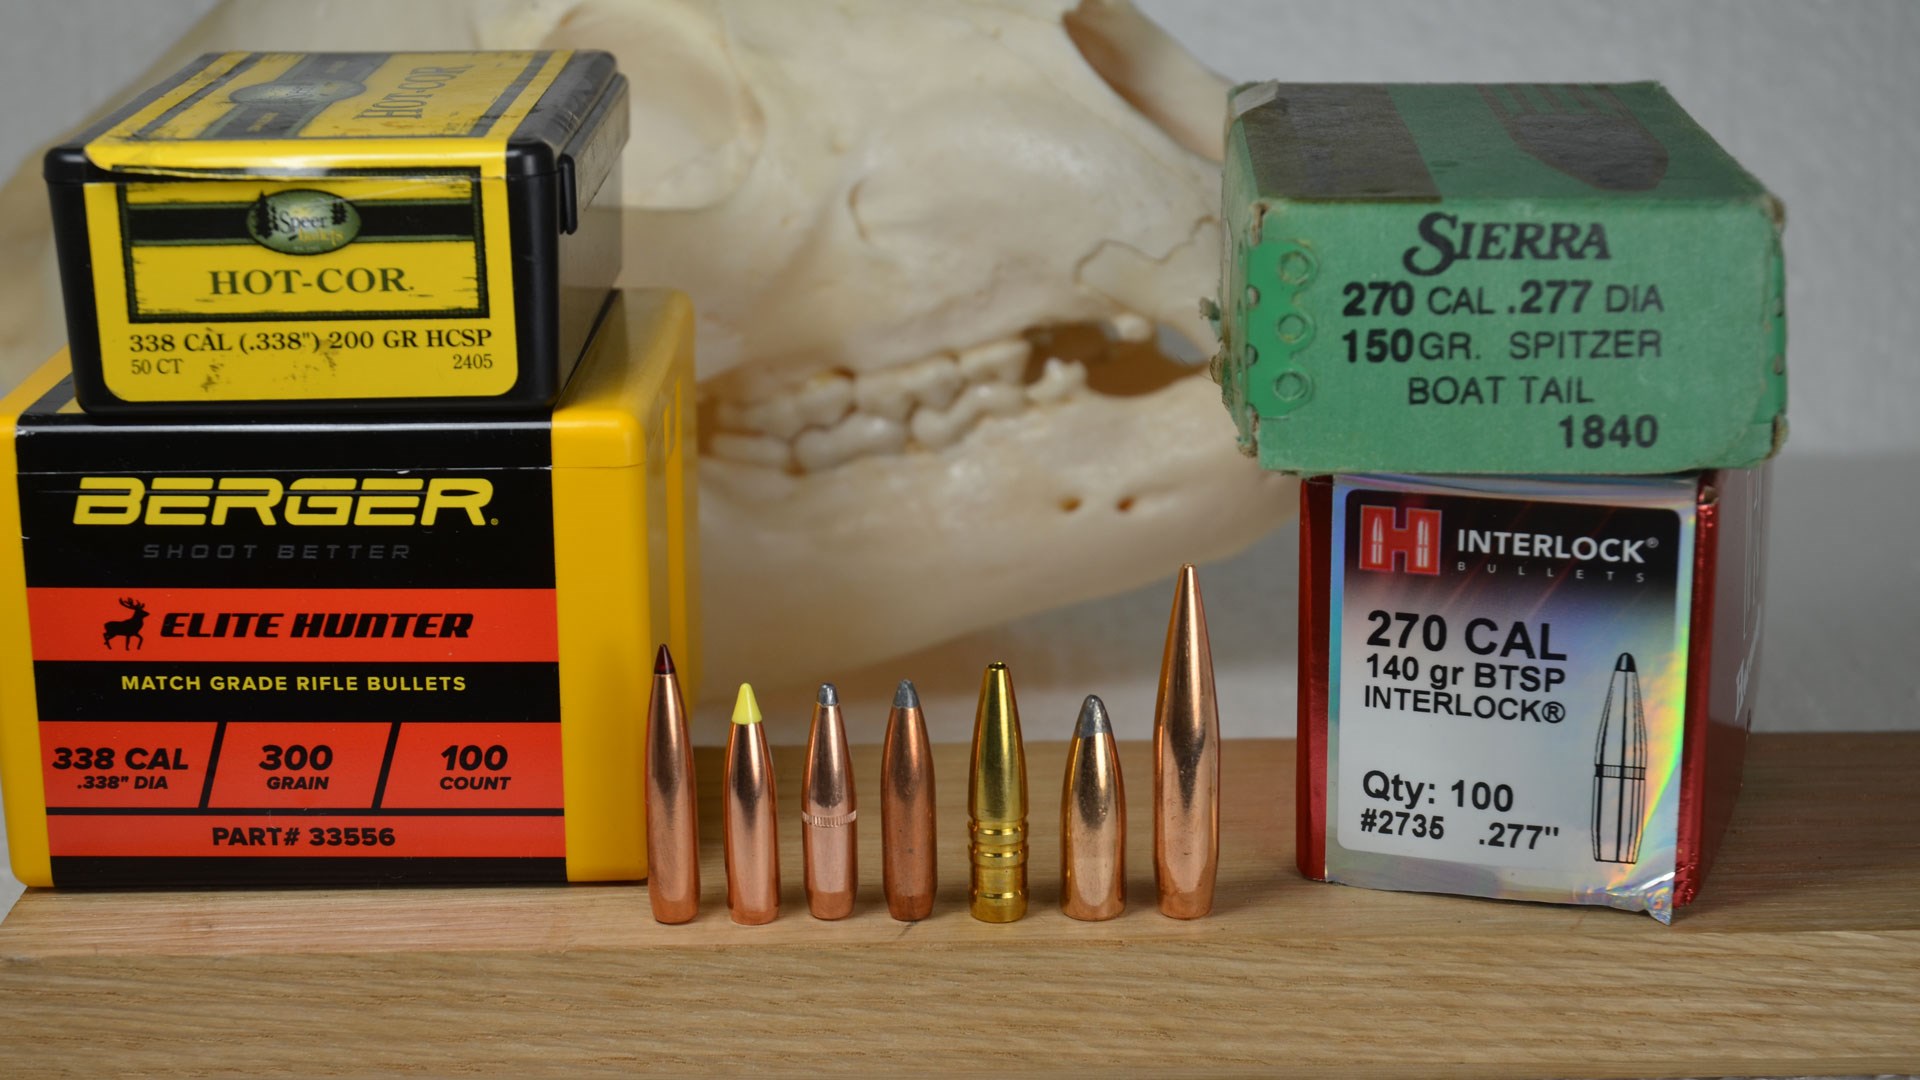
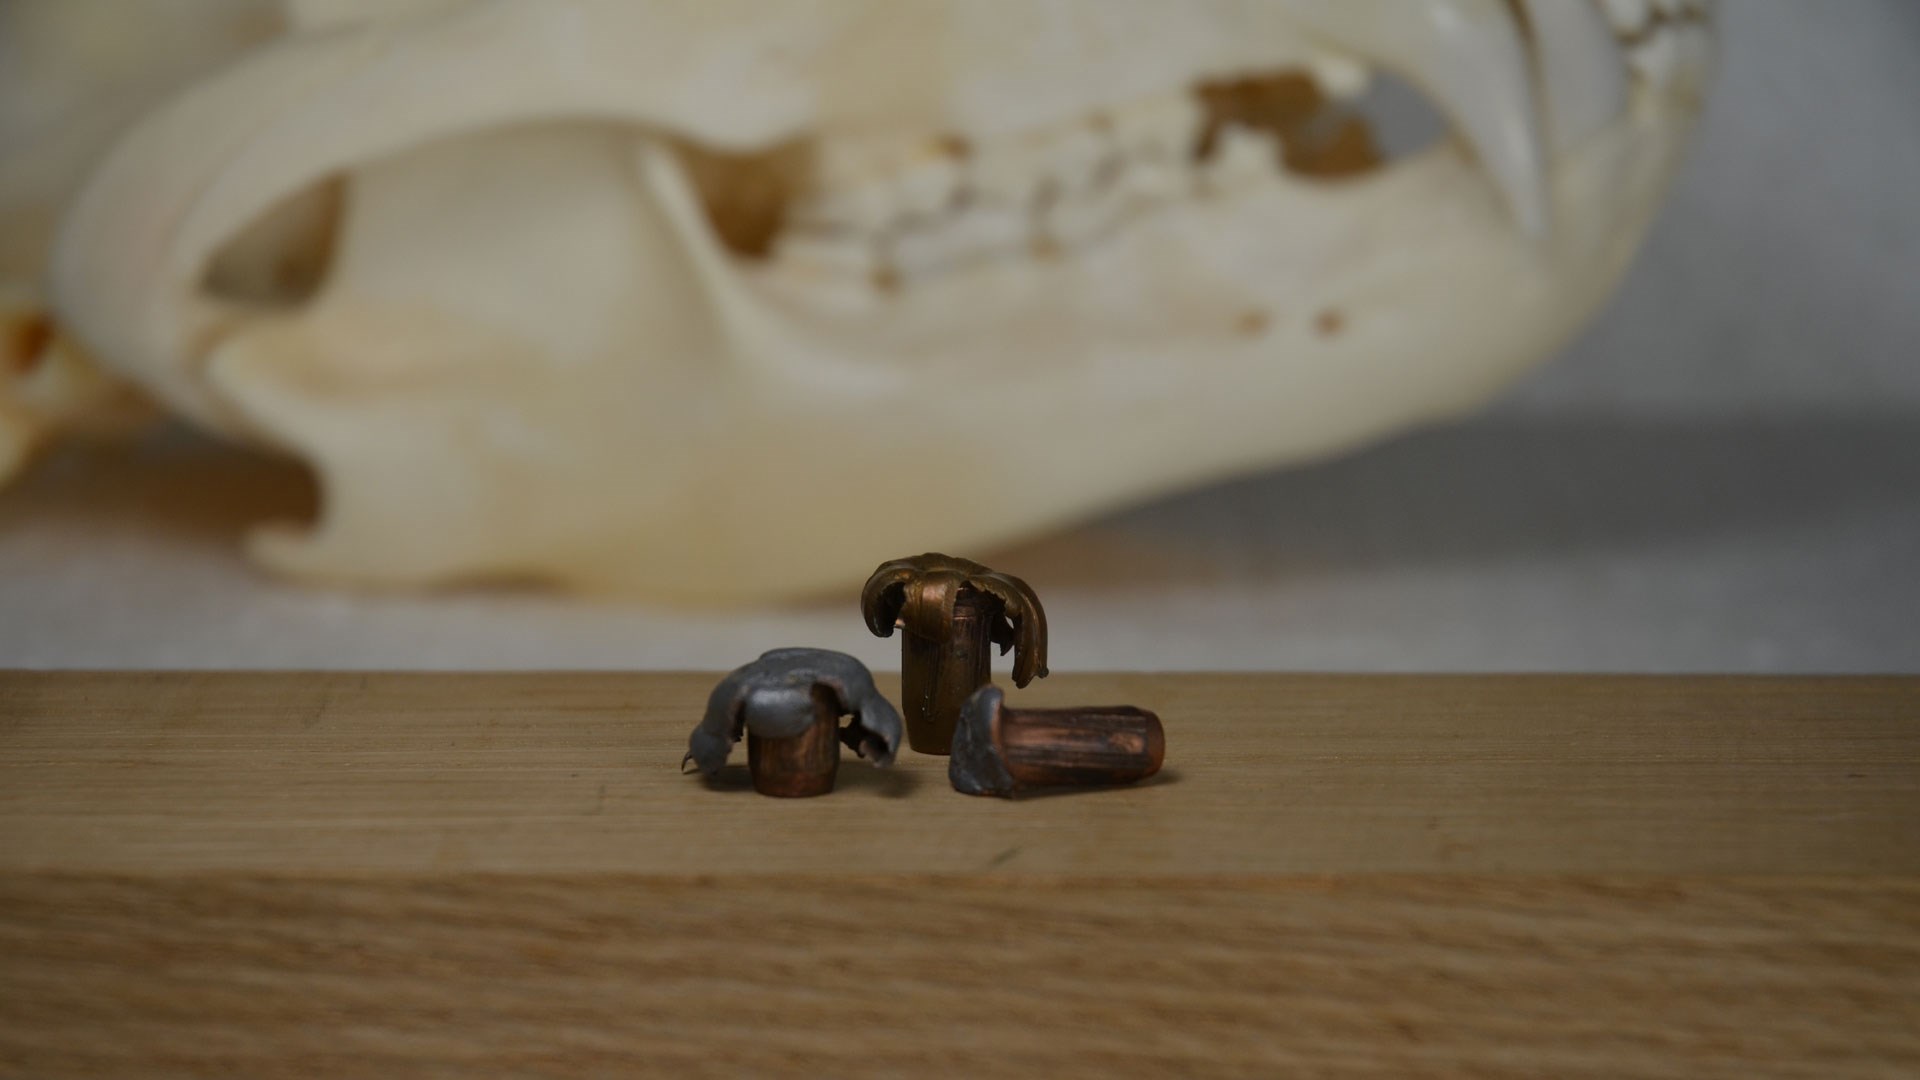
Sectional density (SD) is a fairly simple concept. The mathematical definition of “SD” is bullet weight (gr.) divided by bullet diameter2. The useable formula is: Weight (gr.)/7000/diameter2 (in.). In practical terms, the real use of SD is that it is a round-­about way of defining how long the shank of a bullet is and it is an indicator of penetration potential. Take .30-caliber hunting bullets: They are all limited to approximately the same ogive length because of the head height and magazine length of the .300 Winchester Magnum. This is the lowest common denominator for the bullet designer. The only way to get a heavier, higher SD is to have a longer shank on the bullet. The longer the shank, the heavier it is, which means the more retained weight it will have, leading to higher penetration. SD gives you an idea of what to look for in a bullet depending on the size of the game you are after and how much penetration you need.
penetration chart

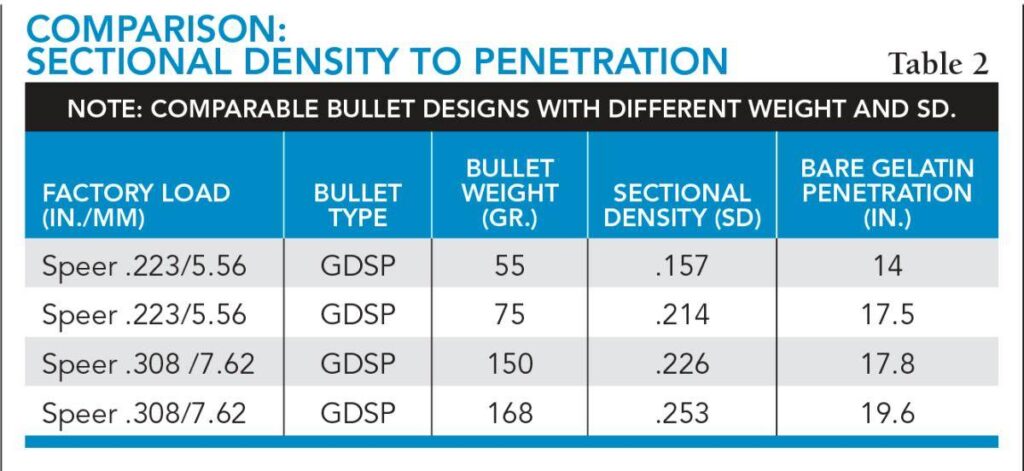
Table 2 shows the penetration of bullets with the same design but different SD in bare gelatin. This data is courtesy of Federal. As you can see for bullets of comparable design, an increase in SD positively correlates to weight and penetration.

Maximum Point-­Blank Range (MPBR)

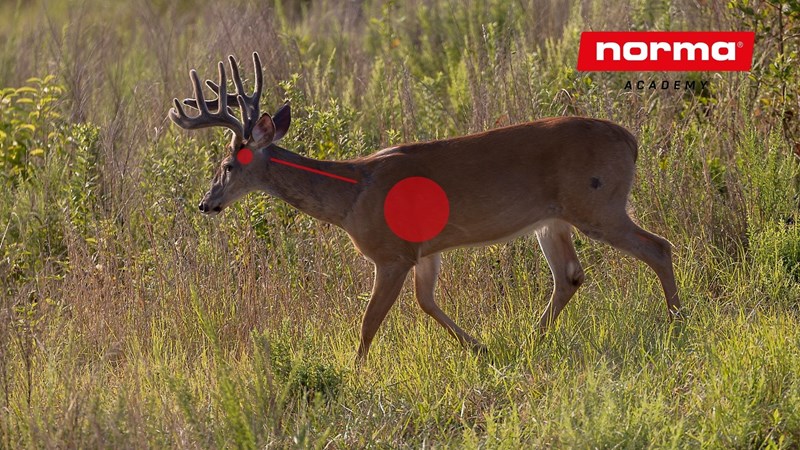
This is a term we haven’t heard mentioned much since the rush to “long-­range” hunting. MPBR still has plenty of meaning to those that want to hunt at traditional ranges inside of 400 yards, and those using traditional, less expensive and smaller-objective scopes lacking target knobs. The definition of MPBR is a rifle zero with a specific ammunition load such that the trajectory of the bullet will not rise above or fall below the height of the kill zone of a particular animal. For this zero, the MPBR is the range at which the bullet falls below the lower limit of the kill zone.
kill zone chart

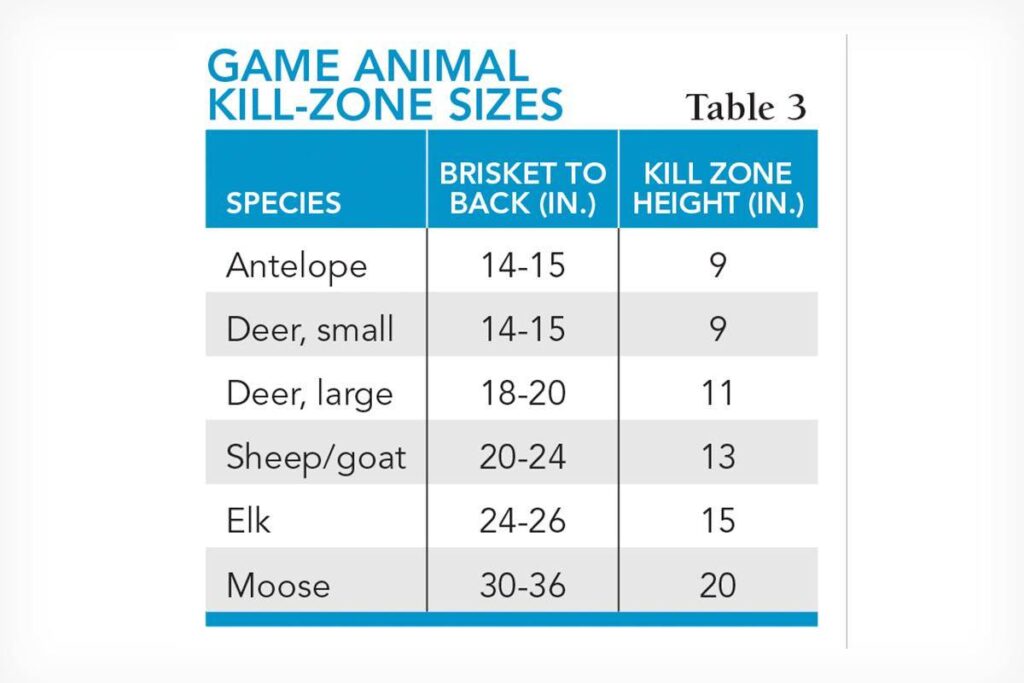
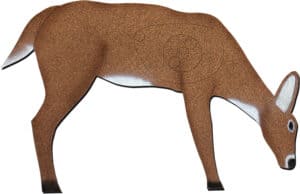
To explain this further, we need to discuss a little bit of animal physiology. As we all know, there are widely different sizes of game animals. The lungs and heart of an animal are the vulnerable organs, thus, it’s what hunters aim to hit. When an expanding bullet penetrates these organs, it will result in rapid incapacitation and a humane kill. Hence, this is the “kill zone” of an animal. Naturally, the size of the animal largely determines the size of the kill zone. Table 3 shows the generally accepted kill zone size for a number of common game animals. I would suggest that you not use the entire size of the kill zone to determine your gun’s zero and MPBR, though. My suggestion is that if you are going to set up your rifle for a zero corresponding to the kill zone size of a particular animal, you use no more than three-quarters of the kill-zone height. This gives you a little margin for a misplaced shot, and not all animals will fit into this chart.
ballistics chart 6

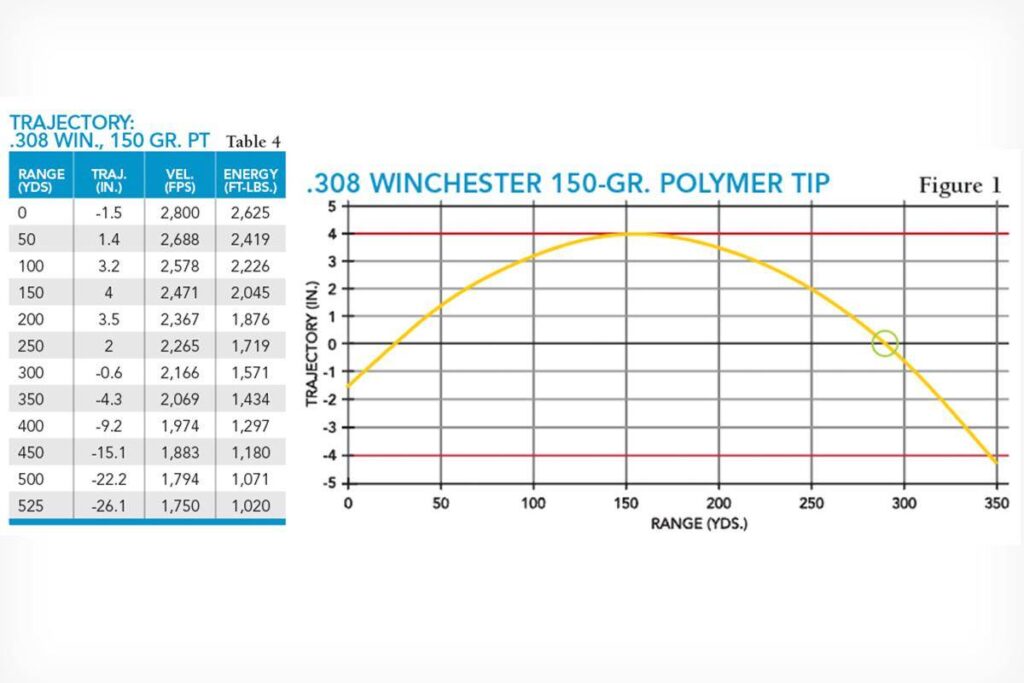
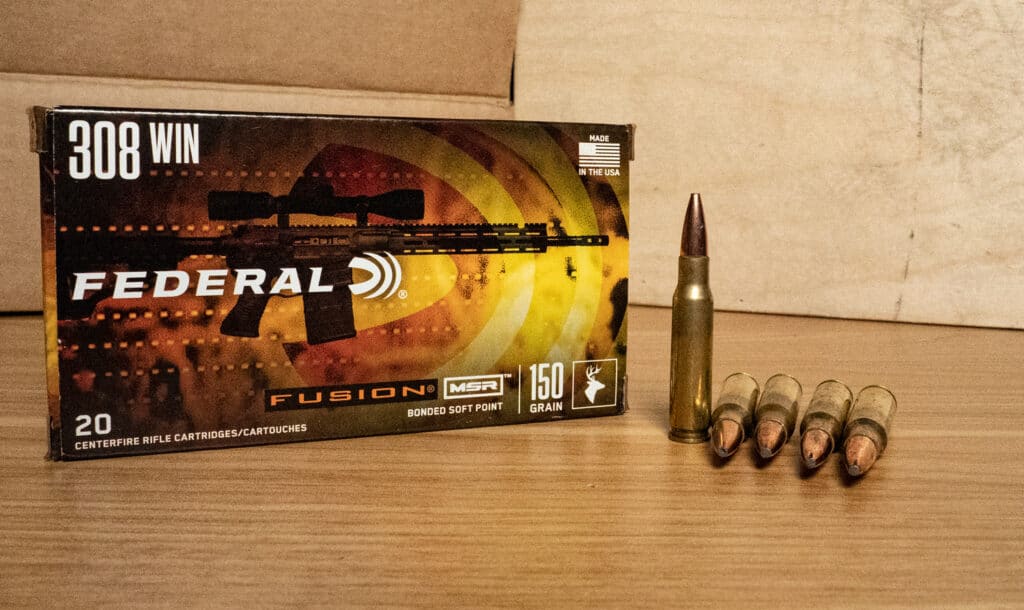
As an example, let’s say that you somehow manage to draw a mule deer tag in a western state. You decide you are going to take your favorite .308 Winchester loaded with a polymer-tipped 150-grain bullet fired at 2,800 fps. Looking at Table 3, you see the maximum kill-zone size for a large deer is 11 inches, so let’s use a kill-zone maximum height of 8 inches. Set the rifle up for a zero that gives a maximum trajectory height of 4 inches and then determine the range at which the bullet drops below 4 inches. The range at which it drops below 4 inches low is the MPBR. This range is the maximum range at which you could shoot at this large deer and not worry about the range or holdover. With a good shot, you’ll know that it will hit the kill zone, at least vertically. Left and right will be influenced by the wind and your ability to compensate for it. Table 4 shows the ballistics of this round, and Figure 1 is a graph of the trajectory with red lines drawn to show the limits of 4 inches high and low.

Seen in the graph, you would want to zero the rifle for about 290 yards for 4 inches maximum height of trajectory at 150 to ­160 yards. This would correspond to being 3.2 inches high at 100 yards. This zero would give you an MPBR of about 345 yards, which is where the bullet drops below 4 inches.
Minimum Striking Energy (MSE)

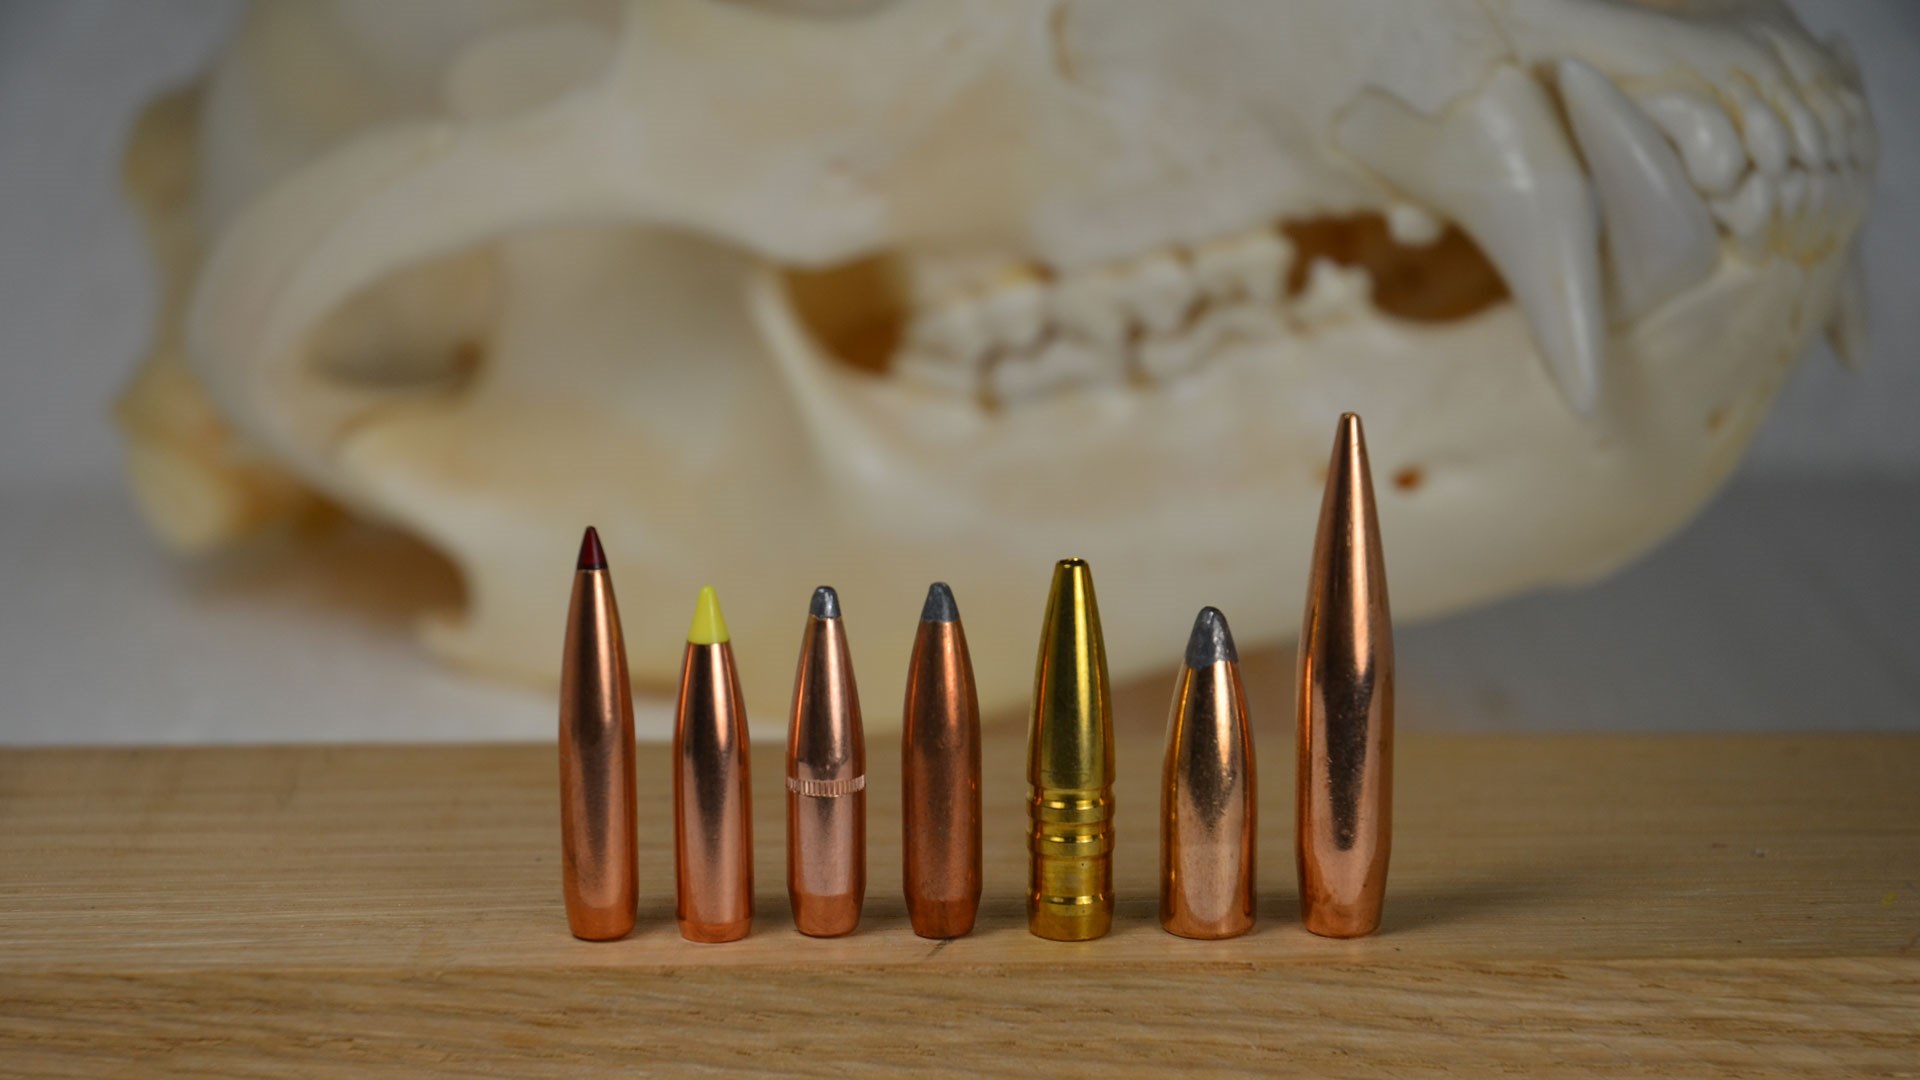
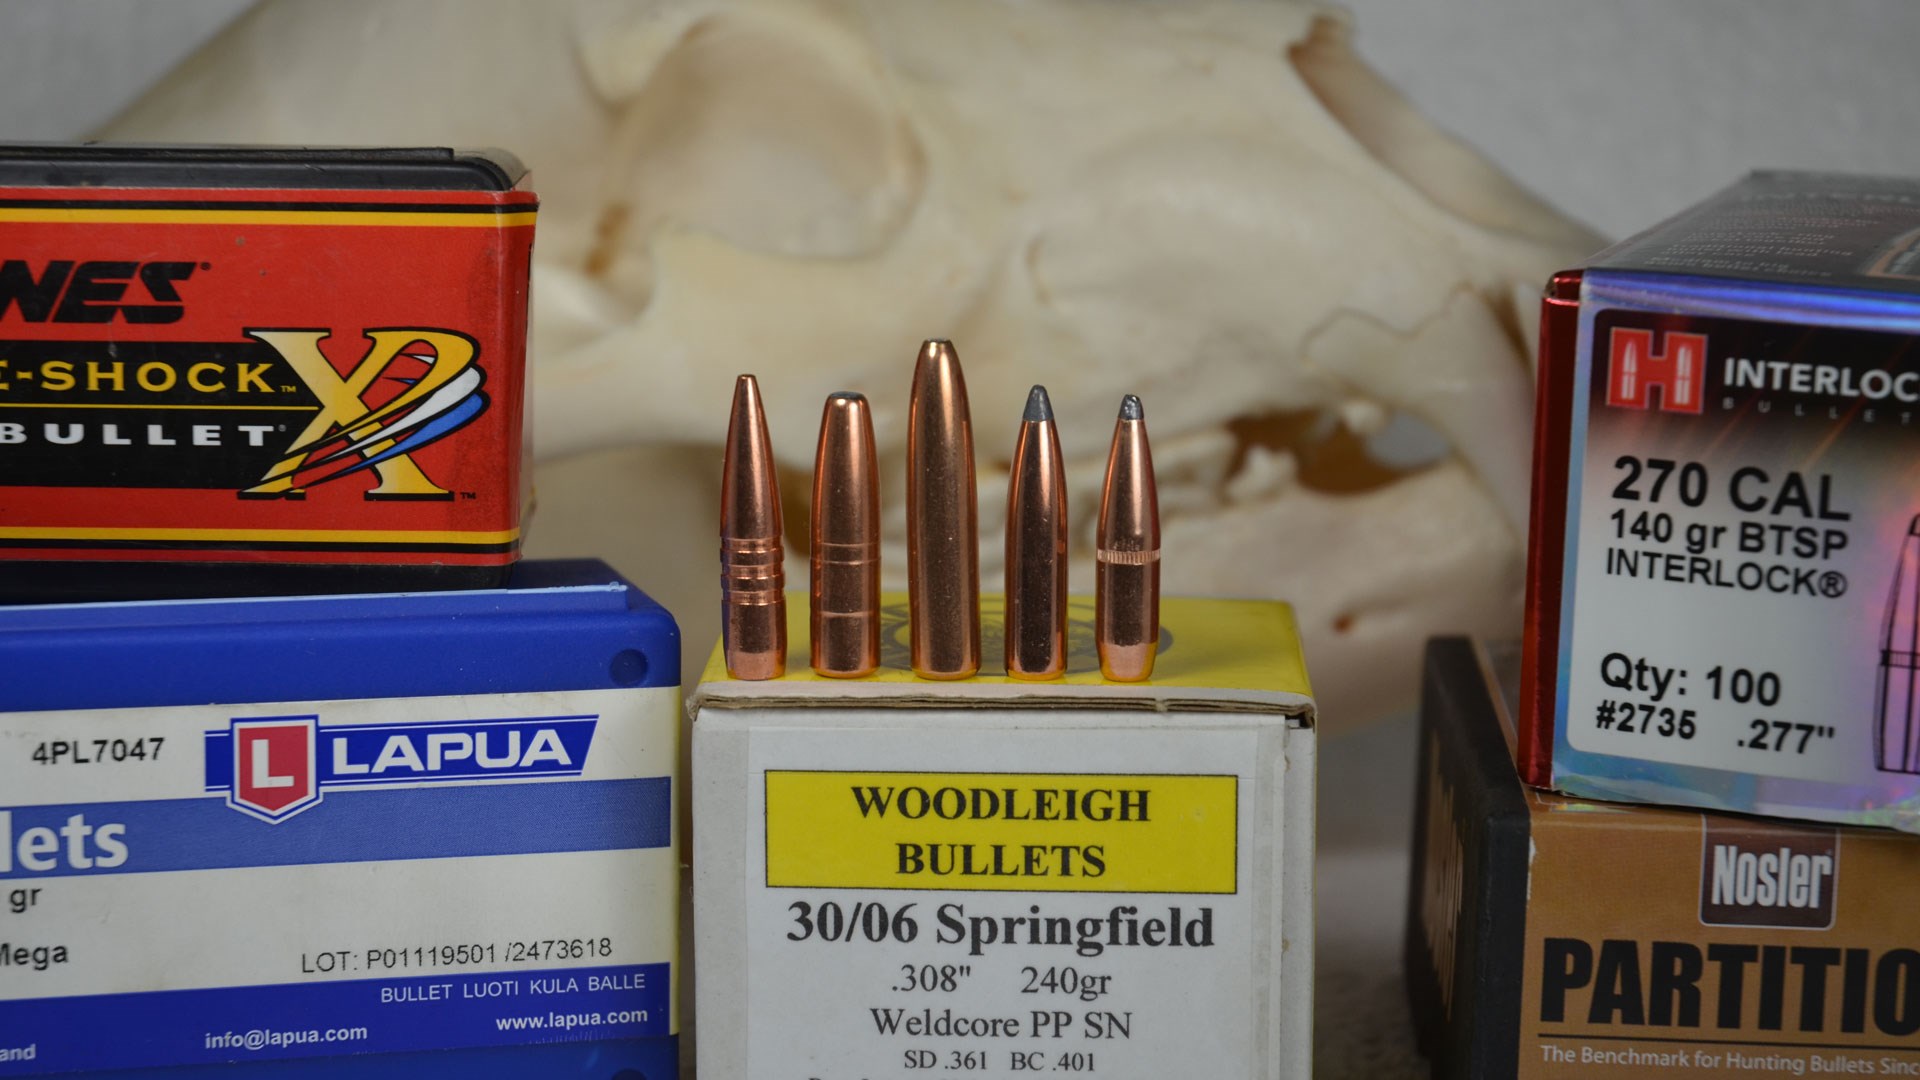
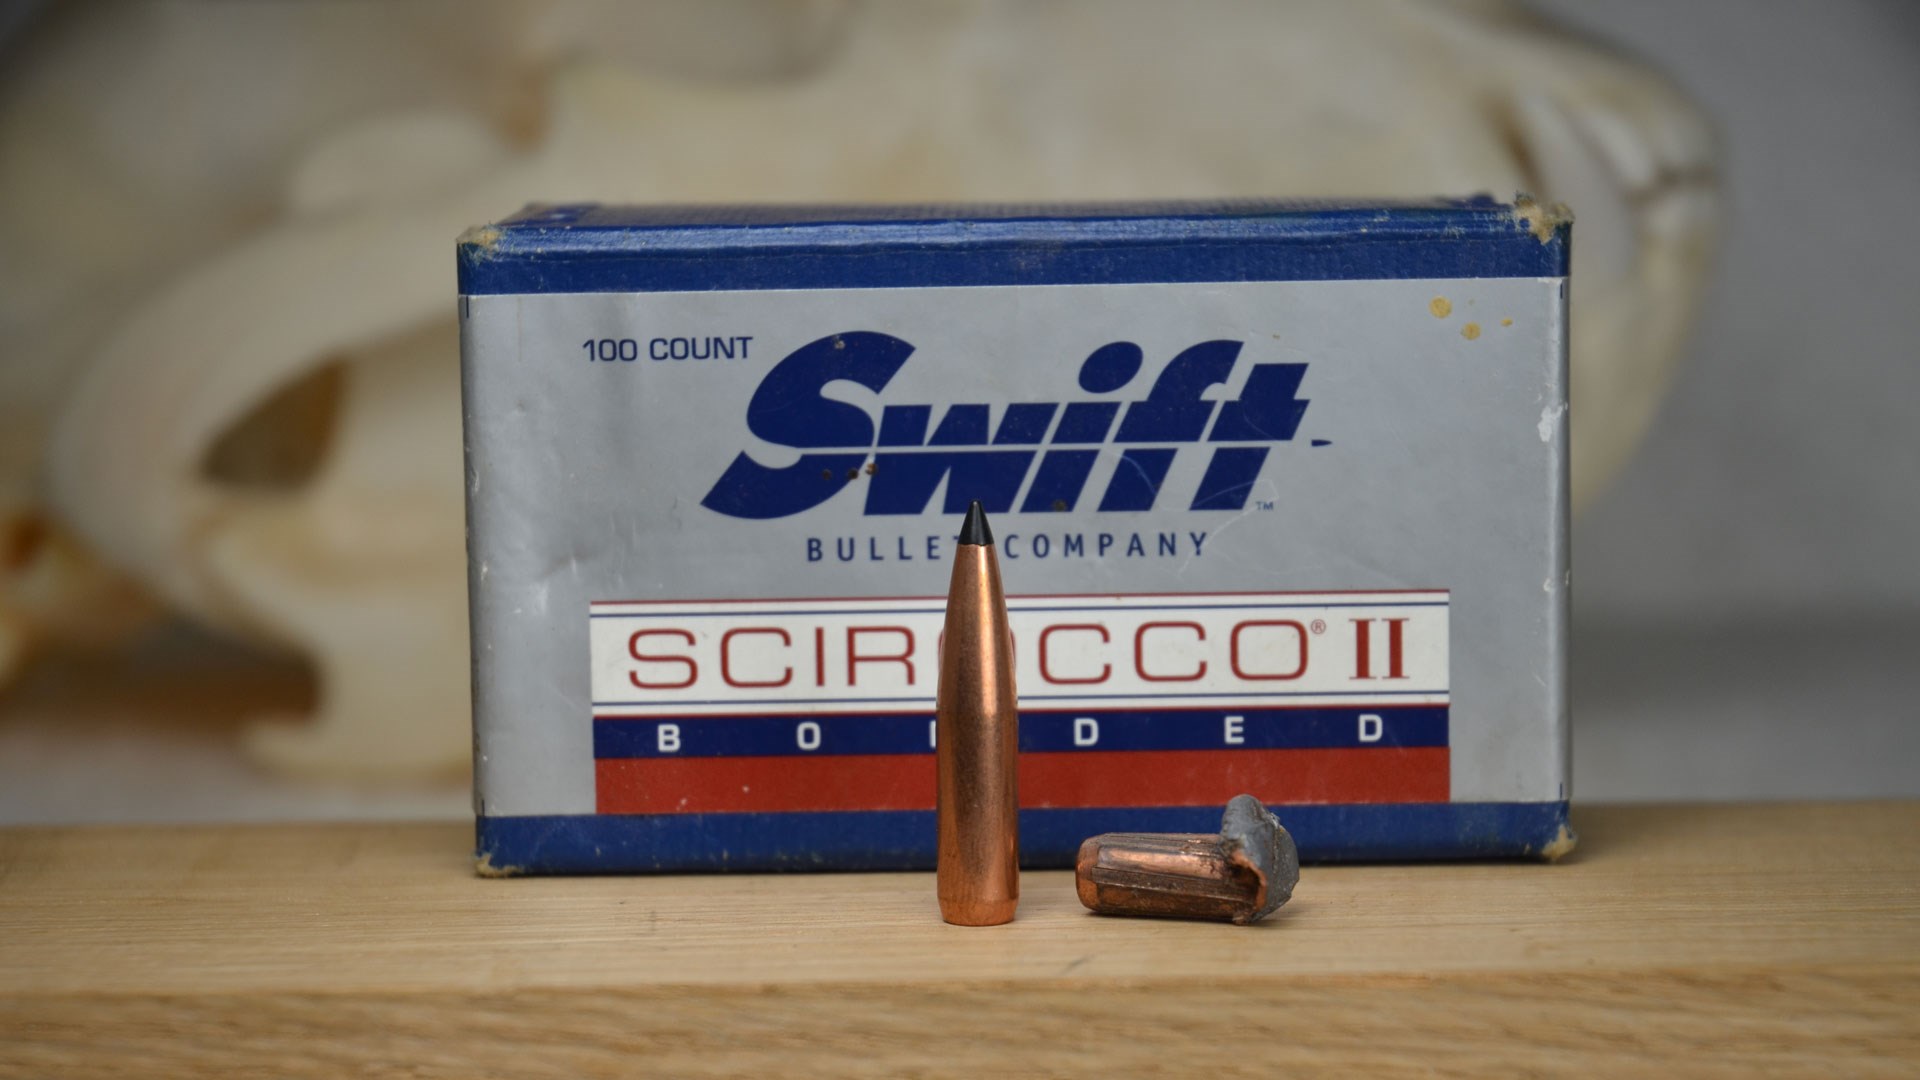
I’m going to admit right up front that this topic and my opinions on it may raise a little controversy — but hear me out. The premise of MSE says that in order to ethically kill an animal you have to have a certain minimum amount of energy. That energy for an elk is said to be 1,500 foot-pounds (ft.-lbs.), and 1,000 ft.-­lbs. for a deer. I believe MSE is a bit of a misnomer. At the business end of the bullet, striking the animal, it isn’t so much about the energy, but the striking velocity and what kind of expansion, wound cavity and penetration the bullet can produce at that striking velocity. MSE can be used as kind of a guide, but as I will show from our 150-grain .308 Win. load, this can be misleading as to what to expect. I am more inclined to look at the striking velocity of the bullet at a distance and have an idea of the minimum velocity your bullet of choice will provide useable expansion and produce enough terminal performance to cleanly take the animal. Using the MSE numbers can be misleading. Is anyone seriously going to argue that a .44 Magnum firing a 300-grain hollowpoint bullet with retained energy of 782 ft.-­lbs. at 50 yards would not humanely kill a deer at that distance? You now see why I feel it is far more important to look at retained velocity and know the threshold velocity at which your bullet won’t produce expansion anymore. Table 5 lists some approximate velocities for expansion threshold for several different types of bullets.
Using the tipped 150-grain .308 Win. ballistics information, and playing it safe, say we want our bullet to strike our deer at a minimum of 1,900 fps? We can see that this would occur at a range of approximately 440 yards, plus or minus a little. If we were using the MSE criteria of 1,000 ft.-­lbs., that would suggest we could push the range to about 535 yards. There’s a pretty big difference in those two distances. I would not expect our tipped 150-grain bullet, with a retained velocity of about 1,700 fps, to do much more than punch a small hole through the deer.
Learn Your Ammo

After reading this, I hope that you have a better understanding of ballistic considerations for hunting. You could certainly pay no attention to any of this, shoot ammunition out of the box and not worry about it. However, you could enhance your experience and find an online ballistic calculator. Then, try the techniques I described to fine tune your setup. Go out and shoot at different distances and prove to yourself that MPBR works. Research or call your favorite bullet manufacturer’s tech line and ask what the lower threshold for expansion is regarding your projectile. You’ll then know the maximum range you should be trying to use the bullet to. Doing this will give you a lot more confidence when it’s time to hunt. That confidence can make the difference between success and failure.

Current Magazine Cover

Enjoy articles like this?

Subscribe to the magazine.

Get access to everything Guns & Ammo has to offer.
Subscribe to the Magazine

Hunter with a supressor Suppressed Is Best. Here’s Why.

Hearing protection. Recoil reduction. Faster Follow-Up Shots. The real question is: Why wouldn’t you want to shoot suppressed this fall? Give this piece a read and get the suppressor ball rolling.

by Mark Kayser

Late winter may seem like an odd time to discuss using a suppressor, but hear me out. You need to start the procedure now. There are some instances where you may be able to file the paperwork with the Bureau of Alcohol, Tobacco, Firearms and Explosives and receive a suppressor in weeks or a few months. Still, the typical waiting period is generally nine to 10 months. With the new electronic ATF Form 4, you may be able to acquire a suppressor in as little as 150 days, but who has faith in the government anymore? I don’t.  

Do you see why it is essential to start now? You are looking at a minimum of five months with the electronic document help for suppressed shooting. Do the math, and you will see that the fall hunting season will be upon you by the time you get the suppressor in your hands. Jump on it now!

If you have been struggling with the investment of time and finances, whether a suppressor is for you, consider the following reasons. A single or accumulated next factor may change your mind and get you started on the paperwork sooner than later. 

Save Your Hearing

Without question, preserving your hearing ranks tops in considering a suppressor. Although some refer to a suppressor as a silencer, the device suppresses sound, measured in decibels (dB), below a harmful level. Most centerfire rifles exceed the decibel level of 140 dB or above, categorized as dangerous by the Occupational, Safety, and Health Organization or OSHA. A .308 Winchester peaks at 167 dB when shot unsuppressed. Add a suppressor to that worthy caliber, and it drops it down to 133 dB. In layperson’s terms, shooting without hearing protection stays at a safe range. 

We have all shot a firearm from time to time accidentally without hearing protection or forgotten them during the haste of a hunt. Even the occasional blast to the ears adds up over time. Add in other loud noises in your life, and your hearing could go faster than your paycheck in the current out-of-control inflation of our economy. 

By purchasing a qualified suppressor, your favorite caliber can be tamed into a suppressed hunting partner that will not harm your hearing. After you shoot a suppressed firearm, you will quickly be sold on this single factor to prod you toward a purchase. 

Hear The World Around You

Throughout my career, I have worked on several hunting shows. One of the difficulties the camera person and I continually dealt with was communicating just before the shot. The reason being I put in ear plugs, and thus I could not hear clearly if, for some reason, the camera operator did not have the animal in the filming frame. 

Often I had to pull an earplug out to confirm that the animal was in the filming frame and I was cleared hot to shoot. That move proved risky several times; the animal moved during the hearing protection adjustment process.

Filming aside, by wearing hearing protection during a hunt, you lose the ability to hear hunting partners, and you lose the ability to track the natural world around you. Deer grunts, elk bugles, coyote howls, and other audio clues disappear in the foam of protection. A suppressed firearm allows you to forgo hearing protection during the hunt, even with larger caliber firearms. You can hear your partner whisper yardage adjustments or the subtle bleat of a doe deer. 

Besides struggling to communicate with a camera operator, I appreciate the opportunity to ditch hearing protection while coyote hunting as I enjoy vocalizing to coyotes. When I howl, having earplugs in prevents me from hearing return howls. With a suppressor, I can hear howls reverberate across the landscape, guiding me on where to look for a possible approaching coyote. 

Reduce Recoil

For every action, there is an equal and opposite reaction. This was Newton’s third law of motion. This is what causes the recoil in a firearm. When the powder burns and propels a projectile on its way, it creates an equal reaction that results in recoil. Recoil varies depending on the caliber of the firearm, but for most big game calibers, expect some felt recoil. This increases if you shoot with a lightweight gun or a larger caliber. 

Recoil is an element that goes hand in hand with shooting, but that bit of jarring recoil can create a problem in the form of flinching. Even the loud bang of a firearm can cause shooters to flinch. Add the two together, and it can become a real issue for accuracy in landing your projectile for precise placement.

You could shoot with a heavier firearm in a more modest caliber to reduce recoil. Or you could outfit your gun with a suppressor. Depending on the caliber and model of the suppressor, you could achieve 25 percent or more of felt reduction in recoil. The jarring is significantly decreased, and the bang of the shot is also subdued, leaving you in a less hostile environment to make the shot. This reduces your overall possibility of flinching, and your bullet hits home more accurately.

Get A Second Shot

In addition to self-help with flinching, the reduced felt recoil allows you to stay on target after the shot to evaluate the hit. That is critical to your overall hunt and how to proceed after the blast. Seeing the reaction of an animal and its escape route without being lost in the jolt of recoil helps you ultimately launch a proper recovery plan. If you do not know where your hit landed and start a recovery operation too soon, it could result in bumping a wounded animal never to find it again. 

Reduced recoil also aids in faster follow-up shots if required. You may miss, your hit may be a bit off, you could have more than one target (calling multiple coyotes), or you may be hunting ultra-tough animals. Regardless of the reason, a follow-up shot or three could be required. With less recoil, speedier target reacquisition occurs, and your follow-up shots have a better chance of a real hit. 

Lastly, if you have ever been “scoped” by a riflescope slamming back into your brow after the shot, a suppressor will eliminate that nasty aftershock. Who wants to gush blood from their forehead? That safety factor alone could be the best reason to investigate the purchase of a suppressor. 

Get Going Now!

Until recently, the hassle and wait to acquire these hearing-saving devices were as stressful as an IRS audit. Silencer Central, an innovative company helping you become a suppressor owner, has streamlined the process. I went through the traditional stamp tax route to purchase my first suppressor, but I recently tested the Silencer Central process and was pleasantly pleased. After completing the electronic forms, a helpful employee contacted me to confirm my paperwork and walk me through the steps. In less than five months, my suppressor arrived with easy-to-follow installation instructions. I went with the Banish 30, which allows swapping between rifles. The 5/8×24 threaded pitch on my Bergara MgLite .300 Winchester Magnum and my CVA Cascade XT in 6.5 Creedmoor means I can move the suppressor to either firearm in seconds. 

Silencer Central offers a complete line of suppressors for nearly every popular firearm and caliber. They have a system set up to simplify the purchase with effortless steps and deliver suppressors to customers in the 42 states where owning them is currently legal. They can even thread your barrel muzzle to accept a suppressor to modernize an heirloom gun in your collection.      

Completing the electronic paperwork takes some time, but the reward of a quiet firearm, ditching hearing protection, and smooth follow-up shots are worth it. If you have ever considered a suppressor for hunting, now is the time to launch the purchase.


Shot placement on White-Tailed Deer

Safe and effective shots on whitetails

The whitetail deer as a target

White-Tailed Deer, or whitetails, are mid-sized deer that offer up a pretty large vital area for the hunter to shoot at. Whitetails are quite shy and skittish and blend in very well with their surroundings, so the challenge for the hunter consists mainly in tracking the deer down rather than achieving a good shot placement as they are quite large animals. Whitetail deer are masters of disguise and are quite silent, lest we are talking about a buck during the rut. There are many different subspecies of whitetails as they adapt to their surroundings competently. Unlike their larger family relative among the Cervidae (i.e Deer) the Moose, you can find whitetails very close to civilization and they actually benefit from the increase in arrable land that humans carve out of the wild. They are native to North and South America, but have been brought to other continents and a wild population of them can be found in countries like Finland.

Where would you place your shot on this fine white-tailed buck? Read the article and see if you learn something new that might change your answer!

White-Tailed Deer Anatomy

For hunters who are familiar with deer anatomy, the white-tailed deer will be just as what you’d expect. There are basically 3 major vital areas that produce deadly shots when struck:

  1. The heart
  2. The lungs
  3. The neck vertebrae
  4. The brain

The lungs are the biggest target by far, followed by the heart, the vertebrae and finally the brain. The ideal shot strikes both lungs and the heart for a guaranteed kill, but you can expect some whitetails to still run quite a distance despite a perfect shot placement. As with most deer, the heart is situated quite low towards and behind the front leg. As White-Tailed Deer are quite a bit bigger than Roe Deer, the skelletal structure is also more robust, meaning that bullet impacts that strike the shoulder first risk deforming the bullet quite severely. This usually isn’t something that prevents a good, clean take-down, but the bullet path and damage to the game can be quite unpredictable and severe when the thick bones of the shoulder are impacted first.

Pictured: The vital areas on a beautiful white-tailed deer buck with the antler velvet still present.

Where to aim on a whitetail

As whitetails are quite apprehensive, you will often find yourself in a situation where you have to wait for a cleaner shot opportunity to arise. The body of a whitetail deer will blend in quite beautifully with the vegetation, and their somewhat limited stature means that often times you can only see the head sticking out from over the thickets and brushes. This shy behaviour along with the propensity for whitetails to run quite long distances even after clean heart-shots means that many seasoned white-tailed deer hunters go for head- or neck-shots. As always, the most ethical shot is to aim for the lungs and heart and as the relationship in size between these two holds is quite large, it is advisable to go for the broadside.

Pictured: This buck is peaking out from the thickets, offering just a small enough opening for a clean broadside hit to the heart and lungs.

Another thing to keep in mind is the angle of the animal. Whitetails are constantly watchful and on the lookout for danger, keeping their heads on the proverbial swivel. With their formidable camouflage, this means that it can be difficult to judge the bullet path that a fired shot will take through the deer’s body, especially at a larger distance. Remember the clock, for a clean broadside hit the animal should be looking straight at either 3 or 9 o’clock. Looking at 12 or 6 o’clock means either a rear or frontal shot. While a rear shot is obviously completely unacceptable, some seasoned deer hunters opt to go for a frontal shot to the chest. Meat damage and knock-down effect are a concern here though, as the bullet will not travel through lungs & heart, but rather strike the heart and then it is quite uncertain how far and in what direction the bullet will continue to travel.

Quick note on whitetail headshots

White-Tailed deer offer some of the most beautiful antlers in the animal kingdom and are a dream trophy for many hunters. Even weaker bucks can be quite astonishingly ordained. Thus, it would be a shame to ruin a beautiful set of antlers by aiming for the head, as the skull is quite frail and your taxidermist would have to perform a miracle so save a trophy when the head has been impacted. Deer brains are notoriously small as well, and it is very rare for a whitetail to remain still for long, which makes for a really tough shot.

Whitetail behaviour

Whitetails will behave very similiar to Roe Deer, being more solitary than Reindeers or Red Deers that often form larger groups or herds. They will not be quick to come out in the open, rather they will venture along the edges of proctecting woods while scouting the area for danger. Often times this means that you will look through the glass at a deer that is partially covered by grass, leaves and branches. These small obstacles can have a major impact on your bullet and it is advised to allways ensure a clean bullet path to your target before pulling the trigger. A signature for the whitetail deer versus other species of the deer is the namesake white tail that the deer will raise like a dog’s tail when sensing accute danger. Similiar to how beavers use their paddle tail to alert and signal danger, the whitetail will flash the tail and bolt away.

They go through a rut during which the males compete for mating rights and pester the poor does for attention. The whitetail rut is quite a bit more action packed though as the bucks are larger and especially in areas with proper climate and dense populations, the rut can become very intense.

Pictured: During periods of strong cold or other distress, most deer species including White-Tailed Deer will flock together as a mechanism of survival.

Many seasoned whitetail hunters report that the whitetails are very sensitive to human infractions on their turf. Trail cameras, blinds and stands can spook the whitetails who are very territorial and are intimately familiar with their habitat. It is important to be ready and take care of every opportunity for a clean shot that the whitetail presents to the hunter.

Pictured: The shy whitetail buck will not easily venture out in broad daylight without feeling very secure. Could you identify this buck under the pressure of a hunt?

Caliber choices for white-tailed deer hunting

As the whitetail is a mid-size deer, the apropriate calibers for other species like fallow deer or red deer are apropriate for a whitetail as well. It is not a particularly tough type of game, but their anxious nature and strong sense of flight often means that they will travel a bit even after perfect shots. This means you should consider not only the caliber but also the type of bullet you are using. A big bore will not allways offer the most efficient impact, despite the higher energies and weights involved. A smaller caliber, with a higher velocity and a more aggressive shock-effect will probably be a better choice for the whitetail hunter. Between 6.5mm up to 30-caliber (7.62mm) is probably going to be the ideal caliber range for most white-tailed deer hunters. As for the bullet, an expanding bullet will be the ideal choice to offer maximum effect. However, there are many different types of expanding bullets (click to read the article) and so there is also a degree of personal preference involved. We have put some recommended selections in the bottom of this article.

Pictured: A group of whitetails displaying how well they blend in with their environment. It is not typical for these territorial animals to roam together like this.

Summary on shot placements for white-tailed deer

It is time to review what we have learned about the optimal shot placement on white-tailed deer.

  • Whitetails are apprehensive so the hunter need to remain undetected and be patient for a good shot opportunity
  • The optimal shot strikes both lungs and the heart
  • Whitetails are known to put a bit of distance behind them even after clean shots
  • Use the right caliber and bullet combination for maximum effect

Article written by Robert Goldberg,

two deer in field

Best Deer Hunting Caliber – Our Picks

Posted by | Nov 21, 2022

You have your deer hunting socks. You have your deer hunting boots. Sounds to us like you’re all ready to do yourself some deer hunting! But wait just a minute – do you also have your deer hunting rifle? That is a crucial piece of equipment for the sport, and not just because the U.S. Fish and Wildlife Service frowns on the practice of beating deer to death with large tree branches. There is no one-size fits all best deer hunting caliber. Sure, a good cartridge will (A) hit the deer and (B) kill it quickly, but many rounds boast that kind of ballistic and terminal performance. What you want is the best round for the kind of terrain you’ll be hunting in – as well as one you’ll be able to easily shop for.

Pick the Right Cartridge for the Terrain

There are better deer cartridges for certain kinds of terrain. If you’re hunting where there are a lot of dense underbrush and closely packed trees, then you may prefer a less powerful round. You won’t need long-distance accuracy when you can’t fire much farther than 200–300 yards, and a lighter rifle with a shorter barrel is easier to carry through the brush. But if you’re hunting in a wide open area, like the desert or the mountains – i.e. where long-distance opportunities will present themselves – then a scoped rifle chambered for something more powerful should serve you better.

Pick a Caliber You’ll Have an Easy Time Finding

different calibers of ammo good for deer hunting When selecting a deer cartridge, it’s helpful to keep it mainstream. Rifles chambered for 444 Marlin and 257 Roberts +P both excel at taking medium game. Unfortunately, less popular rounds like those also make it more difficult to source the steady supply of ammo you’ll need for target practice. You do want to thoroughly familiarize yourself with your rifle’s performance before you stake the outcome of a hunt on it, after all! Before committing to a new deer caliber, check to see how easily you can buy it at local gun shops and online. If you turn up a big fat goose egg during your initial search, then it’s reasonable to expect similar frustration in the future. That all said, we’re going to limit our recommendations to very popular cartridges.

Our Picks for Best Deer Hunting Caliber:

  • 30-30 Winchester
  • 308 Winchester
  • 30-06 Springfield
  • 243 Winchester
  • 270 Winchester
  • 350 Legend
  • 45-70 GOVT
  • 6.5 Creedmoor

Read on to get an idea why each caliber could be a great choice for your next hunt.

30-30 Win: Champion of the Woods

30-30 core lock ammo The 30-30 doesn’t offer a lot of range. Because it is a lever-action cartridge, its bullet must be flat tipped by design (otherwise it could ignite the primer it touches while loaded in a tubular magazine). That alongside the 30-30’s relatively lower power means its range is limited to around 150–200 yards (or potentially 250 yards if you’re hunting with Hornady LEVERevolution ammo). Thing is, the 30-30’s limited range isn’t a huge setback when you’re in the woods where you probably can’t see game beyond 150–200 yards anyway. A 30-30 rifle is also typically lighter by design, and its gentler recoil is a welcome bonus to hunters who are younger, smaller in stature, or given to flinching before squeezing the trigger.

308 Win: A Military Classic

308 federal fusion ammo Why is the 308 one of America’s most popular deer rounds? Several reasons, in fact, although its military heritage is not the least among them. A lot of guys learned how to shoot with this cartridge, and they weren’t keen on abandoning it after they were discharged. And because our military’s virtually identical 7.62×51 is so abundant, finding good .308 target ammo is always a cakewalk. The 308’s effective range for deer hunting usually ends at around 300 yards (a skilled shooter can extend that range by quite a bit, of course). A 150 grain soft point load reliably delivers over 1,000 ft lbs of kinetic energy to a 500-yard target (i.e. the minimum impact energy threshold typically recommended for ethical whitetail harvesting). And since most hunters aren’t going to attempt 500-yard shots anyway, the 308 is more than capable of reaching the distances they want.

30-06 Springfield: Another Military Classic

ammo boxes The 30-06 preceded the 308 as America’s standard combat rifle cartridge. Though it may be over 100 years old, it’s still widely embraced by hunters across the nation. The 30-06 does not perform dramatically unlike the 308. Its larger case does pose a slight velocity advantage – faster moving bullet, flatter trajectory – and it also tends to handle heavier bullets more capably. For this reason the 30-06 can easily do the job at 400 yards. And while its recoil is certainly there, the 30-06 was designed to be fired all day long by hard-working soldiers and accordingly doesn’t jolt the shoulder too violently.

243 Win: The Whitetail All-Rounder

The 243 is one of the safest bets there is. Its flat trajectory produces stellar accuracy within 200–300 yards – and it just so happens to excel at bagging whitetails throughout that range as well. Its lighter recoil makes the 243 a natural choice for younger hunters, although anyone is bound to appreciate just how gently it kicks. And because the 243 cartridge is relatively small, you won’t be burdened by too much rifle during your adventures.

270 Win: The Option to Hunt Larger game

The 270’s performance is best viewed in comparison to the 243. Its muzzle velocity may be a little lower, but its bullet’s greater weight gives it more downrange momentum and resultant great accuracy at 500 yards and beyond. The 270 bullet’s superior kinetic energy also makes it a far better pick for bagging bigger critters like bear and elk. And because it is significantly wider, the 270 bullet can apply its greater energy toward producing a wider wound cavity in the quarry.

350 Legend: A Straight-Walled Dynamo

350 legend ammo Winchester recently introduced 350 Legend ammo in order to better serve hunters whose states prohibit bottlenecked cartridges. In these states, you must used a straight-walled cartridge. But legal compliance isn’t the 350 Legend’s sole advantage! Its effective range of 250 yards is accessible to hunters with only intermediate marksmanship skills, and its surprisingly forgiving recoil is quite the welcome feature during target practice. It’s an agreeably priced cartridge at that, and its effect on medium-size game is fairly comparable to that of significantly larger cartridges.

45-70 Government: The Granddaddy of Military Hunting Rounds

Still open to another straight-walled round? It’s bigger, more expensive and a little bit harder to source than the 350 Legend, and its effective range for deer hunting is about 50–100 yards shorter as well. But despite all of that, 45-70 ammunition remains one of the best shorter-range deer loads at hunters’ disposal. We should note that the 45-70 is perfectly able to strike a human-size target at 1,000 yards. The old round’s steep bullet drop does make long-range shooting a little harder than a heavier-powered modern load, but that’s nothing a little training can’t fix.

6.5 Creedmoor: A Target Round Turned Deer Load

The 6.5 Creedmoor was originally developed as a long-distance target shooting cartridge – but the performance which suited it so well to that application just so happened to carry over ideally to deer hunting. The 6.5 CM’s recoil is remarkably light considering its enormous 800-yard effective range. It’s also incredibly versatile, with ideal cartridges available whether you’re keeping it within 100 yards or testing the extent of your skills beyond the 500-yard line.

Honorable Mention for Best Deer Hunting Caliber

These cartridges are also amazing deer slayers, although their relative unpopularity makes them a somewhat less surefire choice when it comes to ammo selection. You won’t get skunked at the store altogether – you’ll just have fewer options to choose from.

  • 25-06 Rem
  • 260 Rem
  • 7mm-08 Rem
  • 7mm Rem Mag

At the end of the day, the best deer cartridge is the one you most prefer using. Whether that’s a 308 or a 243 boils down to your unassailable personal preference. In other words, if you didn’t see your favorite deer hunting cartridge on our list, that’s only because it’s not one of our favorite deer loads. The beauty of this is that we are both right!

black bear bullets Have you ever had an enraged, oversized black bear charge your ladder stand, fully intent on eviscerating you? I haven’t, but a fellow hunter I was in camp with did. Obviously, the hunt went awry—seriously awry. She wasn’t bluffing, either. Fortunately, a well-placed, handloaded Hornady InterLock 180-grain RN from a Ruger American chambered in .30-06 Springfield stopped dead her assault.

Of all the huntable species worldwide, there’s a certain allure to pursuing bear, and Ursus Americanus in particular. It could be their widespread distribution, predatory nature, keen senses (at least some) and the ever-present danger, or, when prepared correctly, delectable protein. It varies by individual, but there’s no denying the addiction.

Hunters with black bear

What type of bullet is best for hunting this potentially dangerous animal? It depends. Here’s why: The average black bear isn’t particularly stout; it has relatively thin skin and it’s muscular and skeletal structures are such that the vital organs are easily reached. However, there are several key differences between it and America’s foremost game animal, the whitetail deer—also considered “thin-skinned.” Beyond the obvious anatomical dissimilarities when studied side-by-side, often overlooked are the reams of fat and extra-long and -dense fur, which disrupts hemorrhaging. Between the two, they’re akin to putting a gauze pad on the entrance and/or exit wound. As a fleeing black bear can run 30 to 35 mph—give or take—that can greatly complicate the recovery process.

Bear Fur

What’s more, there is inherent and tremendous, danger associated with tracking a wounded black bear. Forget the notion that it will only run away from the hunter following negligible blood; in actuality, at any time, the animal could turnabout and attack its pursuer. Not only is it especially challenging to stop a bear with resolve, but it can also deliver a lethal blow in short order. The axiom, “The best defense is a good offense” certainly applies here.

Keep in mind too that the average bear is what hunters take, not the largest extant. According to the California Department of Fish & Game, the average weight of a black bear is around 300 pounds. The Maine Dept. of Inland Fisheries & Wildlife identifies the mean starting weight (for males) as being 250 pounds Whereas the former puts 500 pounds at the upper end of the weight spectrum, the latter notes 600 pounds In reality, they can grow much, much larger. For instance, according to multiple sources, during the 2021 season Pennsylvania hunter Wade Glessner killed a 722-pound bear. Think that’s big? Think again. The largest in Pennsylvania was taken in 2010 and weighed 875 lbs.—a far cry from the “average.” Five hundred to 800-pound bears aren’t uncommon in the state, either. Nor are they in other places, such as New Jersey, North Carolina (particularly renowned Hyde County), Virginia, Alaska, and Canada, to name a few.

Bear on bait pile

The truth is that behemoths are possible anywhere favorable conditions are met; ample food and time to age/grow are essential. The abovementioned factors complicate the bullet buying process. Why?

Essentially, you have two choices. You’ll need to choose between a bullet that expands widely or loses a significant amount of its pre-expansion weight—both of which negatively affect penetration—or one that maintains its integrity for deep penetration and, perhaps, an exit. How do you know which is right for you? I reached out to well-known ammunition manufacturers and outfitters across the country. Not all responded, but those that did will assist you in making that all-too-important decision. Read on.

Rapid-Expansion Bullets with Medium to Low Retained Weight
Weight retention and expansion diameter are heavily influenced by impact velocity—especially when approaching or surpassing 3000 fps. As a rule, for cup-and-core-type bullets with a mechanical lock (or similar), the faster it hits, the wider it’ll expand and/or the greater percentage of material will be shed. Both can prevent the projectile from exiting; therefore, you could only have the entrance hole to aid tracking. However, said shed material greatly enhances the bullet’s ability to damage vital organs, which hastens its expiration. It’s a Catch-22.

Bullets after expansion

Additionally, because the bullets cannot penetrate as deeply, there’s less margin for error in shot placement and they’re a poor choice for stopping a charging bear. Concerning the latter, the projectile could fail to reach critical organs and skeletal structures to stop an attack. Due to their positive attributes though—namely rapid expiration on fairly hit black bears—they’re the bullets of choice of some hunters.

“For most lower 48 black-bear hunters I think it would be best to use a rapid-expansion, deer-hunting-type bullet,” said Nathan Robinson, media relations manager for Winchester Ammunition. “I would recommend Deer Season XP, Ballistic Silvertip, or PowerPoint from our lines. The average bear killed in the states is less than 200 pounds, and bears in that size range are not particularly thick or hard to penetrate into the vitals. They do, however, [tend to] not leave very good blood trails because of their fat and thick hair, which is why you want them dropping as soon as possible. They also generally live in or near thick, nasty cover where they can almost immediately disappear. Rapid expansion and maximum energy transfer are preferred over controlled expansion and weight retention.”

Bullets with skull

“Berger [bullets] work great on just about any game,” explained Geoff Esterline, marketing director for Capstone Precision Group, LLC, which represents Berger Bullets and Lapua, among others. “But it’s imperative that you perform proper shot placement in the vitals. If you want to bust shoulders or hunt larger, heavy skinned game, the higher weight retention products are the most forgiving.” The last two words are key.

“Personally, I’d recommend using either a heavy-for-caliber, lead-core bullet like our InterLock, SST or ELD-X, or a ‘standard’ weight monolithic bullet like our CX,” shared Seth Swerczek of Hornady Mfg. Co. “I’m a lead-core bullet fan through and through. If I’m afield there’s a darn good chance my rifle is loaded with an ELD-X bullet. I like the more dramatic energy transfer of a lead-core bullet, personally.”

Cup and Core bullets

In addition to the products mentioned above, others in the class include: Nosler Ballistic Tip Hunting; Sierra GameKing and Pro-Hunter; Browning BXR; Lehigh Defense Controlled Chaos and Controlled Fracturing; Speer Gold Dot, Hot-Cor, and Boat-Tail; Federal Fusion and Power-Shok (jacketed soft point); Berger Classic Hunter and VLD Hunting; Norma EVOStrike and Whitetail (jacketed soft point); and Remington Core-Lokt and Core-Lokt Tipped, among others.

Controlled Expansion Bullets With, High Retained Weight
The other option is a controlled-expansion projectile exhibiting maximum retained weight. Typically crafted with a crossmember or bonding (or both) in lead-core variants, or from a single piece of material (i.e. copper, gilding metal), said bullets are preprogrammed to expand predictably and uniformly while maintaining most, if not all, of their original weight, which enhances penetration. These projectiles have the ability to drive deep, even through dense bone and muscle, and thus are more likely to reach critical organs and structures from awkward angles. Remember, not every shot is taken on a perfectly broadside animal—especially if it’s bearing down on you. With two holes to intensify hemorrhaging, tracking is easier, too. High impact velocities are of minimal concern with them. For the reasons above, as well as the fact that you may encounter a larger-than-normal specimen, bullets of this type are most frequently recommended. Here’s what the manufacturers and outfitters had to say.

Hunters with bears

“I’d prefer controlled expansion with high maintained weight on thick-skinned game, personally,” divulged Esterline. “Lapua MEGA and Naturalis (lead-free solid), for example.”

“At some angles/distances and with some bears, and the amount of fur, where exactly to hold the crosshairs can become hard to pick out,” Swerczek opined. “By opting for a monolithic bullet or a heavy-for-caliber lead bullet, you put the odds in your favor should you unknowingly put a bullet squarely on the shoulder. Retaining nearly all of its weight, [the monolithic] will go through the shoulder easily. The heavier lead core will indeed shed some with as it breaks through the shoulder, but the added weight will help it to penetrate deeper despite the lower retained weight percentage.”

Monlithics after expansion

“If you are targeting monster boars and plan to shoot something in the 400- to 600-pound range, then a hard-hitting, deep-penetrating bullet is in order,” stated Robinson. “Bonded and solid-copper bullets maintain their weight and drive deep through thick hide, bone, and muscle to ensure it penetrates the vitals. These tougher bullets are also in my consideration set if I’m hunting open country where losing sight of a wounded bear is less likely. Winchester Expedition Big Game or Copper Impact would be great options in this scenario. Copper Impact is a nice hybrid because it has an oversize hollow-point cavity that initiates expansion immediately, and violently, for great knockdown power, but its solid-copper construction provides excellent penetration.”

Robinson’s observations match that of the Maine and Alaskan outfitters. “Bullets are more important than the caliber of high-power weapons,” wrote Kurt Whitehead of Treasure Hunter Lodge on Prince of Wales Island, Alaska. “Larger and denser bullets do a better job of killing/inflicting damage. We recommend premium, controlled-expansion bullets such as Barnes Triple Shock, Trophy Bonded Bear Claw, Nosler Partition, and Core-Lokt in the largest bullet size available for your weapon.” What’s not recommended? Fragmenting ammunition. Why? “Most of our clients shoot bears that are well over 350 pounds with many in the 450-pound category,” added Whitehead. “We recommend all-copper bullets.”

Monolithics

Taj Shoemaker of Grizzly Skins of Alaska agreed, stating, “We only outfit for brown bear. We do hunt black bear personally. Same, same for bullets only it’s more important on brown bear. Controlled expanding! Have good luck with Barnes X, Nosler Partition and AccuBond, the old Remington Core-Lokt, Swift A-Frame, North Fork, Speer Hot-Cor, and many others.”

In the areas that Foggy Mountain Guide Service clients hunt, they take, on average, 250-pound bears; however, many go over the 400-pound mark. For that reason, and the fact that shots in the thick Maine woods are close, owner Brandon Bishop reported that “slower, hard-hitting bullets that put a big entrance and exit wound” are preferred. Dual holes make tracking easier. That’s the forte of controlled-expansion bullets.

Siriccoco Bonded

Robinson also had the following sage advice to offer. “If you plan to hunt somewhere you might encounter a grizzly, your rifle may also serve as a defense tool. In that case, I would select a bonded or copper bullet in the biggest caliber you feel comfortable with.”

Given the overall trend toward controlled-expansion, high-weight-retention bullets, it makes sense that there are many from which to choose. Among the best are: Barnes TSX, TTSX, and LRX; Swift A-Frame and Scirocco II; Nosler AccuBond, E-Tip and Partition; Speer Grand Slam and Impact; Hornady CX, InterBond and MonoFlex; and Federal Trophy Bonded Bear Claw, Trophy Bonded Tip, Trophy Copper, Power-Shok Copper and Terminal Ascent, to name a few. Lehigh Defense Maximum Expansion bullets retain their weight but, due to their wide expansion diameters, penetration will be on par with many low- to mid-weight retention bullets.

So which bullet is right for your next black bear hunt? Depends on the hunt and your preferences. Use what you learned here to make an informed decision.

Hunter with Black Bear

Hunting Ammo: What to Look for in a Big-Game Bullet

by Aram von Benedikt posted on September 6, 2022

Photo 1

Hunting bullets have come a long way since the first round lead ball was launched game-ward from a long-barreled muzzleloader. Bullets now are long and streamlined, tipped with space-age material, and constructed of copper married to lead through special bonding processes. They are incredibly accurate, highly aerodynamic, and boast superb terminal performance. They are the finest killing projectiles the world has ever known; that’s a great thing for us as hunters.

Bullet Mold

What Kills Game?
To effectively and cleanly kill a big-game animal, a bullet needs to expand reliably and penetrate deeply no matter what it encounters en route. That’s the crux of bullet performance. If a bullet fragments to bits upon impact, or stops upon encountering bone, it likely won’t penetrate deeply enough to accomplish a clean kill. Or if it fails to expand, it may simply pencil through, doing minimal damage along the way and failing to accomplish a clean kill. Here’s a short anatomy-of-a-kill lesson for you:

There are three ways a bullet will cause rapid and mostly painless death:

1: Collapse the lungs, causing a dearth of oxygen to the brain.

2: Cause massive damage to the circulatory system including the heart, arteries, and veins, leading to catastrophic loss of blood and blood pressure.

3: Disrupt or destroy the central nervous system, which consists of the brain and spinal column.*

Of the three, number one—the lungs—offers the biggest target, results in the fastest death, and usually comes with the side benefit of accomplishing number 2 en-route. When a bullet passes through the lungs they collapse almost instantly. Arteries and veins, and sometimes the heart, are destroyed as well. Within seconds the brain is starved of oxygen and blood pressure plummets. The animal literally blacks out and tips over, unconscious even before it is dead. This is the ideal, painless-as-possible death that we as ethical hunters should strive for every time we take a shot.

Cartridge on antler

Small, Medium or Large?
Choosing a hunting bullet is not a one-size-fits-all proposition. But since we’re discussing all-around loads for hunting big game, we will focus on cartridges and bullets that are suitable for everything from coyotes to moose. In my opinion, these start on the bottom end with the 6.5 calibers and work up to .375.

Many modern shooters and hunters opine that a small, accurate bullet is better than a big, hard-hitting bullet, because it’s more likely to be placed correctly into the vitals. There is some truth to this philosophy, but it’s also flawed because a large, accurate bullet will always, thanks to physics, hit harder and kill faster than a small one.

Bottom line, when hunting the bigger stuff like elk or moose, use the biggest caliber you can shoot comfortably and accurately.

Fragmented and expanded

Bullet Design
The way a projectile is built affects performance; both during flight and during impact. Let’s go over some of the basic design elements that make a difference:

Tip: There are two main tip designs used on hunting bullets: lead and polymer. A lead-tipped bullet will expand very reliably, but the tip will not be as aerodynamic as a polymer tip. It can also deform easily in the magazine, which will cost it accuracy and velocity at extended ranges.

A polymer tip is more aerodynamic and will resist deforming much better than lead. Polymer tips also initiate expansion very reliably. The only downside to polymer is that if shot at very high velocity and long distances, it will heat (from friction with the air) and begin to deform or degrade. This leads to a change in BC—not desirable when shooting far. Several manufacturers have solved this issue with proprietary tips that resist heat deformation.

Boat Tail: In simply terms, a boat tail will make a bullet much more aerodynamic than any flat-based bullet. If you never plan to shoot beyond 300 yards, don’t worry about it. But if you plan to shoot far, use a boat tail bullet.

Bonding and Locking Rings: Bullet designers have always struggled to keep a bullet’s copper jacket and lead core together during impact. One good solution is to use a locking ring inside the jacket that will help hold the core in place. Locking rings work, but not all the time.

A second, better solution is to use a chemical or molecular process to bond the core to the jacket. Bonded bullets always stay married, however the process of bonding can potentially compromise accuracy. That said, there are some truly accurate bonded bullets on the market.

Solid Copper: These bullets don’t feature any lead at all, being constructed from solid copper (or copper alloy). They have become a great option for today’s hunters, especially in states where lead projectiles are not legal for hunting. Since copper is not as heavy as lead these bullets necessarily cannot be as heavy as same-size conventional bullets, which compromises their long-range aerodynamics. They also don’t expand well at low velocity. However, all-copper bullets are legendary for accuracy and penetration. Choose them anytime you don’t plan to shoot extreme long range, and do want superior penetration.

Cartridges next to rifle

The Perfect Bullet
Recent years have seen a tremendous spike in bullet engineering and design. Bullets are superbly accurate, aerodynamic and consistent. Shooters and hunters are now able to shoot farther than ever before with astonishing precision.

Even after all these advancements, the fact remains: a bullet needs to penetrate deeply and expand consistently to produce reliable, clean kills. But today’s shooters have added a real complication: a bullet needs to reliably perform those tasks at any and all shot distances. Short range with maximum velocity to long range and low velocity, that bullet still needs to expand and penetrate. And that, my friends, is an engineer’s worst nightmare. However, by hard work and savvy engineering, several have accomplished it. Lets take a look at some of the best all-around bullets on the market:

Expanded into petals

Best Bullets for Big Game
Federal Premium Terminal Ascent: This bullet features a proprietary “Slipstream” tip that will not erode or deform during flight, ensuring a consistent downrange ballistic coefficient. It’s held to match-grade standards during production, resulting in an exceptionally accurate and consistent bullet. And it’s designed for optimal aerodynamics—ideal for long range shooting and hunting.

The front half of the projectile is sort of a cup-and-core design, with the lead core bonded to the jacket. This part expands dramatically but consistently upon impact, even at very high and very low velocities.

The rearward portion of the bullet is solid copper and will hold its shape through hide, bone, and gristle, penetrating deeply and lethally. This is one of my very favorite bullets. It’s available in many popular cartridges including 6.5 PRC, .280 Ackley Improved, 7mm Remington Magnum, .30-06 Springfield, .300 Winchester Magnum, and more. It’s also available in component form for handloaders.

If you must shoot a very light caliber (6.5) for the big stuff, this is one of the very best bullets for the job.

Hornady ELD-X Precision Hunter

Hornady ELD-X Precision Hunter: This bullet also sports a non-eroding proprietary “Heat-Shield” tip, ensuring consistent downrange ballistics. Projectiles are held to match-grade accuracy standards during production, and possess a well-deserved reputation for truly good accuracy. Designed to expand at any range, the jacket tapers dramatically, with the lead core held in place via a locking ring inside the jacket. At very-close range (high velocity) these bullets tend to separate, and if they don’t exit you’ll often find the jacket and core resting side by side under the skin on the far side of the animal. Some hunters might consider that a failure, but every animal I’ve seen shot with the ELD-X has been made very dead, very fast. It’s available in component form or loaded in Hornady’s Precision Hunter ammo line in almost every popular hunting cartridge.

Barnes LRX VOR-TX Long Range: Several years ago, I partnered with Book Your Hunt and conducted a survey to determine the bullet most favored by north-country outfitters and guides. These are the folks who live among and hunt the big stuff like grizzly bears and moose. Barnes bullets won hands down.

Barnes bullets are solid copper, and legendary for their ability to penetrate. Some of the older models (those without a polymer tip) have experienced the occasional failure to expand on light-skinned game, so I recommend sticking with tipped versions. And, since I like aerodynamic bullets, my favorites are the LRX (Long Range X) models. They sport the highest ballistic coefficient of all the Barnes projectiles, a good polymer tip, and a reputation for superb accuracy.

Since these bullets are solid copper they won’t expand at long range and low velocities as well as a “soft” bullet. However, inside recommended distances they expand perfectly, retain almost 100 percent of their weight, and penetrate like your mother-in-law’s stare. They’re available in component form in most calibers and loaded in Barnes VOR-TX Long Range ammunition.

This bullet is another favorite when you must hunt big animals with little calibers.

Cartridge next to horn

Nosler Accubond: This bullet has been around longer than the others on my list, and has a well-deserved reputation as an accurate, aerodynamic, deadly projectile. Featuring a polymer tip and a tapered jacket that’s bonded to the lead core, this bullet is built right. Born before the long-range shooting movement, it nonetheless has a decent ballistic coefficient and will expand at a wide range of velocities.

Nosler introduced the updated ABLR (Accubond Long Range) bullet in response to modern shooter’s demand for high-BC projectiles. These bullets feature similar bonded construction design but are a bit more finicky than original Accubonds. However, if your rifle likes them they offer terminal performance as good as the originals, with superior aerodynamics. They’re available in component form in most popular calibers, and you can buy loaded ammo from Nosler, Winchester, Black Hills, and more.

Ammo in leather ammo pouch

More Good Stuff
There are, of course, other great bullets on the market today. I don’t have space to cover them in detail, but I’d be remiss if I didn’t mention them at all. So here you go:

Remington Core Lokt (I hear this venerable bullet is getting a new polymer tip. Excited to see how that develops).

Sierra Tipped Game King. A softer bullet, better for expansion than penetration, superbly accurate.

Winchester Copper Impact. New on the scene, this solid copper projectile should prove to be an awesome hunting bullet for traditional-to-moderate ranges.

Berger Hybred. Favored by long-range hunters, these are known for superb accuracy and aerodynamics and explosive terminal performance. Not great at penetrating when they’re going really fast or when they hit big bone, so choose your shots wisely.

Hornady CX. Another great solid copper bullet, this is the updated and improved version of Hornady’s well-known GMX projectile.

Nosler Partition. It hurt my feelings to not highlight the Partition in the main section of this article, because it’s such a historic, deep-penetrating, explosive-expansion bullet. At traditional hunting ranges, it is superb.

Cartridges in front of antler and ammo boxes

Conclusion
When you’re choosing a hunting bullet pick several options that are well suited to the game at hand. Then test them for accuracy and consistency. Let your rifle decide which one it prefers, and feed that load into your magazine when you head into the field.

*Author’s Note: Shooting a big game animal in the brain or spine is hard to do, since the target is small and often moving. If you miss, you may hit the animal someplace that will result in a long, agonizing death such as the jawbone, throat or sinus cavity. An animal hit like that will run away and die but you’ll never recover it, so in most circumstances brain or neck/spine shots should be avoided.

4 Deer Hunting Tips for Warm Late-Season Weather

Scott Bestul December 14, 2021 3:32 pm

Deer hunter in a treestand rattling antlers.

During a warm winter, hunt the second rut like it’s the real thing. 

If you’ve logged enough stand time over the years, you know that cold weather means hot whitetail action at prime food sources during the post-rut. I love getting out during any phase of the season, but when it comes to hunting feeding patterns, nothing beats a frigid, snow-filled December. But if you’re experiencing an unseasonably warm winter you’ve got a problem. It doesn’t mean you shouldn’t be fired up for the last weeks of archery season though. It’s a great time to try some tactics you don’t normally use this time of year.

1) Hunt Bedding Areas In the Morning

Focus on bedding-area setups that you normally reserve for the rut. With the lack of crunchy snow that would otherwise announce your entry to these stands, you can push the envelope and try some morning sits. Cold-weather bucks usually bed early to conserve energy, but when they’re less stressed, you may be able to catch those same bucks lollygag a bit before laying up for the day.

2) Rattle In a Buck During the Second Rut

While I carry rattling antlers on virtually every hunt, I don’t use them much in the late-season unless I spot a buck going away that I have no hope of killing without some calling. During a warm winter, try some blind rattling and calling in hopes of teasing in a bruiser. With the normal bed-to-feed patterns of late-season tossed out the window, play the secondary rut like it’s the real deal.

3) Grind it out

By this time of the year, you’ve probably pulled off a few all-day sits. While it’s OK to change stands at midday, you’ll still want to plant your butt in the woods from dawn until dusk a couple times. Whitetails feed and move at midday throughout the year, but in a normal December, most deer hunters are rarely out there to see it from a stand. This time you should be.

4) Pay Attention to the Forecast

Pay close attention to the weather forecast as December progresses. It’s not unusual for an unexpected snowstorm or cold front to visit this month, and if it does, you’ll want to post up on a late-season a food-source. In the meantime, have fun switching things up.

Field-Judging Deer For Dummies

Should you take the shot or not?

by Richard Mann
posted on August 1, 2022

mature whitetail buck approximately six years old

Bucks used to be classified by the number of points you could hang a ring on, or by adjectives like “small,” “medium,” “large” or “monster.” Personally, I like to kill big deer, but I’m not a trophy hunter; I’ve never measured the antlers of any deer I’ve taken. However, we’ve transitioned to a time when deer are rated by inches and age. In some locations, deer are protected similarly. This means you might need to make a measurement before you pull the trigger. That can be tricky.

Before discussing how to field-judge whitetails, it’s important to know why limitations exist. A whitetail buck reaches maturity between three and six years of age. This is the time they’ll generally have the largest antlers. According to the Quality Deer Management Association (QDMA), one of the best ways to increase the number of bucks in the herd is to not shoot the immature ones. In many locations, young bucks make up 50 to 80 percent of the harvest. This can potentially unbalance the herd and destabilize the rut.

A high population of mature bucks makes hunting more exciting. If you shoot ‘em all while they’re small, you’ll never see lots of big ones. Now, this is not to say you’ll never see a three- or even two-year-old with nice antlers. Nutrition and genetic factors have tremendous influence on antler growth. So, while you’re hunting how are you supposed to guess—and a guess is all it is—the age of a deer? 

The Body
Even the QDMA suggests, “Estimating the age of live bucks is not an exact science.” The first trick is to ignore the antlers. Study the body first; a mature buck will generally have a prizefighter’s thick neck and blocky look. However, late in the rut bucks become run down; a buck can lose as much as 25 percent of its body weight in just a few weeks.

Yearling bucks will not have rut-swelled necks, their hindquarters are thin, and their legs spindly. Two-year-old bucks are a little harder to judge and a good analogy might be to compare them to football players. A two-year-old can look big but its body is built lean, kind of resembling that of a wide receiver. At three years old a buck looks more like a fullback, and at four he’ll take on the characteristics of a linebacker with a thick neck and big shoulders.

If it’s late in the rut and you suspect a buck may be run down, you can turn to the antlers for help. Yearling deer rarely have antlers spreading beyond the limit of their ears. Thick bases and longer beams tend to suggest an older deer, as do kicker points and drop tines. Lots of antler mass is most often found on deer three or more years old.

The Antlers
Judging antler size is a bit easier, and this can be even more important because some locations restrict the harvest of deer with antlers that are not wide enough or do not have enough points. If you’re hunting where there’s a point restriction, it’s simple math. Count the points and pull the trigger. However, don’t assume. It’s common for whitetail bucks to have brow tines, but this is not always the case. I’ve seen nice mature bucks with missing or broken brow tines.

Antler width can be trickier to estimate. The spread between the relaxed ears of a whitetail buck is about 15 inches. If the buck is alarmed, ears pointed forward, this width is about 12 inches. Ideally, you should make this comparison while the deer is looking at you. There seems to be an optical illusion when viewing a whitetail from the rear; their antlers always look wider from that angle.

Other Considerations
Older bucks, those past their prime, can become extremely run down by late season. This is even more common when food sources are sparse. Grey elongated faces, swayed backs, and possibly thick but stubby, crooked antlers distinguish these bucks. If you see one of these geezers, consider not passing him up. He’ll be more subject to disease, will struggle to get through the winter, and he’s past his breeding prime. These old brutes are the true trophies of the whitetail woods: They’re wise, rare, and represent everything that is wild.

I’m not suggesting young or new hunters should pass on a young buck, if it is legal and especially if they need the meat. However, as you grow as a hunter you can challenge your skills by shooting mature bucks. The downside is your taxidermy bill will likely increase; we all love them big antlers on the wall!

West Virginia Black Bear Hunting Seasons/ Regulations

  • Black bear archery and crossbow season is Sept. 24 – December 31, 2022.
  • Black bear gun seasons – A special September and October bear firearms season and a bear firearms season running concurrent with the deer firearms season in select counties will again be in place for 2022. There are no permit only counties for any bear firearms season in 2022. Additionally, a concurrent antlerless deer and bear season will take place on private and public land in 42 counties or parts thereof from October 20-23. Please consult the 2022-2023 Hunting and Trapping Regulations Summary for additional details.
  • A legislative rule was approved during the 2016 legislative session which requires all successful bear hunters to submit a first premolar tooth to the DNR by January 31 of the year following the harvest.

Q. As a WV resident, do I need any license to bear hunt on my own property?

No, but if you decide to hunt on your neighbor’s property (private or public), you need the appropriate hunting licenses.

This depends on the county you want to hunt in.

Q. If I want to bear hunt on Nathaniel Mountain or Short Mountain WMAsam I required to apply for a permit? 

No, the special permit season for bear dog hunters was discontinued in 2016.

Q. What is the bag and season limits on black bears?

The daily bag limit is one (1) bear per day with a season bag limit of two (2) bears, provided at least one (1) bear comes from Boone, Fayette, Kanawha, Logan, McDowell, Mingo, Nicholas, Raleigh, or Wyoming counties.

This depends on the county you want to hunt in. There are 42 counties or parts thereof that are open to buck firearm hunting will have a bear season on both public and private land where prior application for a permit is not required. All bear hunters must possess a Bear Damage Stamp (DS) to hunt bears, except hunters exempt from having to purchase one, i.e., resident landowners.

BEAR SEASONS – YOUTH/CLASS Q/CLASS XS BEAR SEASON

• A special Youth/Class Q/Class XS bear season will be open Oct. 15-16, 2022 on public and private lands in the 51 counties open to firearms deer hunting season. The use of dogs is prohibited. See page 36 of the 2022-2023 Hunting and Trapping Regulations Summary.

BEAR SEASONS – URBAN ARCHERY/CROSSBOW DEER/BEAR SEASON

• Approved homeowner’s associations, incorporated cities, towns and villages may participate in the Split urban deer/bear archery/crossbow season which runs from Sep. 3 – Dec. 31, 2022 and Jan. 9 – 31, 2023.

• The season bag limit is one (1) bear.

• A DS Stamp is required, except for underage resident and resident landowners hunting on their own land.

Releasing a Lethal Arrow

BACKGROUND Chris Parrino


Chris Parrino with a Pronghorn

For all bowhunters – an arrow and broadhead set up that can give them reliable lethal penetration, even when bone is encountered, is the most important element of their bowhunting gear – period.

Once bowhunters actually try heavier arrows with the right kinds of broadheads they never go back. When starting out, most bowhunters are advised to shoot light arrows with light broadheads so they get faster arrow speeds, higher kinetic energy numbers, and flatter trajectories. The problem is that they often also get poor penetration and start losing animals. The worst case scenario is when they get lucky for a while and harvest a few animals – even though getting poor penetration. Sometimes their luck holds our for quite a while. When that happens, they start to believe that light and fast is the way to go. Eventually though, things go wrong. Shoulder blades are hit, a leg bone, or they fail to penetrate well enough for a clean kill – even on a broadside shot. 

Eventually they start to question. What’s wrong? This is crazy – why aren’t my arrows able to give me clean kills? Normally, there is a final – “That’s it! That’s the last animal I am willing to lose to an inferior arrow and broadhead set up.” The lucky ones start researching for a better arrow and broadhead combination before they lose too many animals. 

Every ethical bowhunter that releases an arrow at a live animal, whether a turkey, whitetail deer, elk or moose, must do everything possible to ensure that arrow is lethal. Based on decades of research, an arrow/broadhead combination that weighs at least 650 grains and has Forward of Center (FOC) advantage, with great shot placement, will be lethal. Let’s begin with the arrow penetration factors developed by Dr. Ed Ashby.


UNDERSTANDING ARROW PENETRATION greg morgan-elk


Many factors contribute to arrow performance. When it comes to arrows and broadheads – choose wisely or you may have to watch your whitetail deer, or some other animal, run off with your arrow because your setup didn’t have what it takes to get good penetration. As bowhunters we work hard for every animal. No one wants to lose even one because of bad arrow/broadhead choices. 

You’re about to learn the truth about arrow performance and arrow lethality. This truth we’re talking about is backed by science, physics, and actual shots on big game. You may find it hard to believe, but how can you argue with facts? Our reports are easy to read and understand. Most bowhunters don’t care about the actual math and science behind research, we just want to know what works and what doesn’t. We want to know that when we release an arrow, no matter what happens, we’ve selected gear with the highest likelihood of producing quick, clean kills. We encourage you to read these reports in this order.


MATCHING ARROW WEIGHT TO GAME ANIMAL

The chart below shows the recommended total arrow and broadhead weights for reliable lethality on specific categories of game animals. Please note that arrow weights below 650 grains will not give reliable penetration when heavy bone is encountered. When arrows + broadheads are 650 grains and up, and follow the 12 penetration enhancing factors, they can be counted on to breach heavy bone.

arrow chart

ABF Revision June, 2022


EXAMPLE FROM A REAL BOWHUNTER

Bowhunter Spotlight: Todd Smith

My journey to understanding the truth of consistent arrow and broadhead lethality

I shoot lightweight bows between 47# – 50#. That’s not a lot of power so it’s crucial for me to hunt with the most efficient and effective arrows and broadheads I can. Since switching to 650 grain arrows with ultra-sharp single bevel broadheads I have had complete broadhead penetration on every deer I’ve shot. It hasn’t always been that way.

Bow  Hunter

Intro: The beauty of an arrow in flight made its indelible impression on me when I released my first arrow at age seven. I have been shooting stickbows ever since. My bowhunting has always consisted of traditional bows, recurves, longbows, and the occasional self-bow. Bowhunting Alaska with a longbow and wood arrows would be a dream come true for most bowhunters. I moved to the Great Land in 1979. My bow and arrows were there with me. I bowhunted as much as I could, for mostly small game like snowshoe hare and grouse at the start.

It was up off the Dalton HWY, the “Haul Road” to us, and near the Brooks Range, that I took my first big game animal, a barren ground caribou with a cedar arrow and longbow, both made for me by my mentor John Dodge. I’ve come a long way, and learned a lot since then, especially when it comes to knowing how to build arrow and broadhead combinations that stand the highest likelihood of giving me clean kills and better odds of complete pass-throughs, even if I hit bone!

If you’re interested in how you can shoot arrows and broadheads that will increase your odds of cleanly harvesting big game animals consistently – even when things don’t go as planned, please read on. I’d like to share my journey of discovery with you.

Step One: It works – until it doesn’t

Unlike the compound world, the conventional teachings for traditional bowhunters are not all about super lightweight arrows. It is normally accepted that the ideal total arrow and broadhead weight should be around 10 grains per pound of bow weight. So 45# – 50# bows, which I shoot, would be matched with 450 and 500-grain arrow and broadhead setups respectively. Those arrows, tipped with cut-on contact broadheads really work well. Until they don’t.

I harvested my share of whitetails with that combination, and then one day I hit a shoulder blade and didn’t make it through. I lost that deer. Another time, shooting a replaceable bladed broadhead – because I was sure that the “razor-sharp blades” would assure my success, but… I shot a buck high – yes he ducked at the shot – and the arrow hit high, in the spine. The tip of that broadhead was cone-shaped – it was NOT a cut-on-contact broadhead and as such, it didn’t make it through the bone. I lost that deer too.

Shot placement. That’s the answer you’re going to get from other bowhunters. It’s all about shot placement – you blew it. Granted, my arrows didn’t hit the deer in the intended spot, so yes, it was my fault. Still, is that it? Is there nothing you can do but chalk another one up to missing my intended spot? There has to be more that I can do to make sure these things don’t happen again. There has to be!


Step Two: Searching for answers tuffhead arrow


That’s it! I couldn’t believe my eyes, but there it was. Apparently there was a better arrow and broadhead combination that would actually work from any bow, on any North American animal – and this guy figured it out! I had gone online to see if there were any better set-ups for whitetails and through one of the forums I found the Ashby Reports. Wow! I greedily consumed and digested the wonderful writings of Dr. Ed Ashby and found that this guy basically proved – on actual big game animals – what types of arrow and broadheads builds were able to penetrate big game animals consistently – even if you hit bone! Even if you were shooting a 40# bow!

It seemed so easy: Just switch to a sharp single bevel broadhead, make sure that my total combined arrow and broadhead weight was at least 650 grains, and put as much of the weight in the broadhead to increase the FOC (Forward of Center) percentage to at least 20%.

Step Three: Decide and commit

I could understand how 650 grains might be tough for a compound shooter to consider, but for me, a stickbow shooter it was very easy. What was I going to lose, a little trajectory? OK. I can live with that. What was I going to gain, the ability to split bone and cleanly harvest my animals even if things went wrong? No brainer! I decided that from that moment – I was going to commit to the heavier arrow with high FOC tipped with super sharp cut-on-contact single bevel broadheads, and never look back.

You see for me, it’s not just about me taking more game home, it’s about harvesting every animal I decide to shoot. I don’t take a shot that I am not comfortable with. I care about the animals I hunt and I want a quick clean death for them. I pick my shots carefully and have adopted a philosophy of getting close and taking only high percentage shots.

“Don’t tell me how far you shot. Tell me how close you got!”

Step Four: Making a smooth transition

Making the change to a 650 – 750 grain arrow and broadhead setup was easy for me. I tested a couple of different spines of arrows, did some bare shaft tuning, and ended up right at 650 grains my first season. My bow weight was 49#. The tuning process was simple. I ended up shooting tapered carbon arrows with screw-in 200 grain single bevel broadheads. My total arrow/broadhead weight was 650 grains and my FOC was 26%.

Traditional bowhunters are lucky because their brain/subconscious quickly adjust to the new arrow configuration. Even though I lost some trajectory, in one afternoon of stump shooting I was spot on. After that, there were many wonderful afternoons spent scouting and stump shooting to keep my eye sharp and my sight picture embedded.

I was shooting better than ever, and my confidence in my equipment was off the charts! I was excited to get out there and see for myself just how effective this set-up really was.

Step Five: The proof is in the results!

ToddSmith02.jpg

That was several seasons ago. Since then I have taken every deer that I shot. The longbows have ranged from 46# – 49#. My arrow/broadhead setups have varied from 650 – 765 grains. Every soft tissue hit has been a complete pass-through. Every bone hit has resulted in split bones and lethal penetration including one on the largest buck I have ever taken with archery equipment. The buck was quartering away and spun at the shot. The arrow entered his right ham, splitting through the pelvic arch! I found him about 50-yards from where I took the shot.

This is a perfect example of things going wrong – but because I was using the right equipment, there was still enough lethal penetration to kill this buck cleanly. I am certain that I would have lost this buck with my old arrow/broadhead setups.

I am forever grateful to Dr. Ed Ashby for opening my eyes to improved arrow lethality and for sharing the science behind the effectiveness of these heavier arrows and the bone-splitting abilities of tough, sharp, single bevel broadheads. I can’t stress enough how strongly I feel that ALL bowhunters should be shooting arrow and broadhead setups like this. A minimum of 650-grains, as much FOC as possible with 20% as the minimum, and razor-sharp, super-strong, single bevel broadheads.

It’s better for you, it’s better for all the guides and professional hunters you hunt with, and it’s better for the animals you’re hunting.

Shot Placement on Deer

Knowing where to shoot a deer is the first step to becoming a better and more ethical hunter. image

Whether you’re hunting in a ground blind or taking elevated shots from a tree stand, this guide will teach you where to properly aim at a deer for a one-shot kill.

Deer Vitals: What to Aim For

Deer are the most popular game animal to hunt, and knowing the location of deer vitals will help you swiftly take down a doe in the most ethical manner. These shot placements are critical for both bowhunters and rifle marksmen. The biggest difference between the two is simply knowing your skillset and ensuring that you can effectively cover the distance and bring enough power to inflict as little pain as possible on your target.

Here is a list of the most common deer vitals to aim for while hunting:

  • Lungs
  • Heart
  • Liver
  • Brain 
  • Neck

The lungs, heart, and liver are the best deer vitals to aim for while hunting because they are the easiest to hit from a variety of positions and will result in a quick takedown. Also, there are many major blood vessels and arteries in this area, so if you somehow miss the vitals, you will eventually take down the deer and be able to easily track it. 

While video game aficionados know headshots are everything, that does not translate well to real-life hunting scenarios. The brain and neck are small targets, and even the best hunters can experience difficulty trying to hit these minute areas. Plus, these vitals are only exposed from certain positions, whereas the lungs and heart can be easily penetrated while the deer is turned at different angles.

Where to Shoot a Deer at Eye-Level

Knowing what whitetail vitals to target is one thing, but you also need to consider your positioning and the deer’s in order to take the best shot possible. If you’re hunting on foot or in a ground blind, you’ll be eye-level with the deer and need to take your shot accordingly. 

Eye-Level Broadside Shot Placement

Decoy Broadside

Broadside means that the deer is perpendicular to you, providing the largest target with exposed vitals. Bowhunters should definitely not take this shot for granted, as it provides the easiest and cleanest route to an effective takedown. 

Eye-Level Quartering Away Shot Placement

When a deer is quartering away, that means it is facing away from you at an angle that still leaves several vitals exposed. This is a bowhunter’s bread and butter because the deer will not see you draw your bow, and the quartering away shot is especially lethal with a rifle. Aim for the opposite shoulder, and your ballistic of choice should penetrate the essential vitals and lead to a swift takedown.

Eye-Level Quartering Toward Shot Placement

deer looking at you

Quartering toward is like the quartering away position, only this time, the deer is angled facing towards you rather than away. It is best to aim at the front of the shoulder near the leading leg to ensure the vitals are struck in this position. This is a tough shot to take with a rifle, and bowhunters should definitely avoid taking this shot, if possible. Drawing a bow while any game animal faces you may cause them to react and result in a poor shot placement, which may harm the animal instead of providing you with fresh venison. 

Eye-Level Head-On Shot Placement

When a deer is directly facing you, you should aim for the area where its neck and shoulders meet for the best possible shot. Again, bowhunters should not attempt any shot with the deer facing them unless they are expertly trained, and sure they can get the job done right. 

Eye-Level Straight Away Shot Placement

Straight away is the opposite of the head-on position, where the deer’s behind is facing you. This may as well be a deer’s way of showing you where to stick your hunting equipment because this is one of the worst possible shots to take on any big game animal. The bullet has to travel through the deer’s bowels before it gets to the vitals, which can be quite messy and will ruin a good portion of the meat. Always wait for a better shot, and your patience will pay off.

Where to Shoot a Deer from a Tree Stand

ladder deer stand

Shooting from an elevated position changes things a bit. After all, deer are 3D objects and not paper targets, and the entry points to their vitals shift when you’re perched up in a tree. While tree stands make hunters harder to see and smell, it is important to understand how your elevated advantage impacts the ideal shot placement on bucks. Remember, shooting a bow or rifle from a tree stand or elevated blind will impact both the entry and exit points of your projectile, which means you need to properly adjust your aim in order to take out the vitals in one clean hit.

Elevated Broadside Shot Placement

On a spot-and-stalk hunt, the broadside shot is clean and simple. However, a tree stand adds a bit more difficulty to the shot because you need to consider the exit point. The best exit point for a projectile will be on the opposite side of the deer, right behind its shoulder. Visualize where you want the arrow or bullet to exit the deer, and viva la venison, which is my way of saying congrats on your takedown. 

Elevated Quartering Away Shot Placement

This is the shot that will bring a tear to a bowhunter’s eye and instill great confidence in a rifle marksman. The deer will be less aware of your movements and expose its vitals like a huge welcoming target. Aim for the opposite shoulder, and have your field dressing knife at the ready because dinner is about to be served. 

Elevated Quartering Toward Shot Placement

Out of the three elevated shot placements, this is the most difficult for bowhunters and rifle hunters to accomplish. If you must take the shot, you’ll ideally want to aim slightly above the elbow of the leading leg. This shot should only be taken if you’re confident you can nail those vitals because it poses a high risk of wounding or scaring off your prey.

One Shot by Land, One Shot by Tree

Deer feeding Target

Following these guidelines, you should now know how to shoot a deer with a bow and rifle from both the ground and from a tree stand. Remember that visualizing your exit point is one of the best ways to improve your aim on the hunting grounds and ensure those vitals are hit. If you want to practice your shot placement before your next hunt, scoop up some 3D targets for a more realistic hunting experience. With the knowledge in place, it’s time to stock up on broadheads and ammo and hit your next hunt with confidence.